That moment. You spot a dark, suspicious-looking patch on the wall… and your stomach drops. It's so easy to jump to the worst conclusion. But before you start panicking, let's play detective for a minute. What you're seeing might not be the villain you think it is. It could just be everyday grime, soot, or even mildew—mould's less-scary cousin, which is way easier to deal with.
So, Do You Really Have a Mould Problem?
First things first, let's figure out what you're actually looking at. Knowing how to get rid of mould properly starts with making sure it is mould.
So, how can you tell the difference?
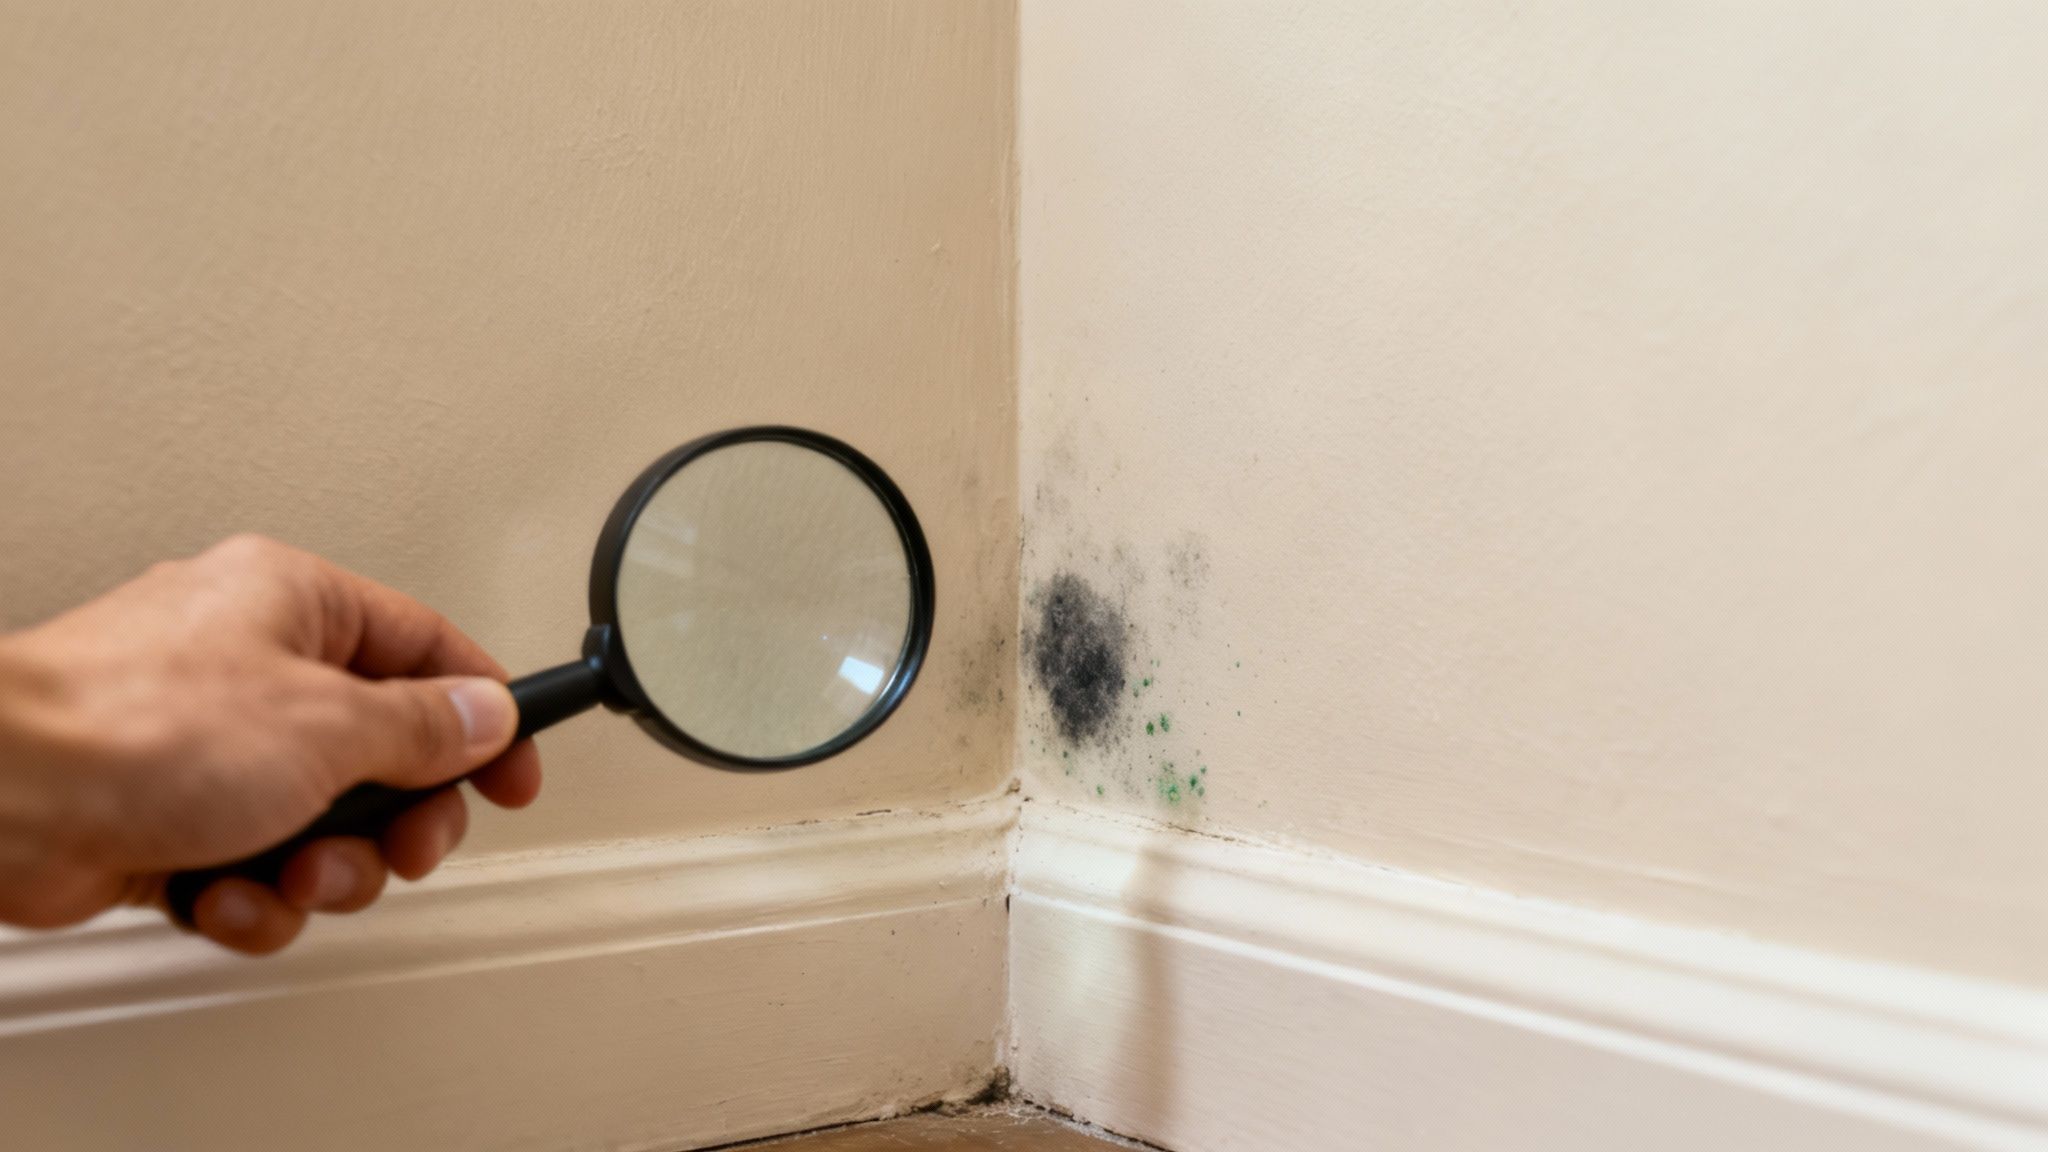
Mould is a bit of a show-off. It often has a textured look. Think fuzzy, velvety, or even a bit slimy to the touch. Mildew, on the other hand, usually just looks flat and powdery, typically in shades of grey or white. And simple grime? Well, that just looks like dirt. No real structure or life to it.
What to Look—and Sniff—For
Your eyes and nose are your best tools here. Mould comes in a whole rainbow of unfortunate colours. You'll often see black or green splotches, but it can also be white, orange, or even pink… depending on the species and what it's decided to have for lunch.
And then there's the smell. A musty, earthy smell is a classic giveaway. If a room smells damp and stale even after you've aired it out, there’s a good chance mould is hiding somewhere nearby.
Think about the usual hiding spots in Aussie homes; they’re almost always linked to moisture.
- Bathrooms and Laundries: These steamy rooms are prime real estate for mould. Especially on ceilings, in tile grout, and around leaky taps.
- Behind Furniture: Poor air circulation behind a big wardrobe or bookshelf can trap moisture against a wall. It creates the perfect little nursery for mould.
- Window Sills: Condensation is a huge culprit here, providing a constant water source for mould to set up camp.
This isn't just a guess, either. A recent national report found that over 30% of Australian homes surveyed had detectable levels of mould. The problem is especially bad in our coastal areas. A huge 42% of homes in places like Byron Bay and Wollongong showed visible mould growth. You can explore the full Australian indoor air quality findings to get the bigger picture.
Your Mould Cleaning Toolkit and Safety Essentials
Alright, before you even think about touching that mouldy patch, we need to have a serious chat. About safety.
It might seem like a bit of a fuss. I get it. But the moment you disturb mould, it can release a cloud of spores into the air. You really don’t want those floating around your home or getting into your lungs. Think of it this way… you wouldn't wade into a murky pond without knowing what’s in there. Same deal here. We're going in prepared.
Gearing Up for the Fight
This isn't the time for a simple pair of marigolds and hoping for the best. Protecting yourself is a must. It’s easier than you might think. Here’s your personal protective equipment (PPE) checklist:
- A P2 Respirator Mask: This is your most important piece of gear. A standard dust mask or a bit of cloth just won't cut it. You need a properly rated P2 mask that forms a good seal around your face to filter out those tiny airborne spores. You can grab these from most hardware stores.
- Safety Goggles: You'll want something that wraps around to protect your eyes from splashes and airborne bits and pieces. Your everyday glasses won't do the trick.
- Long-Sleeved Clothing and Gloves: Cover your skin to avoid direct contact with mould. Disposable gloves are great because you can just toss them out afterwards. No cross-contamination.
Getting this part right is the difference between solving a problem and creating a bigger one. The goal is to contain the mould, not spread it through your house.
Choosing Your Cleaning Weapon
Now for the toolkit. When you're figuring out how to get rid of mould, the solution you choose really matters. Not all cleaners are created equal. And what works on bathroom tiles might be totally useless (or even harmful) on plasterboard.
For porous surfaces like wood or gyprock, bleach is often a terrible choice. It might kill the surface mould, but its water component can soak into the material and actually feed the roots. Before you know it, the mould just grows back. Stronger.
A much better option is a simple solution of 80% white vinegar and 20% water. Vinegar is acidic enough to get into porous surfaces and kill the mould right at its source. It’s a fantastic, low-cost option for most situations.
If you're looking for more ideas, we have a great guide on using a natural mould killer that dives deeper into these kinds of solutions.
Of course, you can also find specialised mould-killing products at your local hardware store. These are often formulated with fungicides designed for specific surfaces and can be really effective. Especially for stubborn patches in tricky spots like grout. Just be sure to read the label and follow the safety instructions carefully.
DIY Mould Cleaning Solutions: What to Use and Where
To make things easier, here’s a quick guide to common household items you can use to tackle mould, highlighting how well they work and where they work best.
| Solution | Effectiveness | Best For | Things to Note |
|---|---|---|---|
| 80% White Vinegar & 20% Water | High | Porous surfaces (wood, gyprock, plasterboard) and non-porous surfaces (tiles, glass). | Kills mould at the root. The smell goes away after a few hours. A go-to for most situations. |
| Tea Tree Oil Solution | Moderate-High | General cleaning, fabric, porous and non-porous surfaces. Great for prevention. | A natural fungicide. Mix a few teaspoons in a spray bottle of water. Strong scent. |
| Hydrogen Peroxide (3%) | Moderate | Kitchen and bathroom surfaces, grout, appliances. Good for killing bacteria too. | A bleach alternative. Can lighten some surfaces, so test a small spot first. |
| Bleach | Low (on porous surfaces) | Hard, non-porous surfaces like tiles, glass, and countertops. | Kills surface mould but doesn't get into porous materials. Can damage surfaces and produces harsh fumes. |
Choosing the right tool for the job makes all the difference. While these DIY options are great for small, manageable spots, always remember that widespread or recurring mould is a sign of a bigger problem that needs a professional eye.
A Practical Guide to Removing Small Mould Patches
Okay. You're geared up with your protective equipment. You've got your cleaning solution of choice. And you’re ready to tackle that mouldy patch. This is where we get our hands dirty… safely, of course.
We're focusing on smaller, manageable spots here. Think of an area less than one square metre. If you're looking at something bigger than that, it's a completely different ball game. It’s probably time to think about calling in the professionals.
But for these smaller jobs? You've got this.
Setting The Stage For a Clean Fight
First, you don't want to turn a small problem into a big one. The moment you start scrubbing, mould spores can become airborne and travel to other parts of your house. It's like trying to sweep up glitter. It just ends up everywhere.
So, let's contain the area before we begin.
If you can, open a window to get some fresh air moving through the room. But make sure to close any doors that lead elsewhere. You can even roll up an old towel and place it along the bottom of the door to seal the gap. This simple trick helps trap any stray spores inside the room you're working in.
The simple process of Wear, Clean, and Dry is your mantra for a safe and effective mould removal job.
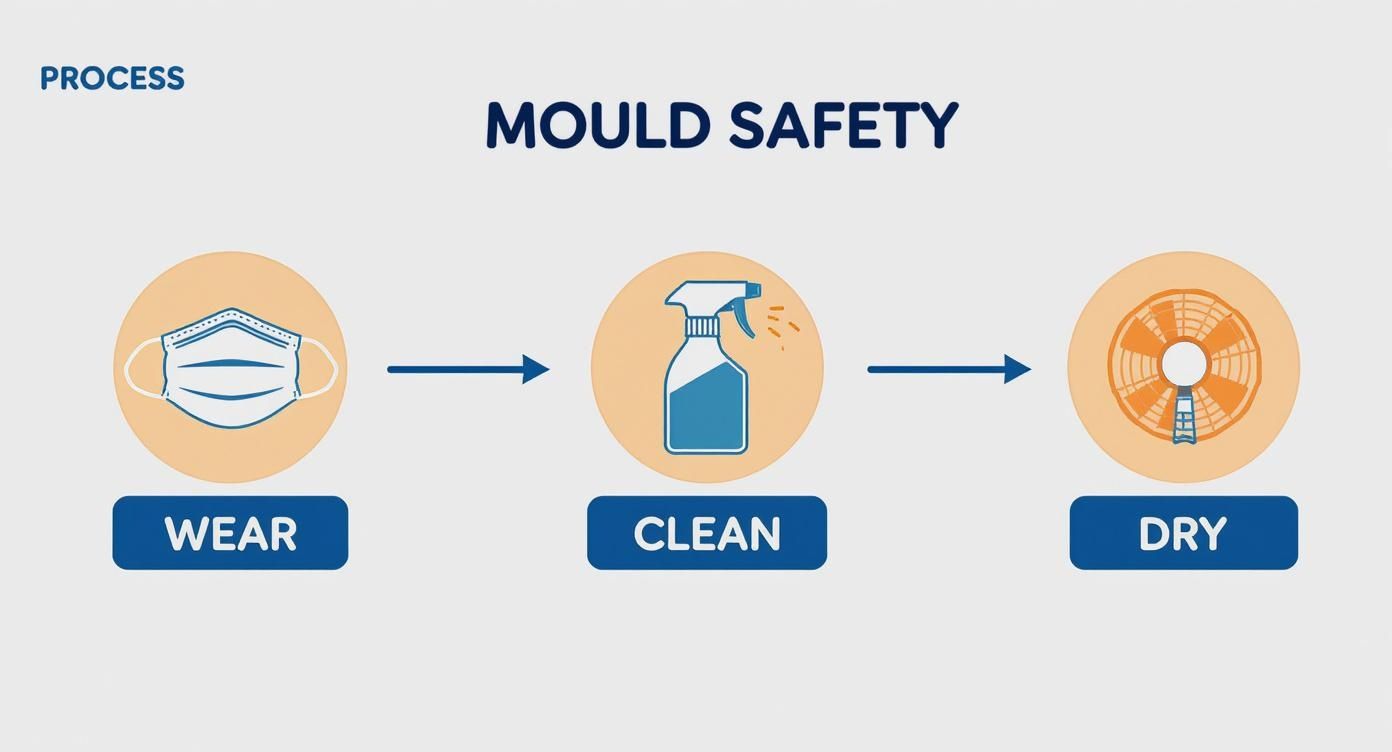
This visual guide is a great reminder that getting rid of mould isn't just about the cleaning product. It's about a safe, methodical approach from start to finish.
The Cleaning Technique That Actually Works
Now for the main event. The actual cleaning. This isn’t about aggressive scrubbing. In fact, scrubbing too hard can damage the surface—especially something like plasterboard—and release even more spores into the air. We need a gentle but firm approach.
Start by applying your chosen cleaning solution. If you're using a spray bottle, lightly mist the mouldy area. Don't drench it. The goal is just to dampen the mould to stop spores from taking flight.
Let the solution sit for a few minutes. This gives it time to work its magic and start breaking down the mould.
Next, using a microfibre cloth or a soft-bristled brush, wipe the mould away. Always wipe in one direction. Don't go back and forth in a classic scrubbing motion, as that can just smear the mould around and push it deeper into the surface.
Think of it like you're wiping a spill off a delicate piece of furniture. You want to lift the mess away, not grind it in. Once your cloth is dirty, grab a fresh one to finish the job.
For those really stubborn spots, especially in tricky areas like bathroom grout, you might need a bit more patience. We actually have a whole guide dedicated to the unique challenges of removing mould from the bathroom that you might find helpful.
The All-Important Final Steps
You've cleaned the spot and it looks great. Job done, right? Not quite. This last part is arguably the most crucial step in the whole process of learning how to get rid of mould for good.
First, you need to dry the area. Completely. Mould loves moisture, so leaving any dampness behind is like rolling out the welcome mat for its return. Use a clean, dry cloth to soak up any excess liquid. Then, aim a fan at the area or use a dehumidifier to ensure it's bone-dry.
Finally, deal with your cleaning gear. Any cloths or disposable brushes should be sealed in a plastic bag and thrown out straight away. If you used non-disposable items, wash them thoroughly in hot, soapy water. And don't forget to have a shower and wash your clothes to get rid of any stray spores you might have picked up.
It feels like a lot of steps, I know. But doing it this way means you're not just cleaning up the visible mess. You're tackling the problem properly so it doesn't come straight back.
Finding the Root Cause of Your Mould Problem
Here’s the thing about mould. Cleaning it is only half the battle. If you don't figure out why it showed up in the first place, you're just signing up for an endless cycle of scrubbing. It’s exhausting.
So, let’s put on our detective hats again. This whole section is about finding the source of the moisture—the one thing mould absolutely needs to thrive. Think of mould as an unwanted weed in your garden. You can pull the top off, but if you don't get the root, it’s just coming right back.
Chasing Down the Usual Suspects
Mould isn't very creative. It almost always comes back to the same few culprits, which are all related to excess water or dampness. The trick is to know where to look.
Most of the time, the source is pretty obvious once you start paying attention. It could be something as simple as poor ventilation in the bathroom after a long, hot shower. Or it might be the condensation that builds up on your window frames during a cold winter morning.
These are some of the most common moisture sources to investigate:
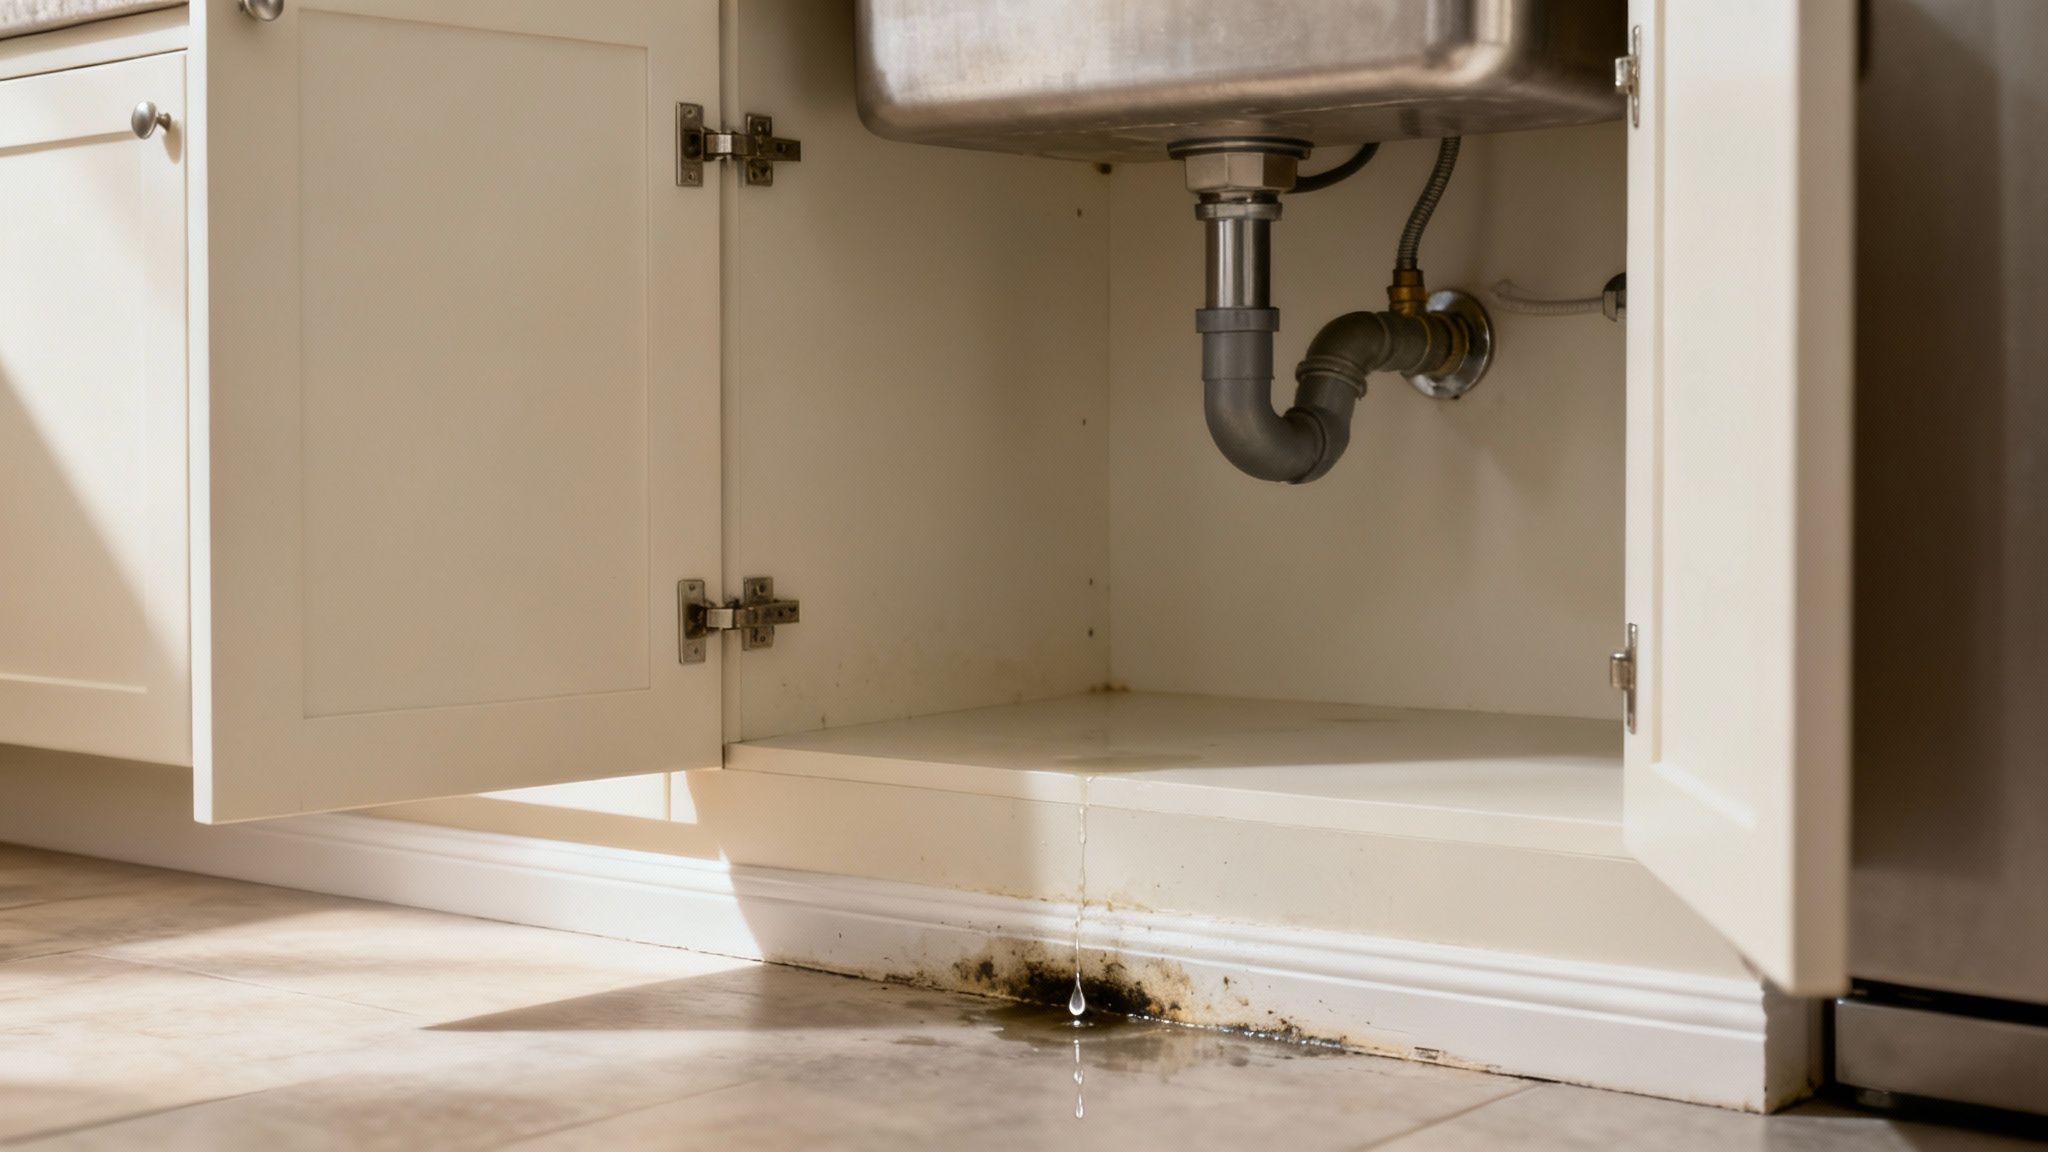
- Small, sneaky leaks. Check under your kitchen and bathroom sinks, around the base of the toilet, and near appliances like your washing machine or dishwasher. A slow drip you never even noticed can create the perfect damp spot behind a cabinet.
- Poor ventilation. Steamy rooms are a mould magnet. If your bathroom or laundry doesn't have an exhaust fan (or you forget to use it), that humid air has nowhere to go.
- High indoor humidity. This is a big one, especially in certain parts of Australia. Everyday things like cooking, drying clothes indoors, and even breathing add moisture to the air.
- Rising damp. This is less common, but in older homes, moisture can sometimes be drawn up from the ground into the walls, creating a persistent problem at the base of your walls.
Simple Fixes for a Drier Home
Finding the source is the first step. The next is to cut off its water supply. The good news is that many of the solutions are simple and don't require a massive renovation. It’s all about improving airflow and reducing that humidity in the air.
For instance, simply opening your windows for 15-20 minutes each day can make a massive difference. It allows damp, stale air to escape and fresh, dry air to circulate. It’s the easiest trick in the book.
Getting this right is the secret to saying goodbye to mould for good, not just for a few weeks. It’s about changing the environment so that mould can’t even get a foothold in the first place.
This isn’t just good advice; it's backed by solid research. The 2025 national report on Australian indoor air quality highlights that simple strategies like improving ventilation and controlling moisture can cut mould spore concentrations by up to 70%. More importantly, homes that made these changes saw a 50% reduction in occupant-reported respiratory symptoms. You can read more about these important findings on indoor air quality in Australia.
Solving the moisture problem is the only way you'll win the war on how to get rid of mould permanently.
When to Call in a Professional Mould Remover
https://www.youtube.com/embed/PvoujvUxfsU
Sometimes, you have to know when to call for backup. And honestly? There’s no shame in it. Knowing when a mould problem has moved beyond a simple DIY fix is a smart move. Not a sign of defeat. It’s about protecting your home and your health.
So, when is it time to pick up the phone?
There are a few clear red flags. If the mouldy area is larger than a square metre—about the size of a large beach towel—it's officially a big job. At that point, you're not just dealing with a surface issue; you're dealing with a huge contamination that can release a massive amount of spores into your air when you disturb it.
Another big one is that persistent, musty smell. If you can smell mould but you can't see it anywhere… that’s a classic sign it's hiding somewhere sinister. Think inside your walls. Under the floorboards. In the ceiling cavity. That’s a situation where you need specialised equipment to find and fix the source, not just guess.
When Health Is the Top Priority
The decision becomes even clearer when health is part of the picture. If anyone in your house has asthma, serious allergies, or a weakened immune system, trying to tackle a mould problem yourself can be a real risk.
Exposing a vulnerable person to a sudden burst of mould spores can trigger serious health issues. It’s just not worth it. Professionals use containment strategies and air filtration systems to make sure the problem stays put and doesn't spread through your home's air.
Calling in an expert isn't just about cleaning the visible spots. It's an investment in your home's long-term health and your family's wellbeing. It gives you peace of mind that the job is done right.
What Professionals Actually Do
A professional mould remediation service does a lot more than just spray and wipe. They're trained to find the hidden moisture source that’s causing the mould in the first place. That’s the key to stopping it from returning. They use specialised gear like moisture meters and thermal imaging cameras to pinpoint the problem.
And the results speak for themselves. One study found that 68% of Australian residents reported significant health improvements after professional mould remediation. It also showed that their homes were 60% less likely to have the mould return within a year compared to DIY methods. You can learn more about the benefits of professional mould remediation and see the data for yourself.
If you're facing a tricky situation, especially in areas with high humidity, getting expert advice can make all the difference. For those in specific regions, looking into a local service that understands the climate, like a team that handles mould removal on the Central Coast, ensures you get tailored expertise. They have the right tools and knowledge to handle the job safely and effectively. Which is what matters most.
Your Top Mould Questions Answered
When you’re staring at a suspicious patch on the wall, it’s completely normal to have a million questions buzzing around your head. It’s one of those things nobody really teaches you about… until you’re dealing with it yourself. Let’s clear the air and tackle some of the most common questions I hear all the time.
Can I Just Paint Over Mould?
Oh, if only it were that simple! But sadly, no. Thinking you can just paint over mould is a bit like putting a sticker over the warning light on your car's dashboard. It hides the problem for a little while, but it doesn't fix a thing.
The mould is still alive and well underneath that fresh coat of paint. In fact, it will eventually eat its way right through the new layer, often looking even worse than before. You absolutely have to kill and remove the mould properly first, make sure the area is completely dry, and then use a quality mould-resistant primer before you even think about painting.
Is Bleach a Good Way to Kill Mould?
This is a super common one, and the answer isn’t as straightforward as you’d think. While bleach can kill surface mould on non-porous surfaces like tiles or glass, it's not very effective on porous materials like wood or plasterboard. Think of mould like a weed… it has roots that grow deep into these materials.
The chlorine in bleach often can't reach those roots. What happens instead is the water in the bleach soaks into the wall, feeding the mould, while the chlorine just bleaches the colour from the surface. So, it looks like it’s gone, but it often comes back with a vengeance.
For most household situations, a simple white vinegar solution is a safer and more effective option. Its acidic nature allows it to get into porous surfaces and kill the mould at its source.
How Do I Know If Mould Is Making Me Sick?
This is a really important one, because the impact of mould goes far beyond just being ugly. Common symptoms of mould exposure often feel like a persistent case of hay fever or a cold that just won't go away.
Things you might notice include:
- A constantly stuffy or runny nose
- Persistent sneezing and coughing
- Itchy, watery eyes or skin irritation
For people with asthma, it can be a significant trigger for attacks. If you notice these symptoms are always worse when you're at home and seem to get better when you go out, it could be a sign that something in your home, like mould, is the culprit.
The health impact is significant. Studies show that tackling mould in Australian homes could prevent up to 15% of asthma cases in children and lead to thousands of healthier years for the population. You can learn more about how our homes affect our health from recent research. If you're genuinely concerned, it's always best to have a chat with your doctor.
When you’re facing a mould problem that feels overwhelming or you want the certainty of a professional solution, That Cleaning Crew is here to help. Our experienced mould remediation team can safely and effectively remove mould from your property and help you identify the source to prevent it from coming back. Request your free on-site quote today and breathe easier knowing your home is in expert hands.