You can absolutely remove mould from your carpet yourself. A simple mix of white vinegar and water often does the trick. But I'll be honest with you… that’s just the clean-up.
The real fix? The one that stops it from sneaking back? That's all about figuring out why it showed up in the first place.
When you get to the root of the moisture problem and catch it early, everything else becomes so much simpler. And way more effective.
What Causes Mould on Your Carpet
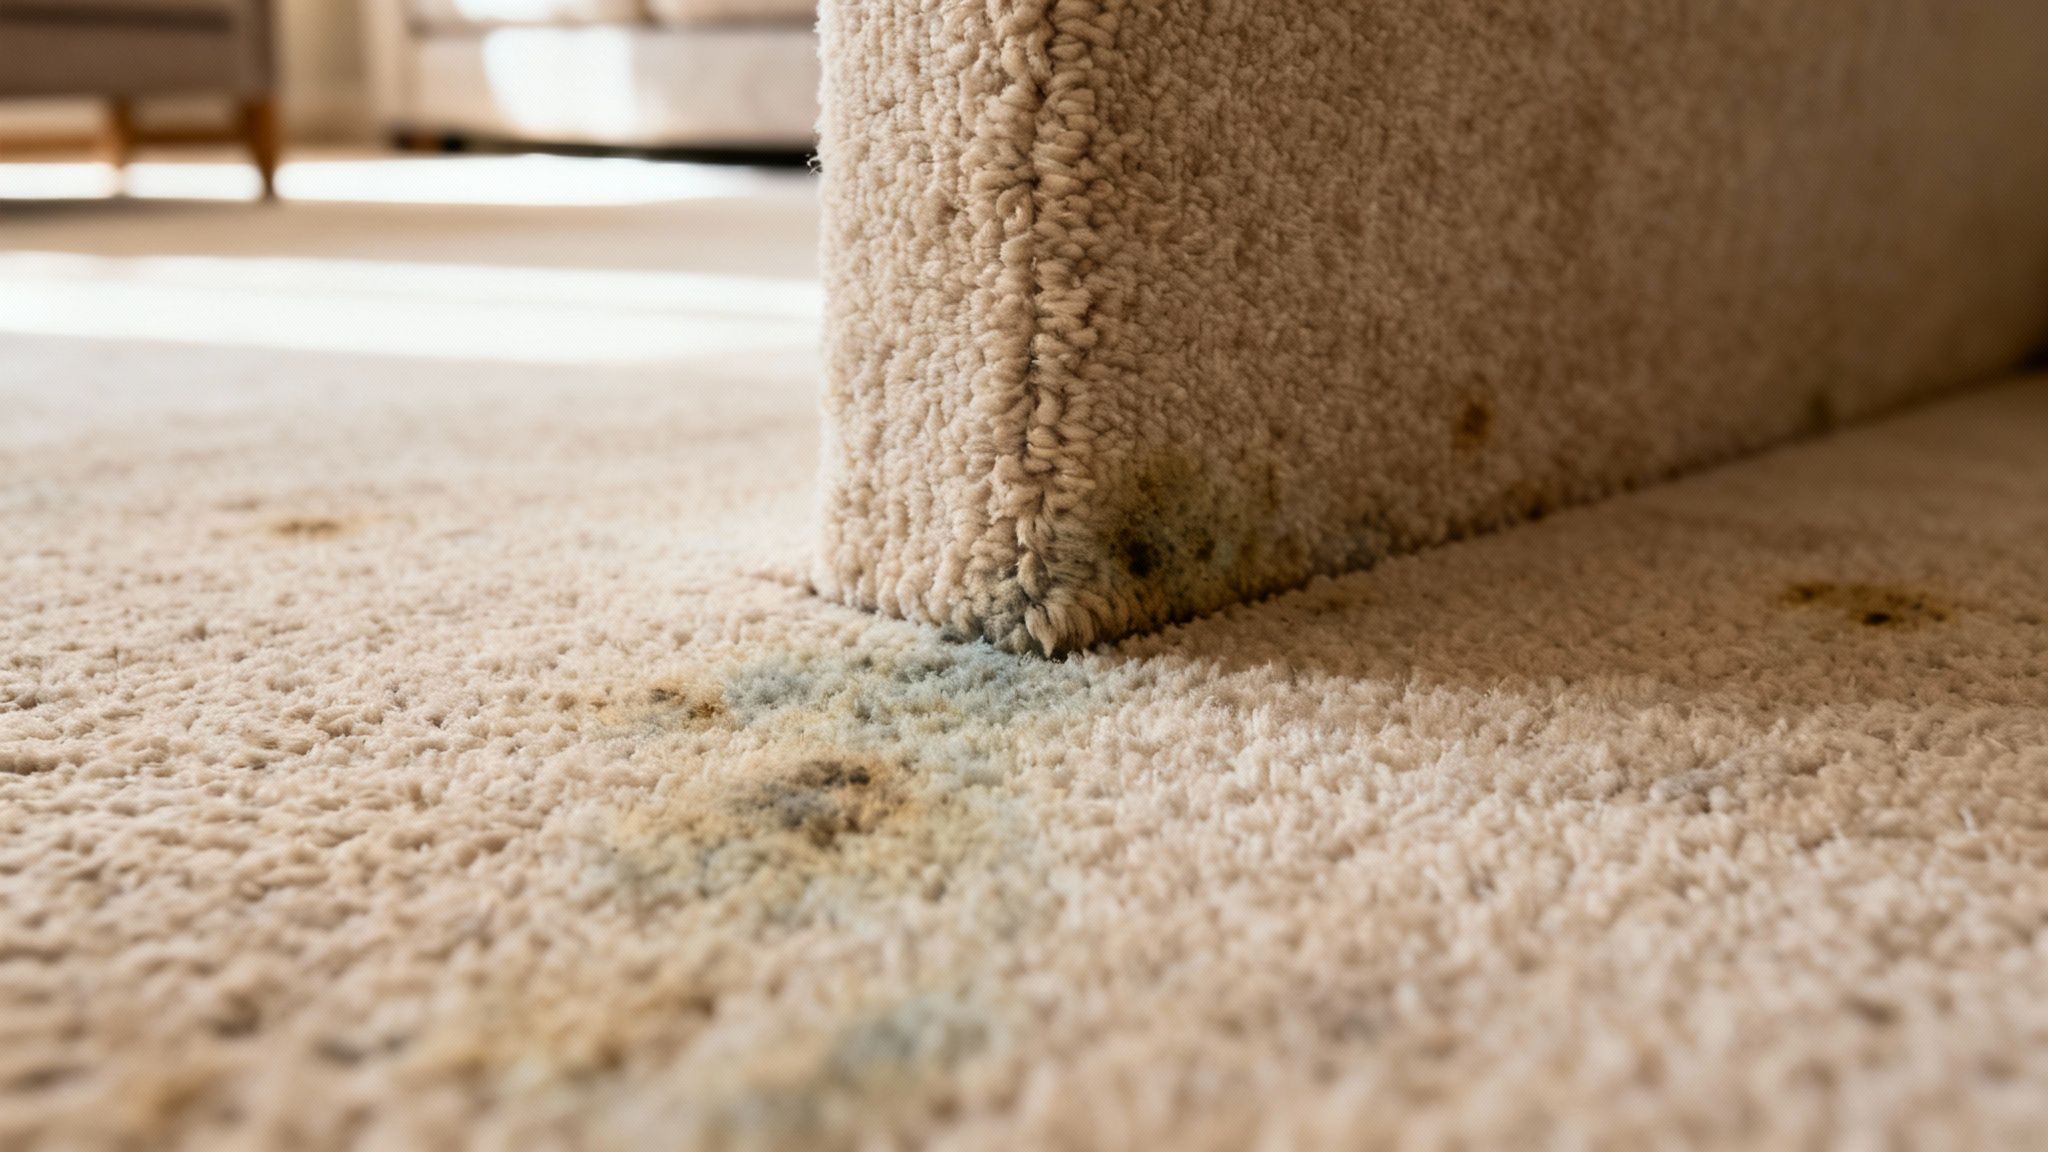
Ever notice a faint, musty smell you just can't quite place? It’s not in your head. That smell is often the very first sign that mould has started to grow deep down in your carpet fibres. It's a massive headache here in Australia, especially with our humid climates.
Mould isn’t just a simple stain you can wipe away. It’s a living thing. It takes root in the carpet, sinks into the underlay, and can even start munching on the subfloor underneath.
Think of it like a stubborn weed in the garden. If you just pull off the top leaves, the roots are still there, just waiting for a bit of rain to sprout all over again. That’s exactly why we need to understand the 'why' before we even think about the 'how'.
Common Culprits Behind Carpet Mould
So, what rolls out the welcome mat for mould? It all boils down to one single ingredient. Moisture.
Mould spores are literally everywhere, all the time, just floating harmlessly in the air. They only become a problem when they find a damp, inviting spot to land and start multiplying. When it comes to your carpet, this usually happens for a few key reasons:
- Hidden Leaks: That slow drip from a pipe under the floorboards or a tiny leak around a window frame is a perfect, out-of-sight breeding ground.
- High Humidity: In many parts of Australia, the air is thick with moisture. Without decent airflow from windows or fans, that humidity just condenses and settles right into your carpet.
- Spills and Accidents: If a spill isn't dried out completely… and I mean bone dry… the lingering dampness is all mould needs to get a foothold.
This is a huge issue right across the country. In fact, it’s estimated that up to 50% of Australian homes are affected by the kind of indoor dampness that leads directly to mould. What's interesting is a 2016 study found that while over half the homes surveyed had structural issues like wall cracks, only a small percentage reported seeing actual mould. This tells us the problem is often hiding where you can't see it. You can dig into these housing studies yourself over on the National Library of Medicine website.
The real secret to beating mould for good isn't just about cleaning the stain you can see. It's about becoming a detective in your own home… tracing the problem back to its source and cutting off its water supply.
How to Spot the Signs Early
Catching mould early makes a world of difference. Your own senses are your best detectors here. Just keep an eye, and a nose, out for these classic tell-tale signs.
- That Smell: A persistent, musty or earthy odour is the number one giveaway. You might notice it's stronger in certain corners or after a few rainy days.
- Subtle Discolouration: Look for patches of green, black, or even white fuzz starting to appear. Sometimes, it just looks like a stubborn patch of dirt that won't lift, no matter how much you scrub.
- Sudden Allergies: If someone in your family suddenly starts sneezing, coughing, or getting itchy eyes at home for no apparent reason, it could be their body reacting to airborne mould spores.
Finding the cause is your first big win. Once you know what’s feeding the mould, you’re in a much stronger position to get rid of it for good and make sure it never comes back.
Getting Ready for a Safe Mould Removal
Alright, before you even think about scrubbing that mould, we need to talk about safety. This isn't your average weekend cleaning job. When you start poking and prodding at mould, it gets defensive and releases clouds of tiny spores into the air. And trust me, you don't want to be breathing those in.
Think of this as your pre-flight checklist. It might seem like the boring bit, but getting this right ensures you can tackle the job properly without putting your health, or your family's, on the line.
Your Must-Have Safety Kit
Gearing up is non-negotiable. You're basically creating a personal barrier between you and the mould spores. It might feel like you're going overboard, but it's absolutely crucial for protecting yourself.
Here's the gear you'll need to grab:
- A P2 Respirator Mask: I'm not talking about one of those flimsy paper masks. You need a proper, well-fitting P2 mask that seals around your face to filter out those microscopic nasties.
- Safety Goggles: Get the kind that wrap around and seal against your skin. Spores can cause some nasty eye irritation, and you want to keep them out.
- Durable Gloves: Go for thick rubber or nitrile gloves that won't tear easily. You'll be dealing with cleaning solutions and potentially soggy, mouldy materials.
Ventilate and Contain the Area
Now, let's prep the room itself. You have two main goals here: get fresh air flowing in and, more importantly, stop the mould spores from taking a tour of your entire house. It’s a bit like performing minor surgery. You need to keep the operating theatre clean and contained.
First, open any windows in the room. Stick a fan in one, pointing outwards. The idea is to create a one-way exit for any airborne spores, pushing them straight outside where they can disperse harmlessly.
Next, if you can, seal the doorway to the affected room with plastic sheeting and tape. This simple step is surprisingly effective at preventing spores from drifting into other parts of your home while you work.
This isn't just my advice; it's a standard safety protocol. For instance, WorkSafe Queensland stresses the importance of sealing off the area for even small jobs (under 1 square metre) to stop cross-contamination. They also highlight the need for personal protective equipment like P2 masks and goggles. It's a practical, health-first approach to managing the risk.
Getting this prep work right is genuinely half the battle. A little bit of time spent on safety now saves a massive headache and potential health issues later. Don't rush it.
By taking these steps, you're not just cleaning up the visible problem. You're actively protecting the air you and your family breathe during the process.
Practical Methods for Cleaning Carpet Mould
Alright, let's get into the actual cleaning. Now that you're prepped and safe, it's time to tackle the mould head-on. The good news is you don’t always need to reach for the harshest chemicals on the shelf. In fact, some of the best solutions are probably sitting in your pantry right now.
We'll start with the gentle stuff and work our way up if needed. The key thing to remember here is that technique is everything. This isn't about getting on your hands and knees and scrubbing like mad. That can actually damage your carpet fibres and push the mould spores deeper. Think of it more like a careful treatment… a process of blotting, treating, and drying.
Starting with a Natural Approach
White vinegar is a brilliant starting point. It's a mild acid that actually kills mould spores, not just bleaches the stain like some other cleaners do. Plus, it's cheap and you probably already have some.
Here’s a simple, effective mix you can use:
- Combine one part white vinegar with one part warm water in a spray bottle. A 50/50 ratio is plenty strong enough for the job, so don't feel like you need to go overboard with the vinegar.
- Lightly mist the solution onto the mouldy patch. The goal here is just to dampen the area, not to completely soak the carpet and its underlay.
- Let it sit for about an hour. This gives the vinegar time to penetrate the fibres and do its work breaking down the mould.
After it's had time to work its magic, gently blot the area with a clean, dry cloth to soak up the excess moisture. If you're interested in other household solutions, you can find more information on creating a powerful natural mould killer that's safe for your home.
When You Need Something Stronger
Sometimes, vinegar alone isn't quite enough for a stubborn patch of mould. That’s when you might look at a dedicated, store-bought mould remover from a place like Bunnings.
When choosing a product, look for something specifically formulated for carpets or upholstery. You want an anti-fungal spray that kills the mould, rather than just a simple stain remover. Always, always do a small spot test on a hidden area of your carpet first, like inside a wardrobe or under the sofa. This is a non-negotiable step to make sure it won’t discolour your carpet.
This infographic breaks down the essential safety prep before you start any cleaning.
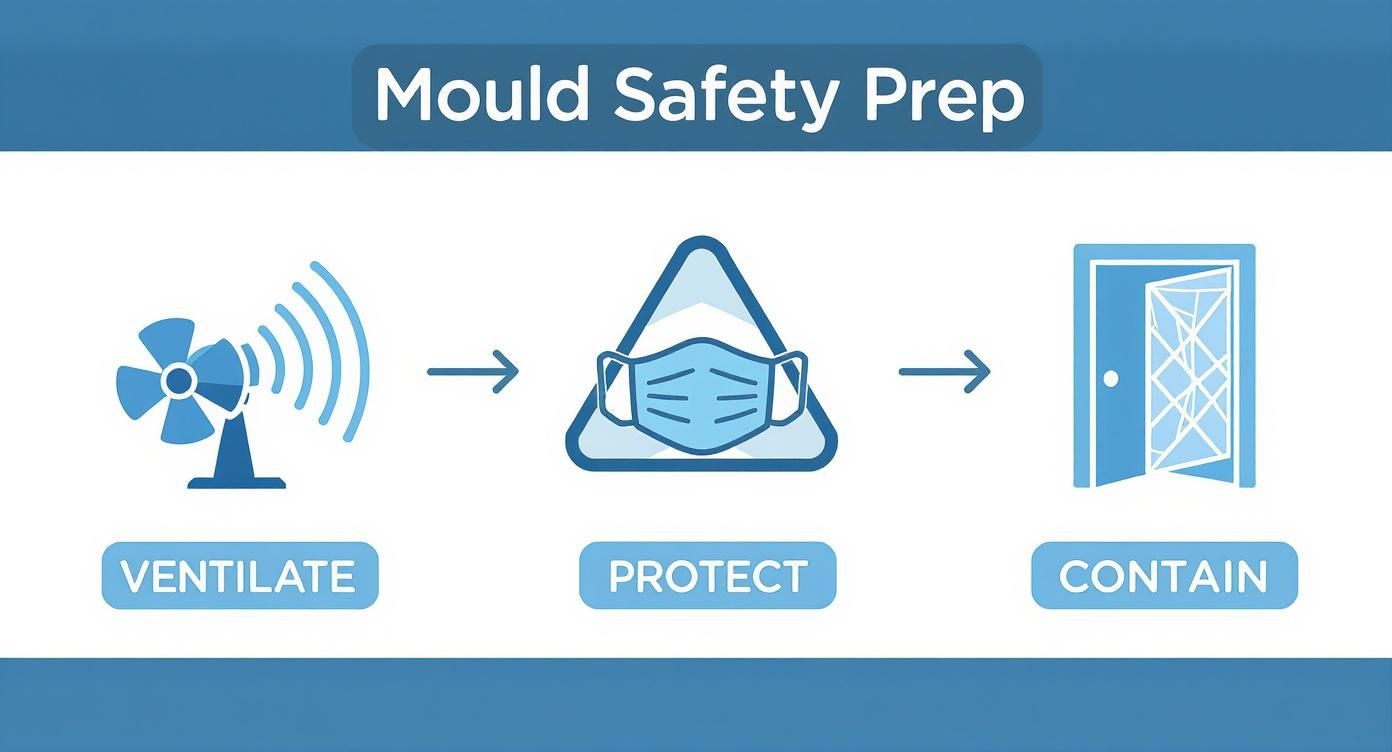
Following this simple flow ensures you're controlling the environment before introducing any cleaning solutions, which is critical for your safety.
The All-Important Drying Process
Now for what might be the most critical part of the entire process: getting your carpet bone-dry. A damp carpet is basically a giant welcome mat for mould to come right back, and you've just done all this work to get rid of it.
Your goal is to dry the area as quickly as possible.
Leaving even a little bit of moisture behind is like leaving the back door open for mould to return. You have to be patient and thorough here, because this is where you win or lose the battle.
Here’s how to do it effectively:
- Blot, Don't Rub: Use old towels or thick paper towels and press down firmly on the damp patch. Keep using fresh, dry sections of the towel until you can’t pull much more moisture out.
- Bring in the Fans: Position a few fans to blow directly across the surface of the carpet. This constant airflow is fantastic for speeding up evaporation.
- Use a Dehumidifier: If you have one, a dehumidifier is your best friend. It will actively pull moisture out of the air and the carpet, which is especially useful on those humid Australian days.
Let the fans and dehumidifier run for at least 24 hours, or until the carpet and the underlay feel completely dry to the touch. Don't guess. Actually get down and check it. This final step is your insurance policy against having to do this whole job all over again.
Checking Under the Carpet
Right, you've handled the mould on the carpet's surface. Good job. But don't break out the celebratory biscuits just yet. What you see on top is often just the tip of the iceberg, and the real trouble is usually lurking underneath.
Think of it like this: the carpet fibres are the leaves of a weed, but the underlay and subfloor are the root system. If you skip checking what’s going on down there, you’re practically guaranteeing the mould will pop back up. This part of the job is less about cleaning and more about being a detective.

Lifting the Carpet for a Proper Look
Start in the corner where the mould seemed worst. You might need a pair of pliers to grab the edge of the carpet and gently pull it up from the tack strip holding it down.
Go easy. You don't have to rip the whole thing up. Just peel back a large enough section to get a clear view of what you're dealing with.
Once it's lifted, trust your senses. A good look and a good sniff will tell you a lot.
- Dark Stains: Look for any dark, discoloured patches on the foam underlay.
- Musty Odour: Is that damp smell stronger now? That’s a massive red flag.
- Dampness: Press your hand against the underlay and the floor beneath. Does it feel cold to the touch or actively damp?
Can the Underlay Be Saved?
Here’s where you need to be ruthless. If you find mould on the underlay, my honest advice is to get rid of it. That foam padding is basically a giant sponge; once mould gets its hooks in, it’s next to impossible to get it all out.
Trying to clean and save mouldy underlay is a false economy. You'll pour time and effort into it, only for the mould to almost certainly return. A far more reliable, long-term fix is to cut out the affected section and replace it. For bigger problems, professional mould remediation is the only truly safe and effective path.
DIY vs Professional Mould Removal: When to Call for Help
Sometimes a small spot of mould is manageable, but other times it’s a job best left to the pros. Here’s a quick guide to help you decide.
| Scenario | DIY Approach | When to Call a Pro |
|---|---|---|
| Small, contained spot (<1 sq. metre) | A vinegar or bicarb soda solution can work. Ensure you have good ventilation and wear PPE. | If it returns after cleaning or if you have respiratory issues. |
| Mould on the underlay or subfloor | You can cut out and replace a small section of underlay yourself. | If the mould covers a large area or has soaked into a timber subfloor. |
| Recent water damage (e.g., burst pipe) | Dry the area immediately with fans and dehumidifiers. Clean any surface mould. | If the area has been wet for more than 48 hours, mould is likely deep in the materials. |
| Persistent musty smell with no visible mould | Check for hidden moisture sources like leaky pipes or poor ventilation. | A professional can use moisture meters and thermal imaging to find hidden mould. |
| Mould in an area larger than a dinner plate | Best to avoid. Disturbing large colonies can release millions of spores into the air. | Always. Large-scale infestations require professional containment and equipment. |
Making the right call here saves you time, money, and a lot of headaches down the track. When in doubt, getting a professional opinion is always the safest bet.
Treating the Subfloor
With the underlay gone, you’re down to the subfloor. This is your final line of defence. Whether you're looking at concrete or timber, it has to be treated properly before anything new goes down.
First, give the surface a thorough clean with your vinegar solution and let it dry completely. For concrete floors, which are common in Aussie homes and notorious for rising damp, just cleaning isn’t going to cut it.
The subfloor is the foundation of your mould-free future. Rushing this step is like building a house on a shaky foundation—it’s just a matter of time before problems reappear.
Many builders and remediation experts in Australia recommend applying a specialised damp-proof sealant after cleaning. A product like Crommelin Dampstop creates a moisture barrier, stopping damp from wicking up from the ground into your new underlay. It’s a crucial step.
Only when the subfloor is clean, dry, and properly sealed should you even think about laying new underlay and putting your carpet back. Yes, it's extra work, but it's the only way to be sure you've solved the problem for good.
Your Long-Term Mould Prevention Plan
You’ve done the hard work. The scrubbing, the drying, the inspecting… it’s a big effort. Now, let's make sure you never have to do it again.
This final part isn't about more cleaning. It's about creating a home environment where mould just can't get a foothold. We're not talking about being on high alert 24/7, but about building some smart, simple habits that stack the odds in your favour. Think of it as your ongoing mould insurance plan.
Keep the Air Moving
Mould absolutely loves still, stagnant, humid air. It’s a five-star hotel for mould spores, letting them settle and thrive. The single best thing you can do to ruin their stay is to get some fresh air circulating through your home.
It sounds almost too simple, but it works.
Try opening your windows for just 15-20 minutes every single day, even in winter. That small window of time is often enough to flush out the damp, stale air and replace it with drier, fresher air from outside.
Getting into the habit of daily ventilation is probably the most powerful, long-term weapon you have against mould. It costs nothing, takes seconds, and works wonders.
Another easy win? Use your exhaust fans religiously. Every time you have a shower or cook on the stovetop, flick that fan on. Just as important, let it run for a good ten minutes after you’re done to pull all that lingering steam and moisture right out of the room before it has a chance to settle.
Control the Humidity Levels
Sometimes, especially during a wet Aussie summer, just opening a window isn't enough to beat the humidity. If you live in a damp climate or have a room that just always feels a bit clammy no matter what you do, a dehumidifier is an absolute game-changer.
Think of it as a quiet little moisture magnet. It just sits in the corner, pulling water directly out of the air and, crucially, from deep within your carpet fibres. You'd be amazed how much water it can collect in just one day.
Here are a few other simple tricks to keep humidity down:
- Mind Your Indoor Plants: They look fantastic, but plants naturally release moisture into the air through transpiration. If you have a jungle in your living room, make sure the area is well-ventilated to compensate.
- Check Your Dryer Vent: Always ensure your clothes dryer is properly vented to the outside. A non-vented or poorly vented dryer is a menace, pumping litres of moisture straight back into your home with every load.
- Keep Surfaces Dry: After a shower, give the walls and screen a quick wipe-down with a squeegee. It takes ten seconds but stops all that water from evaporating and raising the room’s humidity.
Eliminate Moisture Sources
Finally, it's time to become a leak detective. The vast majority of serious mould problems I see start with a slow, sneaky leak that goes unnoticed for weeks or even months.
Make it a habit to check under your sinks, around the base of your toilets, and behind the washing machine every couple of months. You’re just looking for any tell-tale drips, water stains, or damp spots. Catching a tiny leak early can save you from a massive mould disaster down the track, especially with carpets where water can soak into the underlay unnoticed.
For a deeper dive into tackling moisture at its source, check out our complete guide on how to get rid of mould from all surfaces in your home. It’s all about stopping the problem before it even begins.
Common Questions About Carpet Mould
Alright, we’ve covered a lot of ground here. From sniffing out that first musty smell to the nitty-gritty of pulling back carpet to see what’s lurking underneath. It’s a big job, I get it.
But you probably still have a few questions rolling around. That’s completely normal. Let’s tackle some of the most common ones I hear from people figuring out how to get mould out of their carpet for good.
Can I Just Use Bleach to Kill the Mould?
This is the number one question I get asked, without a doubt. And my answer is always a firm but friendly no. Please, step away from the bleach.
Here’s the deal: bleach is great for hard, non-porous surfaces like bathroom tiles. But on a soft, porous material like carpet? It's a disaster waiting to happen. It will almost certainly discolour and damage the fibres, leaving you with a patchy, ruined mess.
Worse still, it rarely kills the mould's roots, which have burrowed deep into the carpet backing and underlay. All you're really doing is taking the colour out of the surface stain. It gives you a false sense of security while the real problem thrives underneath, ready to come back.
Using bleach on carpet mould is like spray-painting over rust on a car. It might look better for a week, but you haven't fixed the underlying issue, and it will inevitably return worse than before.
How Can I Tell if the Mould Has Reached the Underlay?
This is a tricky one because you often can't tell just by looking at the top of the carpet. Your senses are your best tool here.
If you’ve scrubbed the surface but that stubborn, earthy smell just refuses to leave, that’s a massive red flag. Another big clue is if the carpet feels spongy or stays damp in that area, long after you’ve tried to dry it.
Ultimately, there’s only one way to be certain. You have to be brave, grab a pair of pliers, and gently pull back a corner of the carpet to get a direct look. It’s the only way to see the full picture of what you’re up against.
Will a Steam Cleaner Get Rid of the Mould?
This one is a real double-edged sword. On one hand, yes, the high heat from a steam cleaner can kill surface mould spores. It sounds like a perfect solution.
But here’s the catch: steam cleaning injects a huge amount of hot water deep into your carpet fibres and underlay. If you can't extract that moisture with incredible speed and efficiency, you’ve just created the perfect warm, damp playground for any surviving spores to throw a massive comeback party.
Unless you're working with professional-grade extraction equipment, you run a very high risk of making the mould problem much, much worse. For a DIY job, it’s far safer to stick with targeted treatments and be absolutely relentless about the drying process.
Dealing with mould can feel overwhelming, but you don't have to tackle it alone. If you're facing a stubborn mould problem or want to ensure your commercial space is safe and healthy, That Cleaning Crew provides professional mould remediation services you can trust. Get your free on-site quote today.