You can tackle mould on silicone with a simple paste of bicarb soda and vinegar or go straight for a specialised mould killer. For those really stubborn stains, the trick is to give your chosen cleaner plenty of time to work its magic before you start scrubbing.
Understanding Why Mould Loves Your Silicone
You’ve seen it… those ugly black specks creeping along the silicone in your shower or around the kitchen sink. It’s frustrating, and you're definitely not the only one dealing with it. Before we jump into how to get rid of it, let’s quickly touch on what’s actually going on.
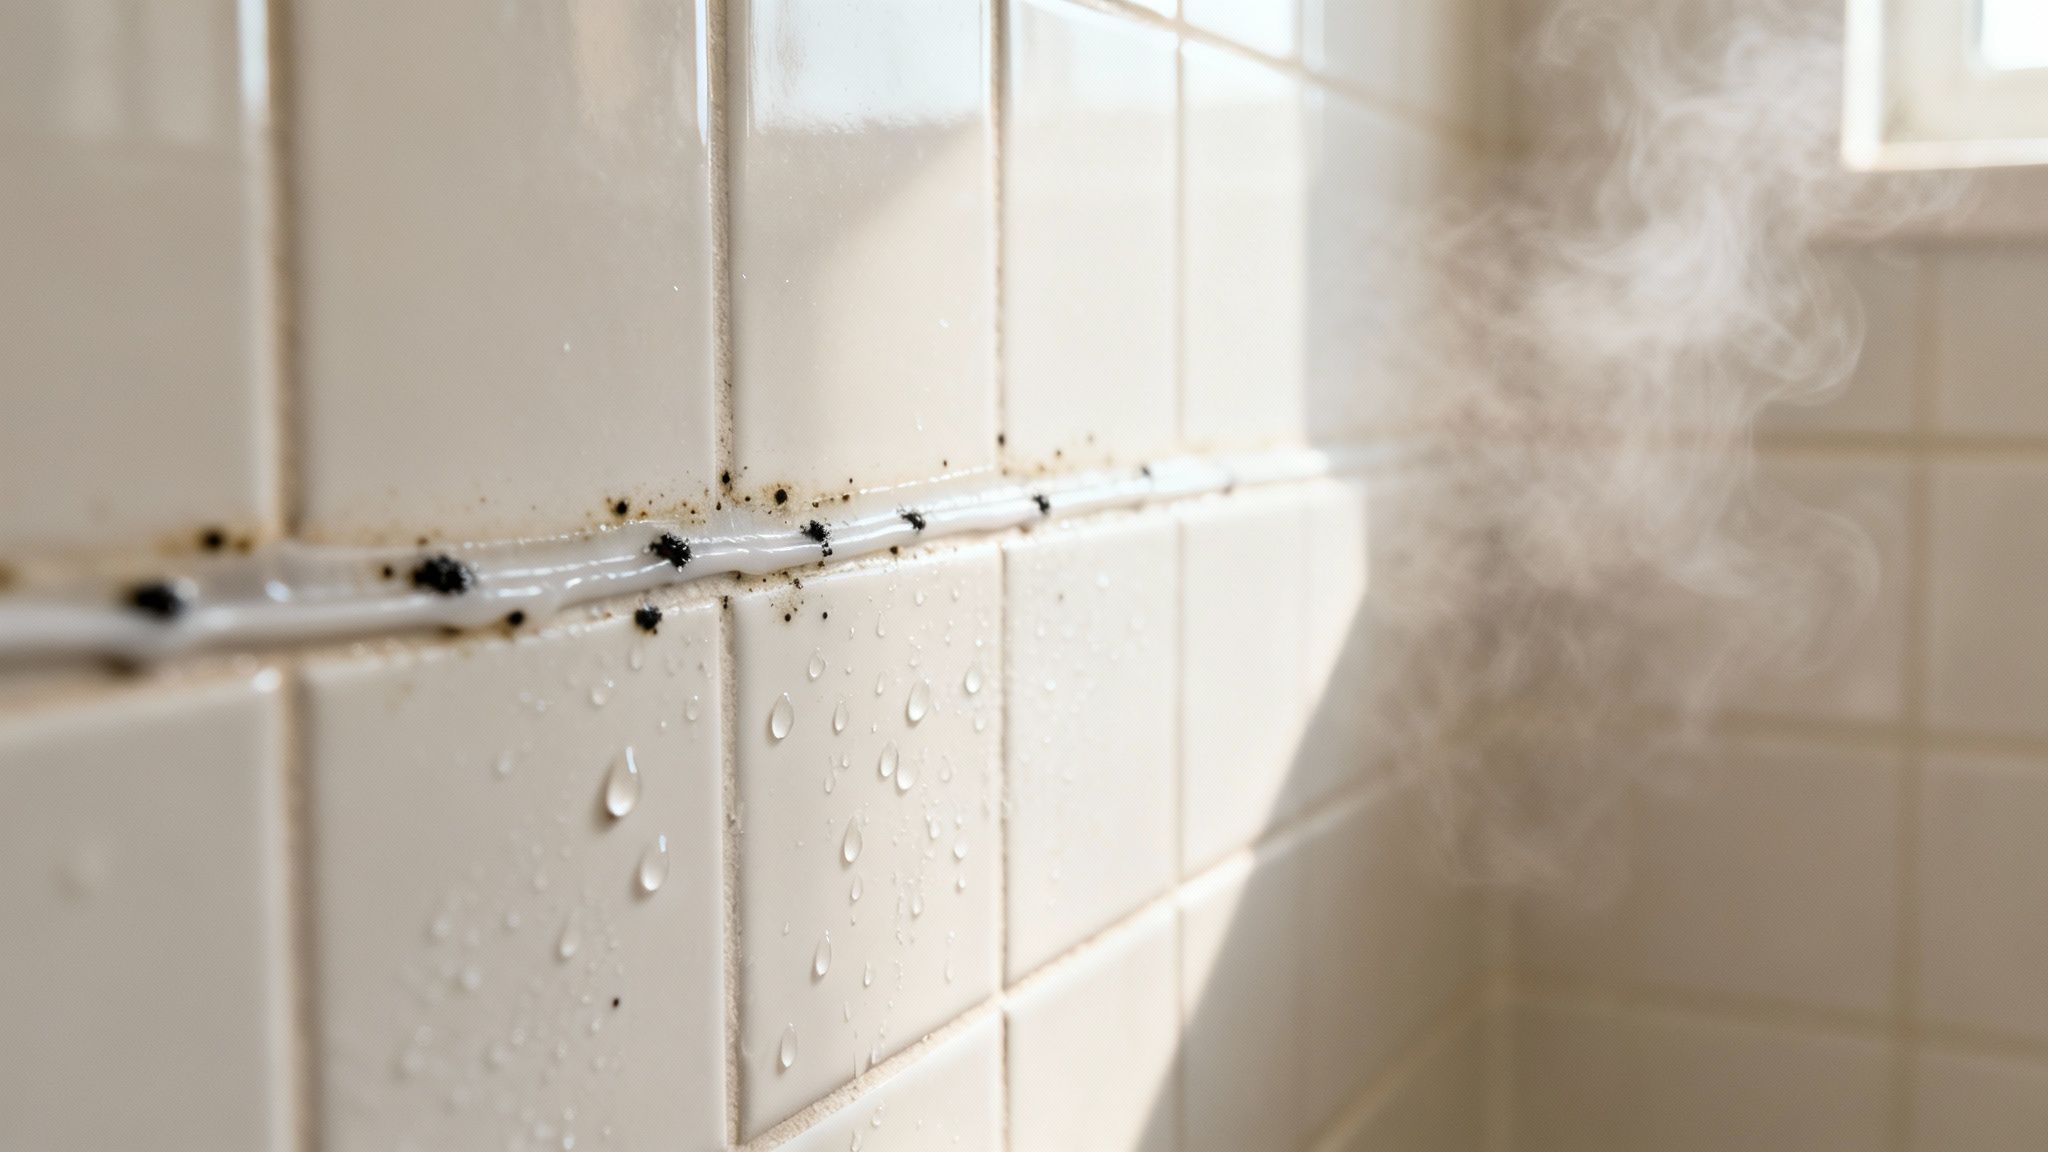
Think of your bathroom as a five-star resort for mould. It’s warm. It’s steamy. And there's almost always a bit of lingering dampness. These are the exact conditions mould spores need to settle in and start a colony. This isn't a reflection of how clean you keep your home… it’s simply about the environment.
The Perfect Storm for Mould Growth
So, what makes silicone sealant such prime real estate for these unwelcome guests? It really just comes down to a few factors that combine to create the ideal home for mould.
- Constant Moisture: Every time you have a shower or wash the dishes, you're creating condensation that settles on nearby surfaces. Silicone is often the last place to properly dry out.
- Poor Airflow: Bathrooms, especially older ones without a decent exhaust fan, are notorious for trapping humid air. This lingering moisture is like putting out a welcome mat for mould.
- A Food Source: Believe it or not, mould actually feeds on the tiny particles of soap scum and skin cells that inevitably build up on the silicone.
Across Australian homes, it's usually the combination of moisture and poor ventilation that's the main culprit, particularly in bathrooms and kitchens. Even though silicone itself is water-resistant, it becomes a hotspot for mould when it’s constantly damp. Getting the air moving properly can prevent around 60–70% of mould issues on sealants, which just shows how critical good ventilation is. You can find more practical insights on preventing mould in silicone from this Australian caulking specialist.
The bottom line is this: mould isn't a sign that your home is unclean. It's a sign that the environment has become a little too welcoming. By understanding this, you’re already one step closer to getting rid of it for good.
Getting Your Mould-Busting Toolkit Ready
Before you roll up your sleeves and declare war on that ugly mould, let's get your gear sorted. Don't worry, you won't need a professional cleaning van full of equipment for this job. A few key items from around the house or a quick trip to the shops will do the trick.
This is all about working smarter, not harder. Having the right tools on hand makes the whole process of getting mould off silicone sealant so much easier… and a heck of a lot safer. Some of these cleaners can pack a punch, so a little prep goes a long way.
Your Essential Cleaning Kit
Chances are you have most of these things already. It’s a pretty simple list, but each item has a really important job to do.
- Safety First: A pair of rubber gloves is non-negotiable, and a simple face mask is a brilliant idea. The last thing you want is to be breathing in mould spores or strong cleaning fumes.
- The Right Tools: An old toothbrush or a small, stiff-bristled brush is perfect for this. It’s firm enough to scrub away the grime but gentle enough that it won't tear up your silicone sealant.
- Your Cleaning Agent: You've got options here, from commercial mould killers to DIY solutions. If you're looking for gentler options, our guide to creating a powerful natural mould killer has some great recipes you can try.
Remember to open a window or get an exhaust fan running before you start. Good ventilation is your best friend when you're cleaning. It helps whisk away both the cleaning fumes and any disturbed mould spores, making the entire job safer for you.
Your Practical Guide To Getting Rid Of Mould For Good
Alright, let's get down to business. This is where we get our hands dirty (safely, of course) and walk through a clear, no-fuss process to get that silicone looking brand new again. I’ll guide you through each part, from applying your cleaner the right way to the crucial step of giving it time to work its magic.
Forget confusing instructions and old wives' tales. This is a straightforward, real-world method. The goal is simple: kill the mould and get rid of the ugly stains without destroying the silicone underneath. It's much easier than you might think.
This infographic breaks down the essential gear you'll want to have on hand for the job.
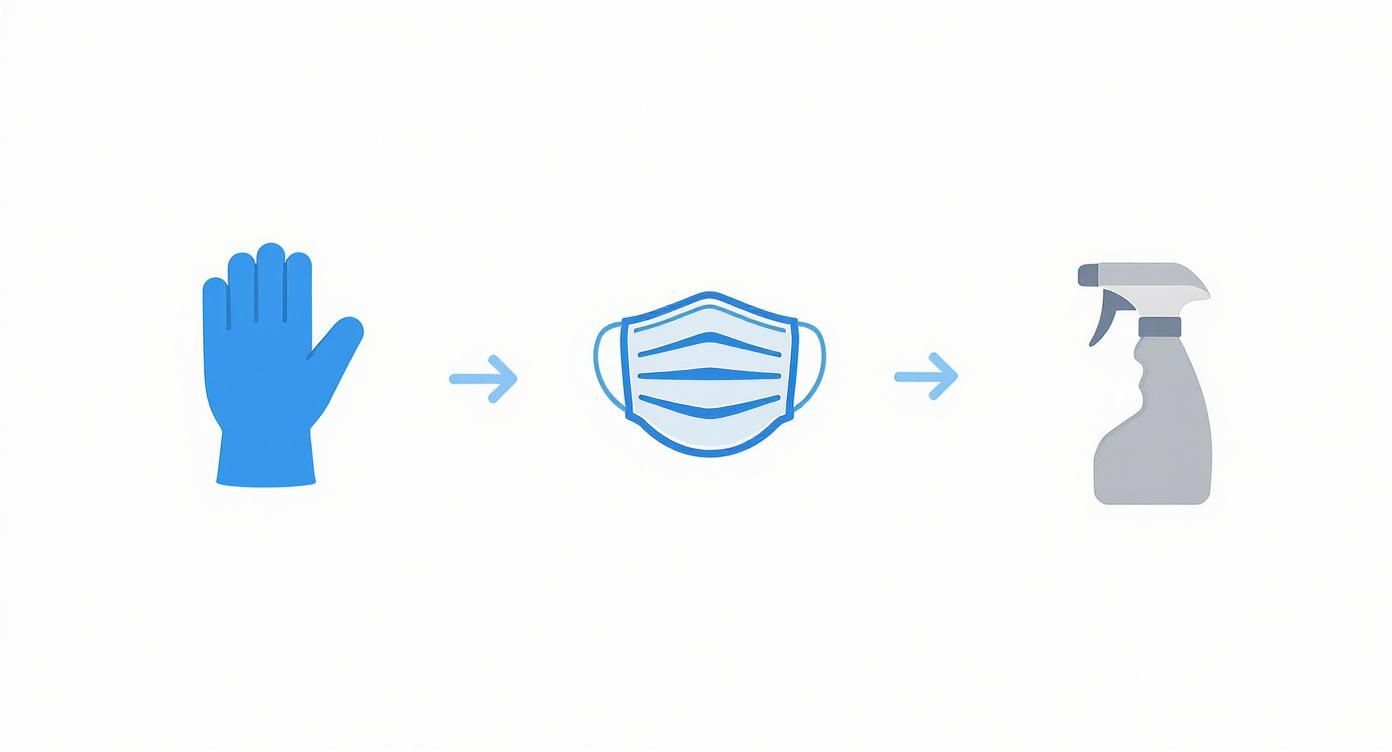
It really just comes down to protecting yourself and having the right cleaning agent for the task at hand.
Applying Your Cleaner The Right Way
Now for the most important part… patience. The single biggest mistake I see people make is spraying and immediately scrubbing. That’s like trying to cook a steak in thirty seconds—it just won’t work.
You have to give your cleaning solution time to soak in, penetrate the mould, and break it down from the inside out. Whether you’re using a store-bought product or a homemade paste, the application process is pretty much the same.
- Apply it generously. Make sure the entire mouldy area is completely covered. Don't be shy with it.
- Let it sit. This is the key. Check the product label for specific times, but you’ll generally want to leave it for at least 30 minutes. For really stubborn, deep-set mould, you might even need to leave it on for a few hours.
- Keep it damp. If you're leaving it on for a longer period, don't let the cleaner dry out. You can lightly mist it with water or, for vertical surfaces like shower walls, press some plastic wrap over the top to stop it from evaporating.
In many Aussie households, tackling silicone mould comes down to a good chemical cleaner and a bit of light scrubbing. A product many people swear by is Selleys Rapid Mould Killer, which you can find at places like Bunnings. The common wisdom from fellow DIYers is to apply it, let it do its thing for the recommended time without scrubbing, and then gently brush it. It’s a tried-and-true method that works for most visible mould. You can read more about how Aussies tackle silicone mould in this Bunnings Workshop discussion.
The Gentle Scrubbing Technique
Once your cleaner has had enough time to work, it’s time for a little elbow grease. But the keyword here is gentle. You're not trying to sand down a piece of timber.
Your goal is to agitate and lift the now-dead mould from the surface, not to gouge the silicone sealant itself. Damaging the sealant will only create more tiny crevices for mould to hide in next time around.
Using an old toothbrush or a small grout brush, work in small, circular motions. You should see the black specks start to lift away quite easily. Focus on the stained areas, applying consistent but light pressure.
After you've scrubbed the entire area, give it a thorough rinse with clean water. Then, dry it completely with an old cloth or paper towels. Getting it bone dry is crucial to make sure you’re not leaving any moisture behind to start the whole cycle over again. And that's it—stand back and admire your handiwork.
When to Clean Versus When to Replace Silicone
Let's be honest, sometimes no amount of scrubbing is going to cut it. You’ve followed all the steps, you’ve been patient, but those stubborn black stains just won’t budge. As a cleaning professional, I can tell you it’s a classic case of knowing when to admit defeat and start fresh.
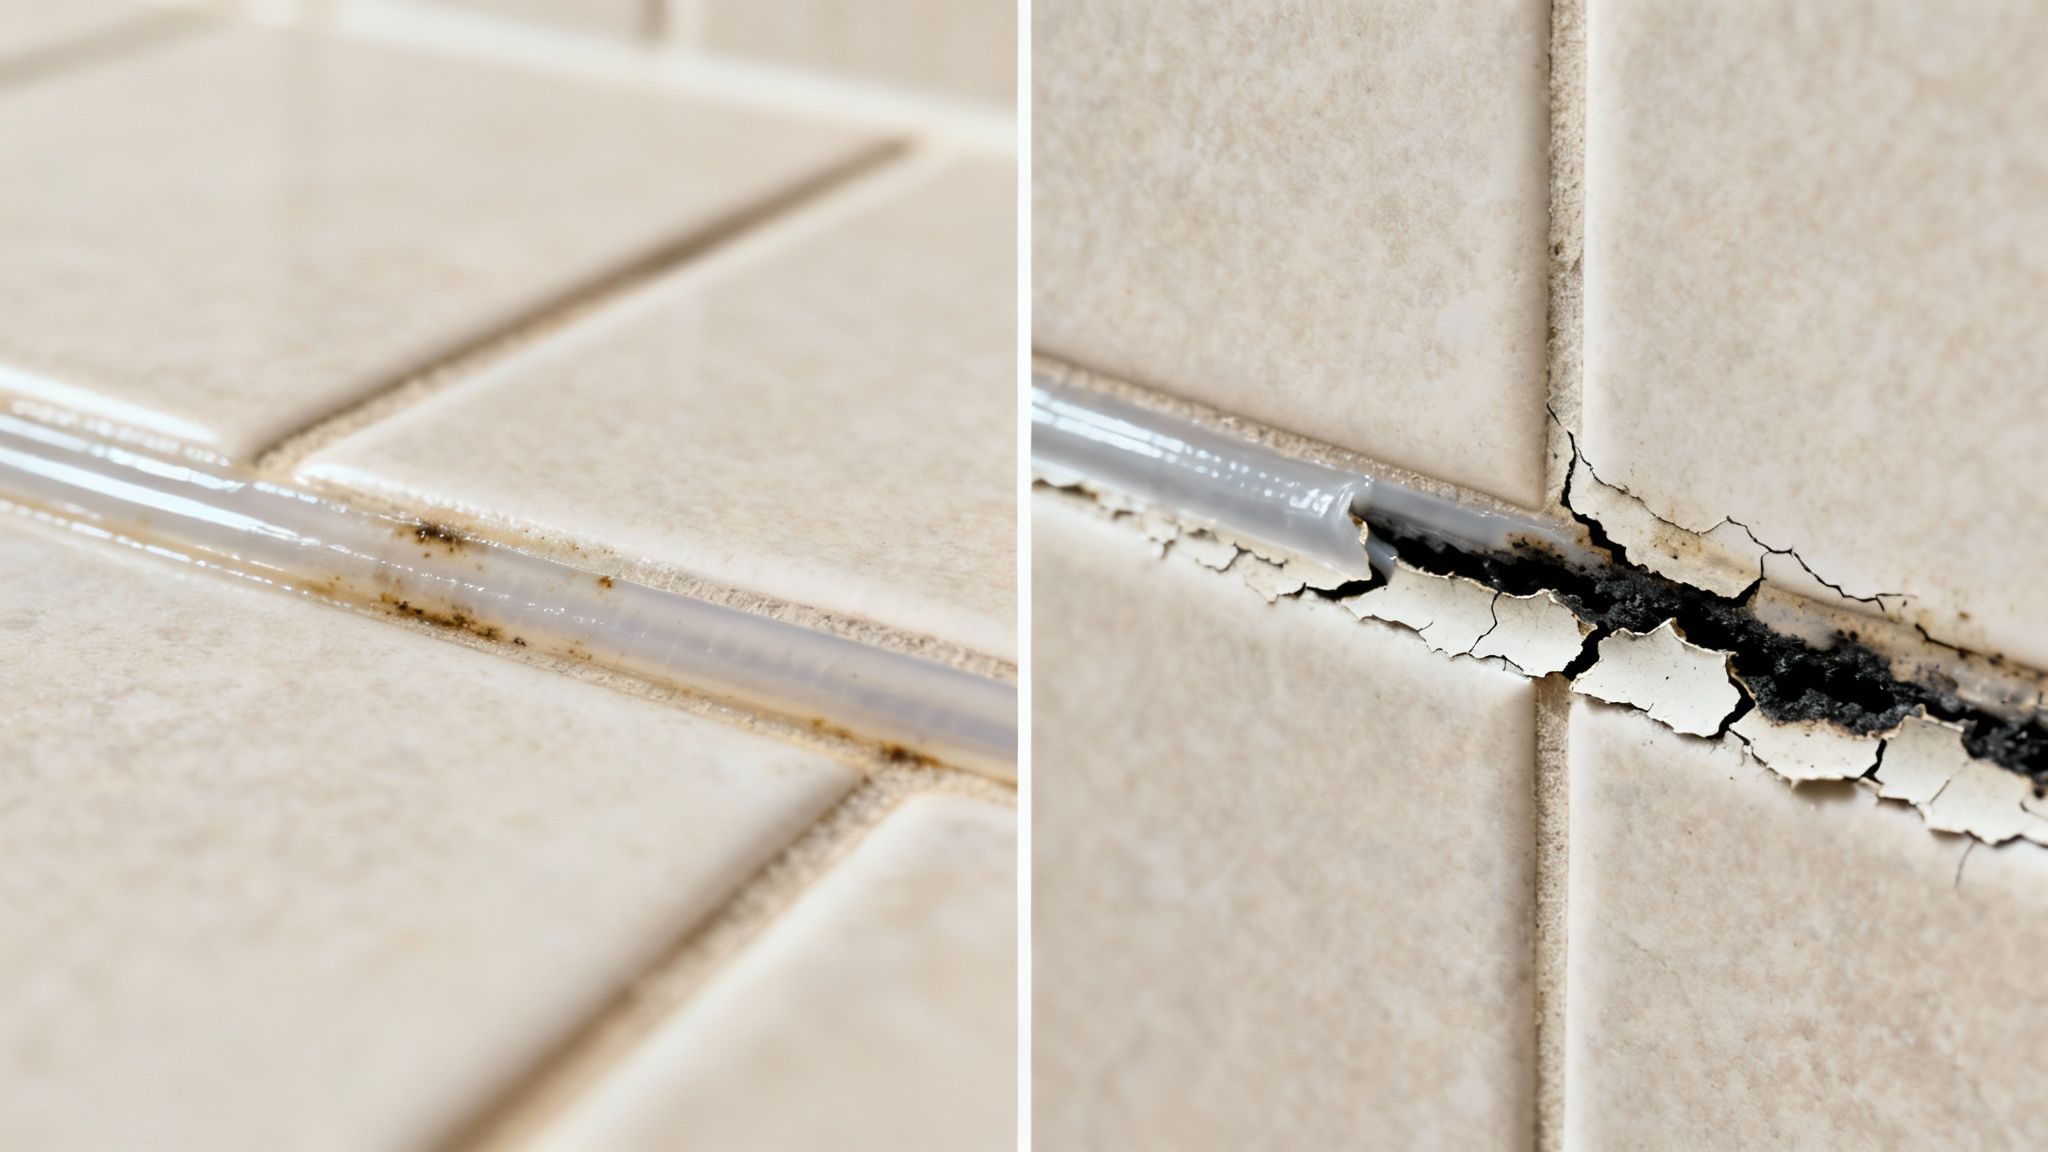
If mould has worked its way deep into the silicone, it can leave behind permanent stains. Think of it like a permanent marker… once it’s soaked in, it’s not really coming out. Trying to clean deeply compromised silicone is a bit of a losing battle.
This is especially true in homes that have dealt with serious moisture issues. After events like the 2011 Brisbane floods, studies found significant mould contamination inside residences. The research showed just how challenging it is to fully remove mould from household surfaces like silicone, even with strong cleaning agents. It’s a clear example of why replacement is sometimes the only certain fix.
Signs It's Time to Replace Your Silicone
So how do you know when you’ve reached that point? It’s usually pretty obvious when you take a closer look.
Here’s what I tell my clients to watch out for:
- Deep-Set Black Stains: These are the ones that remain even after a thorough clean. They’re no longer sitting on the surface; they’re in the silicone itself.
- Peeling or Cracking: If the sealant is physically damaged—peeling away from the wall or showing obvious cracks—it's no longer creating a waterproof seal. Cleaning won't fix this structural problem.
- Shrinking or Gaps: Over time, silicone can shrink and pull away, leaving small gaps where water can seep in. This is a fast track to bigger problems behind your tiles and walls.
If you’re seeing any of these signs, replacing the silicone is the healthier and more effective long-term solution. When the problem becomes bigger than just surface stains, it’s often best to call in the professionals. For a complete solution, our team provides expert mould removal on the Central Coast to ensure the job is done right.
Keeping Mould Away for Good
So, you’ve won the battle. The black specks are gone, and your silicone is looking fresh again. High five. But now we need to make sure you win the war.
Getting rid of the existing mould is one thing, but keeping it from staging a comeback is the real prize. This is all about simple, consistent prevention. Think of it as creating an anti-mould forcefield around your bathroom.
It's not about big, time-consuming chores. Honestly, it’s about tiny tweaks to your daily routine that make your bathroom a much less inviting place for those pesky spores to settle.
Your New Anti-Mould Habits
The key is to reduce moisture and increase airflow. That's it. If mould doesn't have a damp, stagnant place to hang out, it will simply move on.
Here are a few super simple habits to get into:
- Run the Fan: Always switch on your exhaust fan when you shower or bathe, and let it run for a good 10-15 minutes afterwards. This is the single most effective thing you can do.
- Wipe it Down: Keep an old towel or a squeegee in the shower. A quick wipe of the screen, tiles, and silicone after you're done takes about 30 seconds and makes a huge difference.
- Let the Air In: Whenever you can, crack a window open to let fresh air circulate. Even just for a little while each day helps to dry out the room properly.
It really boils down to this: a dry bathroom is a mould-free bathroom. These small actions disrupt the warm, humid environment that mould absolutely loves to call home.
Making these changes is fundamental to stopping the problem from returning. For an even deeper look into this, check out our complete guide on how to prevent mould in your bathroom. It’s packed with extra tips to keep your space healthy and clean for the long haul.
Your Silicone Mould Questions Answered
Got a few questions still buzzing around? Good. It’s smart to be thorough. Let's tackle them head-on so you can get to work feeling completely confident.
It’s pretty common for a few last-minute thoughts to pop up, especially when you're about to tackle something as stubborn as mould. Things like, "Am I using the right stuff?" or "How long will this actually stay clean?" Let's clear up some of the most common queries I hear all the time.
Can I Just Use Straight Bleach?
This is probably the number one question I get. While it’s true that straight bleach can kill mould on the surface, it’s not a great friend to your silicone sealant. Over time, bleach can make the material brittle and cause it to degrade, which basically just creates more tiny cracks for mould to grow in later. You're solving one problem while creating another.
A much safer and more effective approach is to use a properly diluted solution. Or, even better, grab a product specifically designed for removing mould from silicone. This ensures you kill the mould spores without accidentally damaging the very thing you're trying to clean.
How Quickly Will The Mould Come Back?
Honestly? If the root cause isn't sorted, mould can start creeping back in just a few weeks. It’s a persistent little thing. This is exactly why prevention is just as important as the initial cleanup.
The real secret isn't just knowing how to remove mould from silicone; it's about making the environment less friendly for it in the first place. A little bit of airflow and a quick wipe-down after a shower makes a massive difference.
Is The Black Mould On Silicone Dangerous?
While not all black mould is the highly toxic Stachybotrys chartarum, you shouldn't take any chances. Any type of mould has the potential to cause issues, especially for people who are sensitive to it.
It can trigger allergic reactions, asthma attacks, or other respiratory problems. Because of this, it's always best practice to get rid of it promptly and safely, no matter what specific type you think it might be. Better safe than sorry.
When mould becomes a recurring nightmare, sometimes you need a professional touch. At That Cleaning Crew, we provide expert mould remediation services to get your space healthy and clean. Get a free on-site quote from us today!