Getting rid of mould on silicone? It's really a two-part job. First, you'll need something strong… like a bleach solution or a specialised mould killer to deal with the spores sitting on the surface. Then, it’s all about a bit of elbow grease with a stiff brush to scrub away those stubborn, lingering stains. You're basically combining a chemical attack with a good old-fashioned physical removal.
Why Silicone Is a Magnet for Stubborn Mould
It’s incredibly frustrating, isn't it? You can scrub the bathroom until it’s spotless, but a few weeks later, those ugly black specks are creeping back along the silicone around your shower or sink. It feels like a battle you just can't win.
But what if I told you it's not entirely your fault? The truth is, silicone is practically a five-star resort for mould, especially in our humid Australian homes. This is a massive issue nationwide, and some studies have shown that up to half of all homes are affected by mould, mostly in damp spots like bathrooms. You can dig deeper into the common causes of mould in silicone sealants, but the bottom line is clear… it's a really widespread problem.
So, why does this keep happening? A few key things come together to create the perfect storm for mould to set up camp.
The Perfect Environment for Growth
First, you’ve got the obvious culprit. Constant moisture. Silicone is designed to be waterproof, but the places we use it… showers, sinks, baths… are perpetually damp. Think of it like a rainforest floor. Mould doesn't need much to get going, and that little bit of lingering water is an open invitation.
Then there's ventilation, or more often, the lack of it. A steamy bathroom that isn’t aired out properly after a shower traps warm, moist air, creating the ideal conditions for mould spores to settle in and start a family.
But here’s what really makes silicone the perfect home for mould:
- Porous Nature: Over time, silicone can develop tiny, invisible pores and micro-cracks. These little gaps are brilliant at trapping water, soap scum, and skin cells. A gourmet buffet for mould.
- Organic Additives: Believe it or not, some silicone sealants actually contain organic materials that mould can feed on. This helps it not only survive but thrive and dig in deep.
- Difficult to Clean: Its flexible, rubbery texture makes it tricky to scrub deeply without causing damage. This allows mould to take root in places your sponge or cloth just can't reach effectively.
The real secret to winning this fight isn't about scrubbing harder. It's about understanding why it’s happening in the first place. When you know the enemy, you can finally figure out how to outsmart it.
Assembling Your Mould-Busting Toolkit
Alright, before we declare war on that ugly mould, let's get our supplies organised. There's genuinely nothing worse than getting halfway through a job… only to realise you're missing something vital. It completely kills the momentum.
Think of this part as our pre-mission briefing. We'll go through a simple, no-fuss list of everything you'll need to finally get rid of that mould. You don't need a whole arsenal. Just a few key items.
Your Essential Supplies
You'll want a mix of cleaning agents and application tools. Some jobs call for a gentle approach, while others need the big guns.
- A Stiff Bristled Brush: An old toothbrush is perfect. It's great for getting into the grout lines and the tight corners of the silicone. Don't use anything too abrasive that could scratch your tiles or bath, though.
- Commercial Mould Killer: Products like Selleys Rapid Mould Killer are popular for a reason. They contain bleach and are designed to tackle tough stains quickly and effectively.
- White Vinegar: If you'd rather go a more natural route for less severe spots, simple white vinegar is a fantastic option. Its acidity helps to kill the mould at its roots, not just bleach the surface stain. You can find more details in our guide to natural mould killers if you're keen to avoid harsh chemicals.
- Cotton Balls or Paper Towels: These are my secret weapon for stubborn areas. You can soak them in your chosen cleaner and press them against the silicone, making sure the solution stays in direct contact for longer.
And please, let's have a quick but serious chat about safety. It might just look like a bit of grime, but you're still dealing with mould spores and cleaning chemicals.
You absolutely need to protect yourself. Grab a pair of rubber gloves to keep your hands safe from the chemicals. Also, make sure the room is well-ventilated. Open a window, turn on the exhaust fan, or both. For heavy-duty jobs, a pair of safety glasses isn't a bad idea either.
Right, let's get those gloves on and tackle that mould. This is where the real work begins, and I’ll walk you through exactly how to get that silicone looking new again.
Step-by-Step: How to Get Rid of Silicone Mould
The trick is knowing what you're up against. A few light mildew spots need a different battle plan than those deep-set, stubborn black stains that have been lurking for months. We'll start gentle and work our way up if we need to.
Choosing Your Mould Removal Method
To make it easier to decide where to start, here's a quick guide. Just think about how bad the mould is, how much time you have, and what you’re comfortable using.
A quick guide to help you decide which cleaning approach is right for your situation, from light stains to deep-set mould.
| Mould Severity | Recommended Method | What You'll Need | Time Commitment |
|---|---|---|---|
| Light & Fresh | Natural Solution | Bicarb soda, white vinegar, old toothbrush, spray bottle | 1-2 hours |
| Moderate Stains | Commercial Cleaner | Bleach-based mould remover, scrubbing brush | 30 mins – 1 hour |
| Stubborn & Deep | Soaking Method | Mould remover, cotton balls or paper towel | Overnight |
| Severe/Recurring | Professional Help | Mould remediation service | Varies |
This table should help you match your weapon to your war. Start with the gentlest method that suits your situation and only escalate if you need to.
Starting With a Softer Approach
For minor mould, let's try something less intense first. A simple paste of bicarb soda and water, scrubbed in with an old toothbrush, can sometimes be enough to lift fresh surface stains.
Another great option is undiluted white vinegar. Just spray it directly onto the silicone and let it sit for about an hour before giving it a good scrub and rinse. Your bathroom might smell a bit like a fish and chip shop for a while, but hey, it's a small price to pay for a natural solution that actually kills mould at its roots.
This handy decision tree shows which approach might work best for your situation.
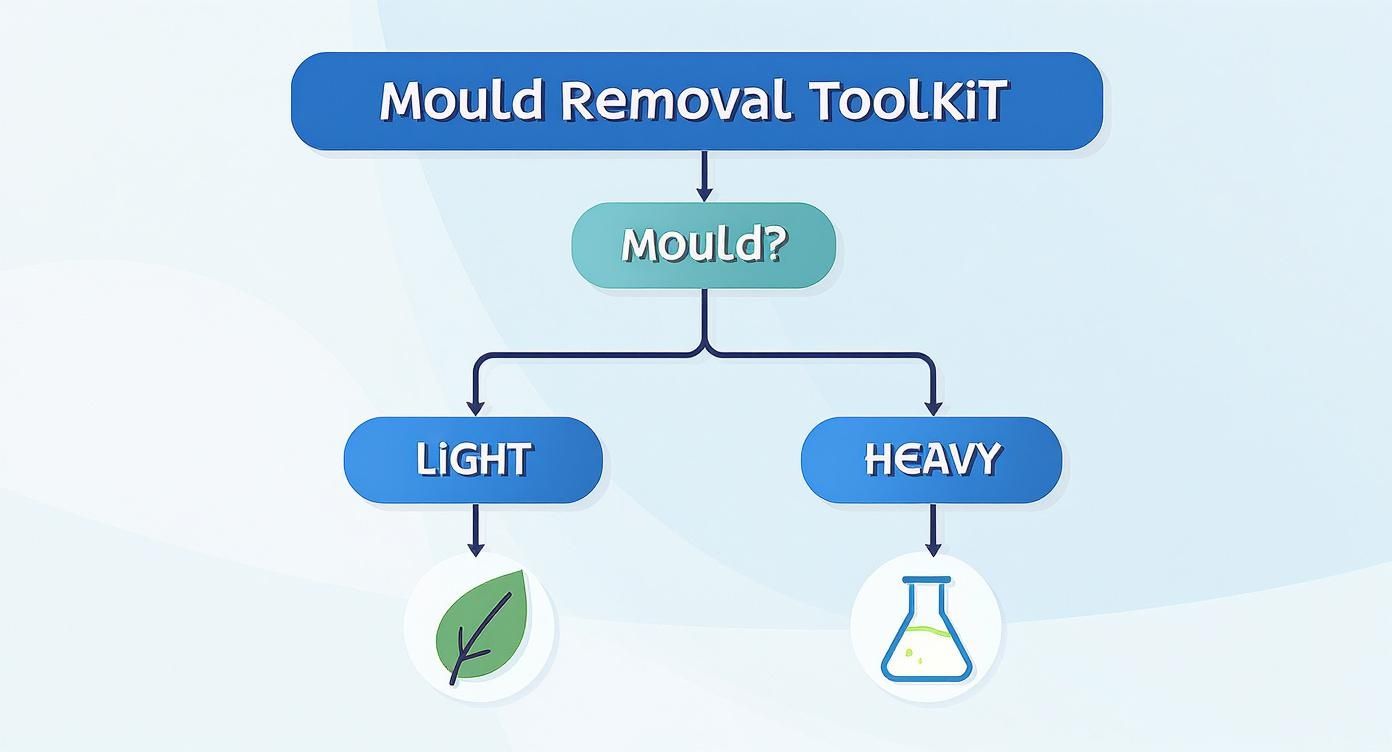
As you can see, light mould often responds well to natural methods. But if the growth is heavier or has been there a while, you’ll likely need something with a bit more punch.
When It's Time for the Heavy Hitters
If the vinegar trick didn't quite cut it, it’s time to escalate. This is when you reach for a commercial, bleach-based mould remover. Products like Selleys Rapid Mould Killer Remover are popular for a reason… they can produce visible results in as little as 15–30 minutes.
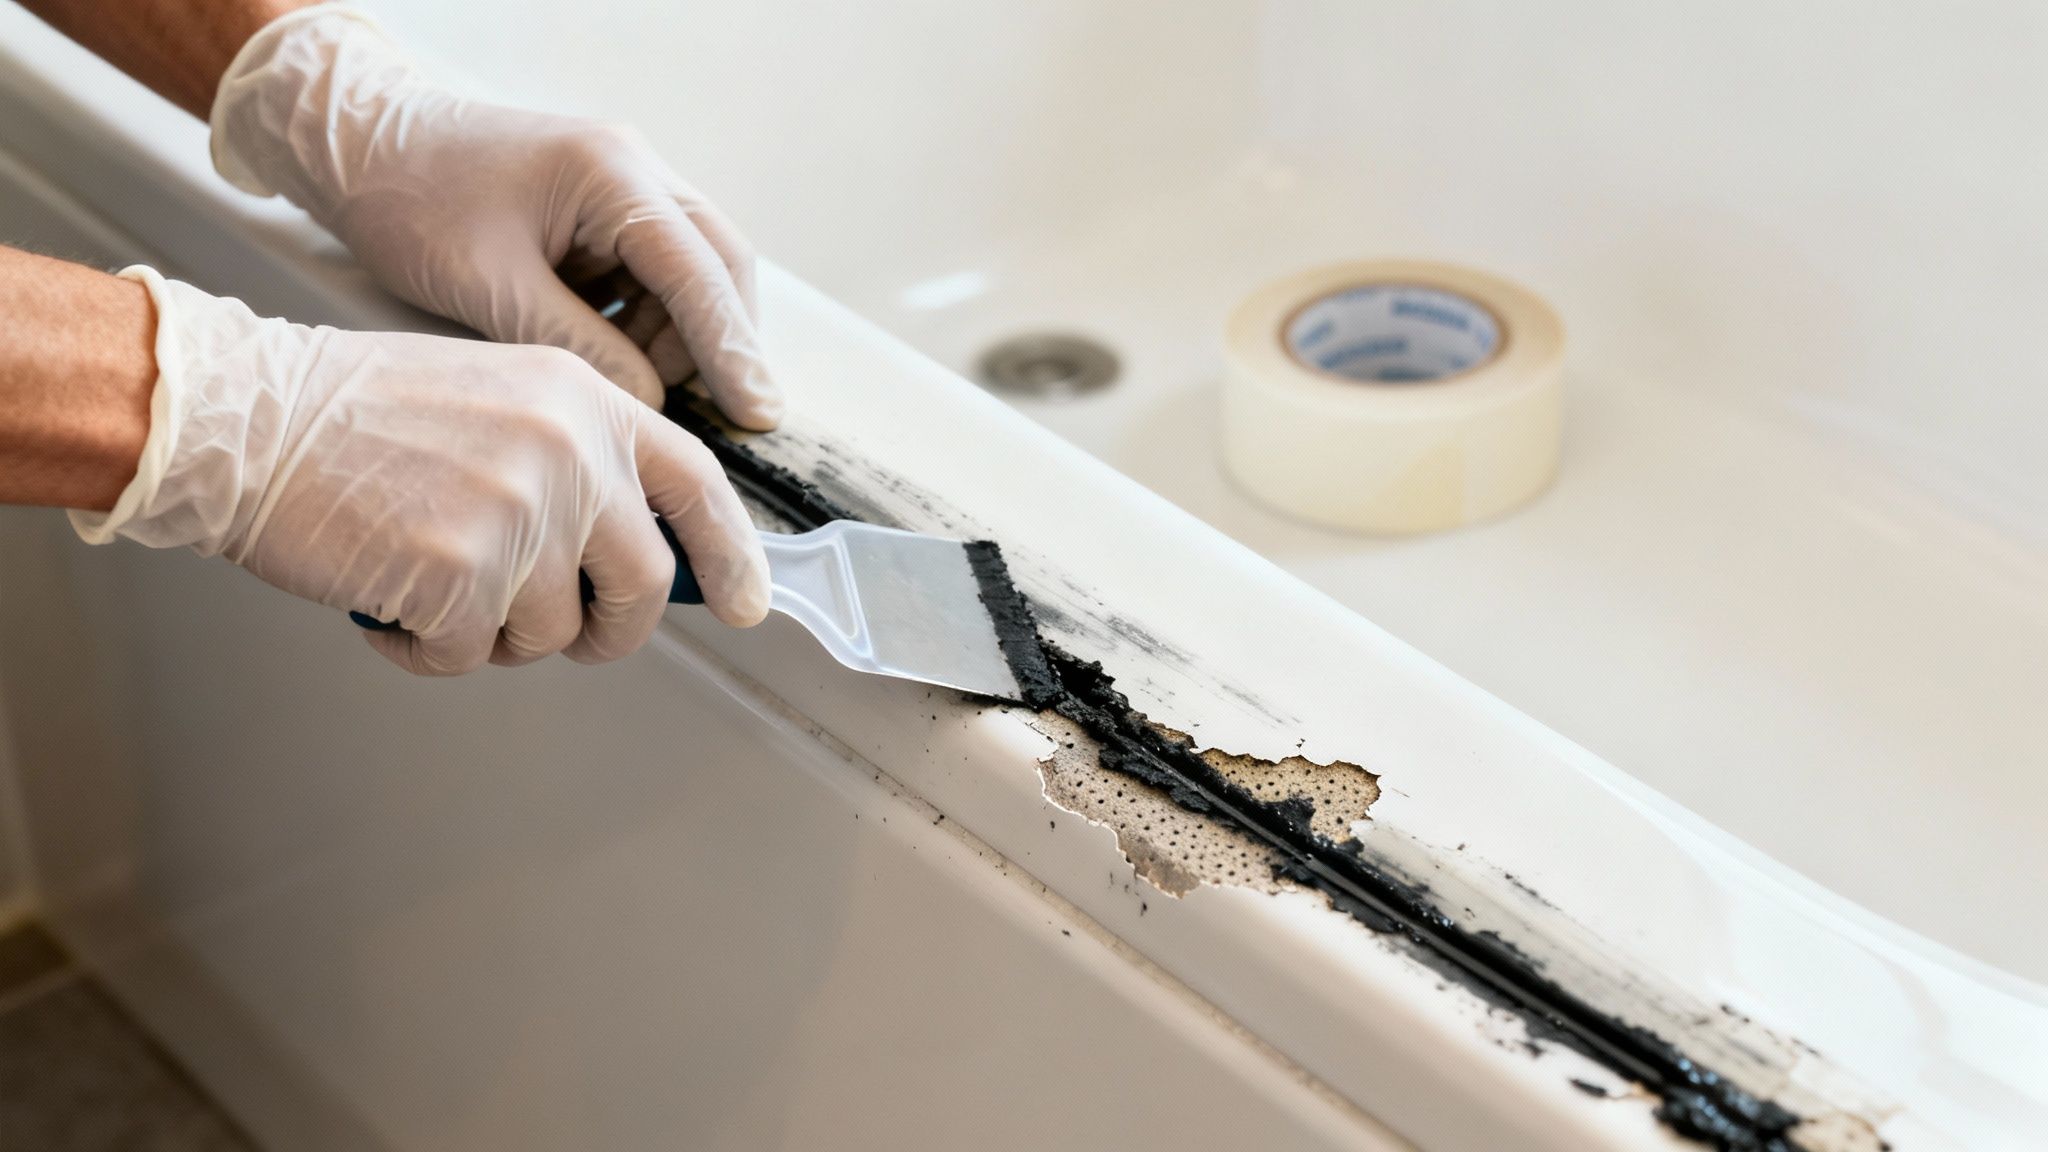
Here’s a little trick I’ve picked up for those really tough, ingrained stains.
Instead of just spraying the cleaner on, soak some cotton balls or a strip of paper towel in the solution. Press them firmly against the mouldy silicone and just leave them there overnight. This keeps the active ingredients in constant contact, giving them more time to penetrate and dissolve the stain.
It's like a deep-cleaning treatment for your bathroom. In the morning, remove the cotton, give the area a solid scrub with your brush, and rinse it all off thoroughly. You should see a massive difference.
For a broader look at different techniques, our complete guide on how to get rid of mould offers even more strategies for around the home.
Knowing When It's Time to Replace the Silicone
Sometimes, no matter how much you scrub, those black stains just won't budge. You’ve soaked them, scrubbed them, and tried every trick in the book, but they’re still there… laughing at you.
It's a tough pill to swallow, but this usually means one thing. The mould isn't just on the silicone anymore. It has grown deep inside it.
At that point, no surface cleaner in the world is going to solve the problem. The mould has set up a permanent home deep within the sealant itself, and you're only cleaning the front door.
Signs It's Time for a Fresh Start
It’s not a failure on your part. Honestly. Silicone sealant is a wearable item, just like the tyres on your car. Over time, it degrades and needs replacing.
Look out for these clear signs:
- Permanent Staining: The black or dark grey discolouration just won't lift, no matter what you use to clean it.
- Peeling or Cracking: The silicone is visibly pulling away from the wall or the tub, creating gaps where water can get in.
- A Spongy or Soft Texture: If the sealant feels soft, gummy, or weak when you press on it, its structural integrity is gone.
If you’re seeing any of these, it’s time to stop cleaning and start replacing. Research from across Australia and New Zealand shows that once mould has deeply penetrated the silicone, replacement is often the only effective long-term fix. Homeowners who replace their silicone every 3–5 years report far fewer problems with mould returning. You can get more insights on how to handle stubborn mould on the Bunnings community forum.
Think of it less as a chore and more as giving your bathroom a fresh start. You’re putting up a brand-new, impenetrable barrier against moisture and mould. It's the only way to truly win the war against those really stubborn stains.
Simple Habits to Keep Mould Away for Good
So, you've put in the hard work and your silicone is sparkling clean again. Fantastic! Now, how do we make sure it stays that way?
This is arguably the most important part of the whole process. We’re shifting our focus from cleaning to prevention, and it’s all about making your bathroom a place where mould simply doesn't want to live.
These aren’t big, time-consuming chores. They’re just small adjustments to your routine that will save you from having this same headache again in six months.
Make Ventilation Your Top Priority
Your number one ally in the fight against mould is air. Good, old-fashioned air circulation. Mould thrives in still, damp environments, so the goal is to get that moist air out of the room as quickly as possible.
- Use Your Exhaust Fan: Turn it on before you start the shower and leave it running for at least 15-20 minutes after you’re done. This pulls the steam and moisture out of the air before it can settle.
- Open a Window: If you have one, crack it open. Even a small gap can create a cross-breeze that helps dry things out much faster.
Public health advice in Australia now focuses heavily on prevention for this very reason. Simply improving ventilation can reduce indoor humidity to below 50%, which is linked to a 50–70% lower chance of mould popping up on silicone. It's surprising how few of us do it consistently, but it makes a massive difference. You can find out more about how ventilation impacts mould in homes.
A Quick Wipe Down Goes a Long Way
Another simple but incredibly effective habit is to wipe down wet surfaces after you shower. Keep an old towel or a squeegee handy in the shower.
Just give the shower screen, tiles, and especially the silicone seams a quick wipe. It only takes about 30 seconds, but it removes the standing water that mould needs to grow. Think of it as robbing the mould of its primary fuel source.
By taking away the moisture, you’re creating an environment that is actively hostile to mould. It’s a small daily action that has a massive preventative impact over time.
For even more tips, check out our complete guide on how to prevent mould in your bathroom, which offers a few more clever tricks to keep your space fresh and dry.
Got Questions About Silicone Mould?
Let's clear up some of the common questions that pop up when you're staring down stubborn mould on your silicone. It’s completely normal to have a few things you're not sure about, so here are some straight answers based on what I’ve seen out in the field.
Can I Just Paint Over Mouldy Silicone?
Oh, I wish it were that simple! But please, don't do it. Painting over mould is like putting a tiny band-aid on a gaping wound. You’re not actually fixing anything.
The mould is still alive and well underneath that fresh coat of paint. In fact, it'll happily feed on the paint, eat its way right through, and reappear looking even angrier than before. You absolutely have to kill and remove the mould at its source first.
Is Vinegar or Bleach Better for Killing Mould?
This is a great question, and the truth is, they both have different superpowers.
White vinegar is fantastic at killing mould right down to its roots, thanks to its acidity. Bleach, on the other hand, is brilliant for wiping out the surface stains and making the silicone look clean again, but it doesn’t always get the underlying growth that’s burrowed in deep.
For a powerful one-two punch, a lot of people I talk to clean with vinegar first to kill the mould at its source. Then, they follow up with a bleach-based cleaner to get rid of any ugly, lingering stains left behind.
How Do I Know if the Mould Is Dangerous?
Most of that common black stuff you see in bathrooms is more of an ugly nuisance than a major health crisis for healthy people. However, if you or someone in your home has asthma, allergies, or a compromised immune system, any type of mould can trigger symptoms.
If you're dealing with a large amount of mould that’s creeping beyond the silicone, or if you have any health concerns at all, it's always best to get a professional in to take a look. Better to be safe than sorry.
When the mould is too much to handle on your own, the team at That Cleaning Crew provides professional mould remediation services to keep your environment safe and healthy. Book a free on-site quote with us today!