Before we even get into killing mould on your walls, let's get one thing straight. Simply wiping away the visible spots is a complete waste of your time. You've got to deal with the underlying dampness that’s feeding it. If you don't, you're just setting yourself up for it to come roaring back, often worse than before.
Understanding Why You Have Wall Mould
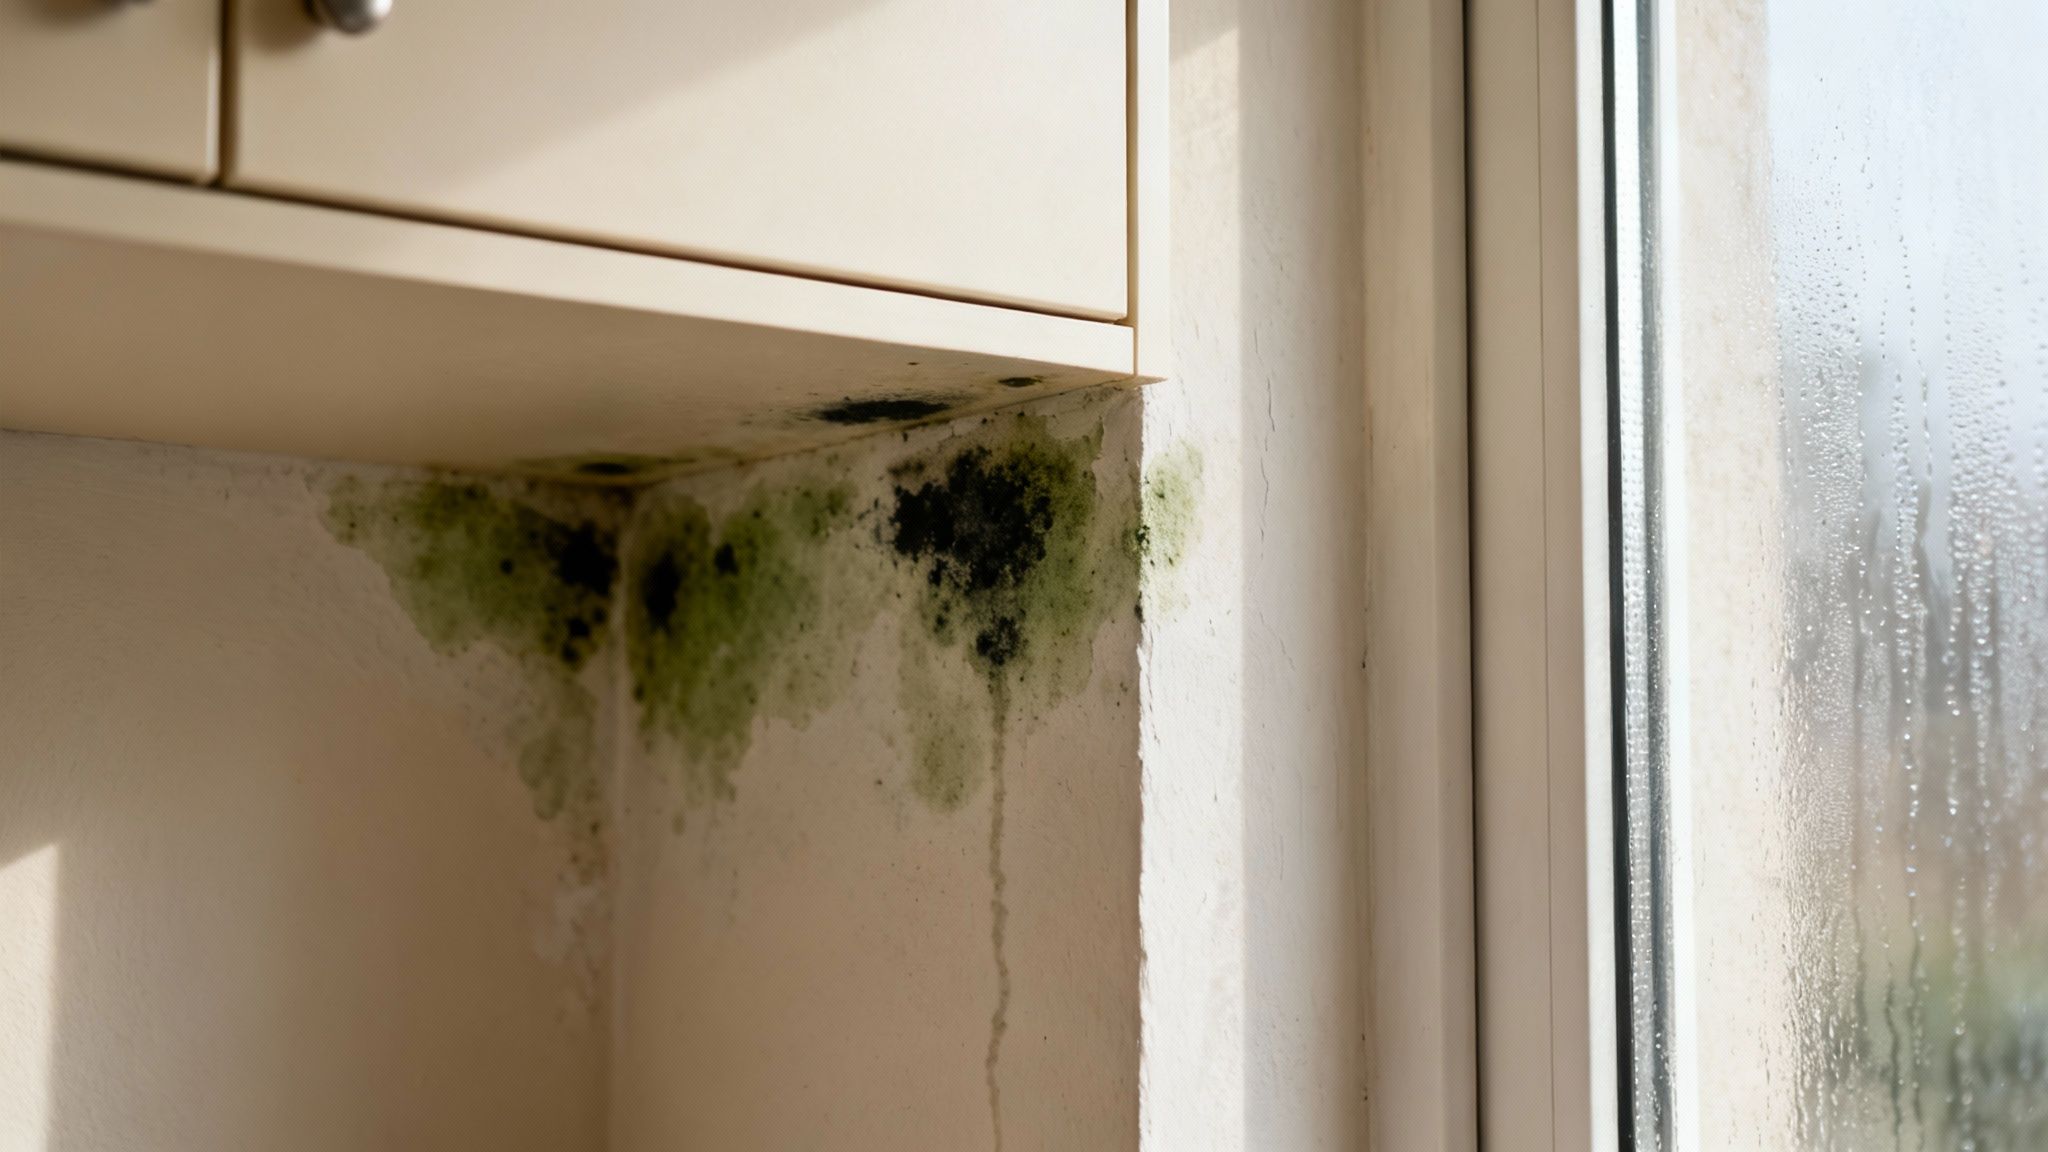
We've all seen it. That unmistakable musty smell that hits you the moment you walk into a room. Or maybe it’s those ugly, speckled patches creeping up a wall behind a cupboard or blooming in the corner of a ceiling.
So what's the first instinct? Grab the nearest spray bottle and blast it into oblivion. But hold on a second. Before you start scrubbing, you need to understand what you’re actually dealing with. Mould isn't just a dirty mark you can wipe away. Nope. It's a living fungus that has decided your building is a pretty great place to live, and it only needs one thing to thrive: moisture.
I've walked through countless properties where a tiny, ignored spot of dampness has snowballed into a huge, costly problem. Finding the 'why' behind the mould is the single most critical step you can take.
Playing Detective to Find the Source
If you don't find and fix the source of the water, that mould will come back. Guaranteed. You’ll just be cleaning up the symptoms, not curing the disease. It’s like trying to bail water out of a boat that has a massive hole in it… you can bail all day, but until you plug the hole, you're not getting anywhere.
So, let's put on our detective hats. The moisture source is almost always one of a few common culprits:
- Leaky Pipes: This could be a slow, sneaky drip inside a wall cavity from your bathroom or kitchen plumbing. Often, the first sign you’ll see is a discoloured or soft patch on the plasterboard. Sneaky.
- Poor Ventilation: Steam from showers, cooking, or even clothes dryers creates a humid environment. If that moist air has nowhere to go, it will condense on cool surfaces like walls and windows. This is the classic cause of bathroom and laundry mould.
- Condensation: In the cooler months, warm indoor air hitting cold windows or poorly insulated external walls can cause water droplets to form. This creates the perfect damp surface for mould spores to land on and settle in. It’s their dream home.
- Building Leaks: Issues like a cracked roof tile, blocked and overflowing gutters, or faulty window seals can let rainwater seep into your wall cavities, often going unnoticed for a very long time.
Here's a key takeaway before we move on: Your mission isn't just to learn how to kill mould on walls; it's to make your walls a place where mould can't live in the first place. Fixing the water problem is just as important as the cleaning itself.
Essential Safety Gear Before You Start Cleaning
Alright, before you dive in and start scrubbing, we need to have a serious chat. This part is absolutely non-negotiable, so please don't skip it.
When you disturb mould, even just by wiping it, it releases microscopic spores into the air. Think of it like kicking a dandelion head… those little seeds go everywhere. Except these "seeds" can cause some pretty nasty respiratory issues and allergic reactions if you breathe them in. So, let’s treat this with the respect it deserves.
Gearing Up The Right Way
We're not just talking about throwing on an old t-shirt and a pair of marigolds. To properly protect yourself while you figure out how to kill mould on walls, you need some specific gear. This isn't overkill. It's just smart.
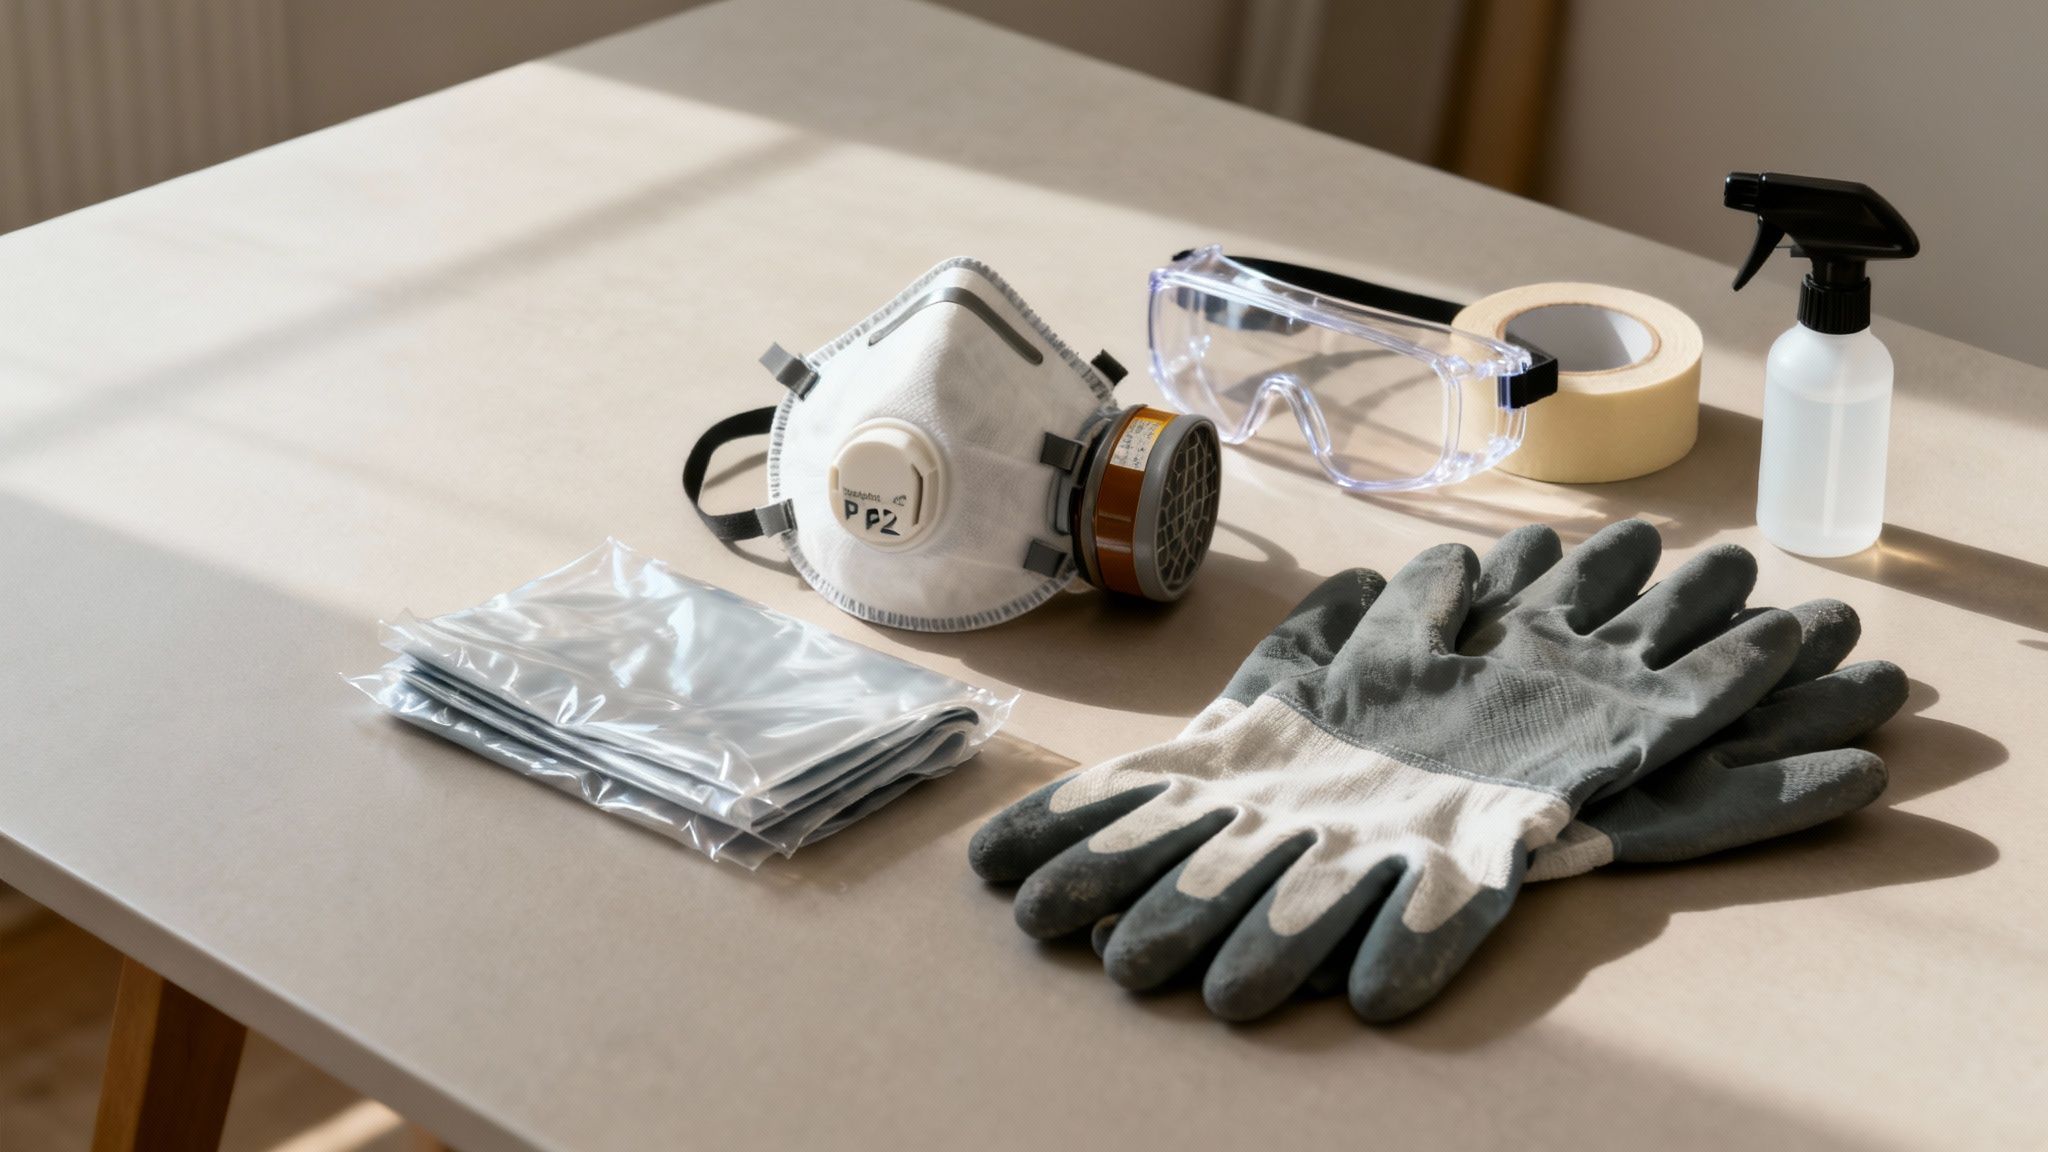
Your essential personal protective equipment (PPE) list includes:
- A Proper Respirator: This is the big one. Don't even think about using one of those flimsy paper dust masks. You need a P2-rated respirator mask (often called an N95 mask). This rating means it's designed to filter out very fine airborne particles, including those mould spores.
- Sealed Safety Glasses: You need goggles that seal around your eyes. Why? Because spores can easily irritate your eyes or enter your system through the mucous membranes. Your everyday glasses just won't cut it.
- Heavy-Duty Gloves: Choose non-porous gloves made from rubber, nitrile, or neoprene. You want something that extends up your wrist a bit, not short disposable ones that can let contaminated water run down your arm.
Taking an extra five minutes to put on the right gear can save you from weeks of potential health problems. It's a simple trade-off that's always, always worth it.
Containing the Work Zone
Now that you're protected, let's protect the rest of your place. The last thing you want is to clean the mould in one room only to find you've accidentally spread it to three others. Containment is key.
Start by sealing off the affected room from the rest of the property. Close the door, and if you can, slide an old towel along the bottom to block the gap.
If you’re dealing with a significant patch of mould, it's a great idea to create a sealed work zone. This sounds complicated, but it's really not. You can use heavy plastic sheeting and painter's tape to cover doorways and seal off any air vents in the room. This creates a little bubble… ensuring the airborne spores you kick up stay put. It's a simple step that makes a world of difference in preventing cross-contamination.
Ventilation is Your Best Friend
Next, you need to think about airflow. You want to ventilate the room you're working in, but you have to do it smartly. Don't just open a window and turn on a fan pointing into the room. That'll just blow spores everywhere.
Instead, place a box fan in an open window, facing outwards. This creates negative air pressure, actively pulling the contaminated air and spores out of the room and venting them directly outside. Just make sure all other windows and doors leading to other parts of the building are firmly closed.
This setup prevents the spores from taking a tour of your property via the air currents. It's a professional trick that's easy enough for anyone to do.
Finally, know when to fold 'em. If the mould patch is larger than about one square metre, if you suspect it's inside the walls, or if it was caused by contaminated water like a sewage leak… please stop. Your health is not worth the risk. At that point, the job is too big for a DIY approach, and it’s time to call in a professional who has the specialised equipment to handle it safely.
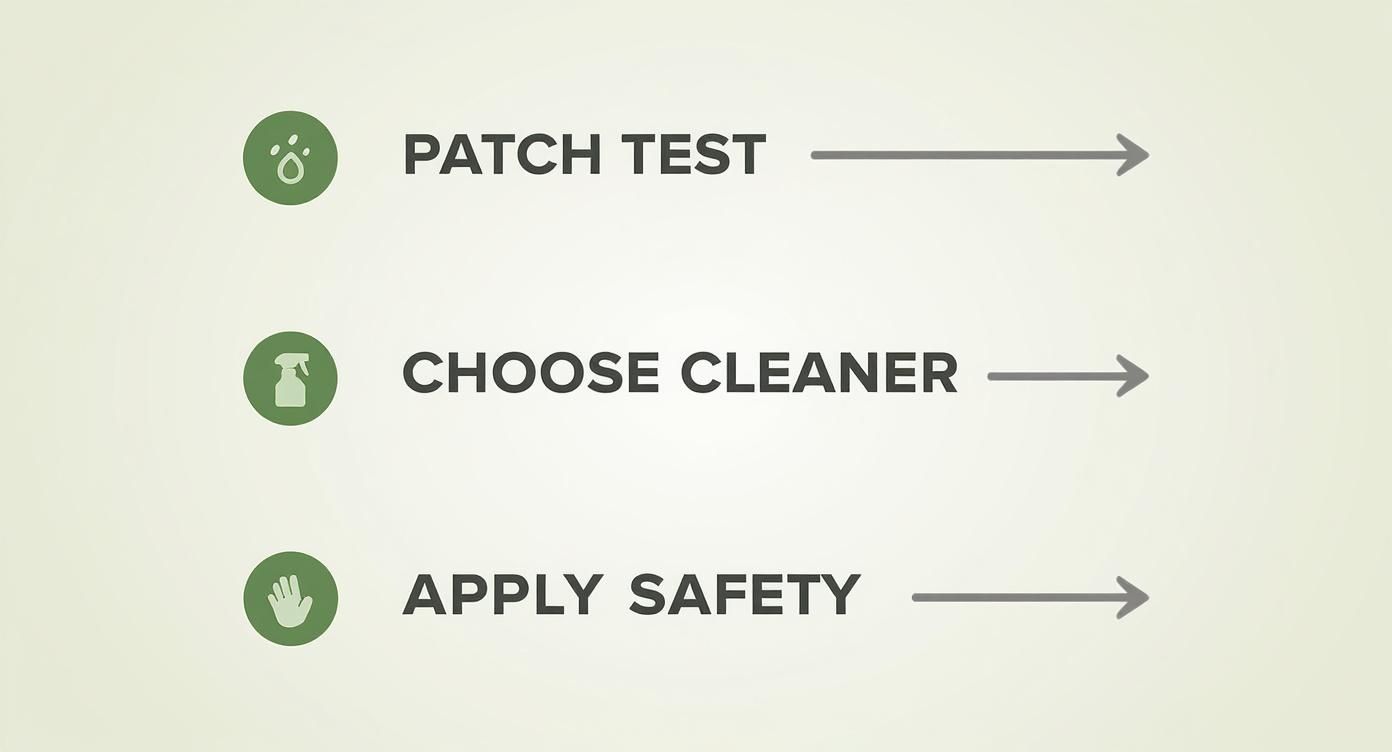
Choosing the Right Cleaner for Your Walls
Alright, you’re suited up in your PPE and the area is completely sealed off. Now for the most important decision: what are you actually going to use to kill the mould? This is where so many people get it wrong, often just grabbing the first bottle of whatever they find under the kitchen sink.
This is definitely not a one-size-fits-all job. The right cleaner depends entirely on the type of wall surface you’re dealing with. Trying to kill mould on a porous surface like unpainted plasterboard is a completely different ball game to tackling it on non-porous bathroom tiles.
What works brilliantly on one surface could damage another, or worse… be totally ineffective and let the mould grow right back. Let’s break down your options so you can pick the right tool for the job.
Common Mould Killers and What They’re Good For
You don’t always need to reach for a heavy-duty chemical solution. In many cases, simple household items can be incredibly effective, but you absolutely have to know their strengths and weaknesses.
- White Vinegar: This is my go-to for most porous surfaces. Because it’s acidic, vinegar can actually penetrate materials like plasterboard and wood to kill the mould at its roots. Bleach, on the other hand, often just cleans the surface, leaving the hidden roots intact to grow straight back. Clever, huh?
- Commercial Mould Removers: These products are specifically formulated to kill mould and usually contain fungicides. They’re a great choice for stubborn patches, especially on non-porous surfaces like tiles, glass, and sealed concrete. Just make sure you read the label carefully and follow the safety instructions to the letter.
- Diluted Bleach Solution: Bleach is effective at killing surface mould on hard, non-porous materials. Think bathroom tiles, shower screens, and sealed benchtops. However, it is not recommended for porous surfaces like plasterboard or wood. Its high water content can soak into the material and end up feeding the mould’s roots instead of killing them. Talk about a backfire.
We’ve explored a few more options in our detailed guide on finding a great natural mould killer, which you might find really useful. This is a massive issue for many Aussies, especially in damp climates. In fact, a 2023 survey found that in New South Wales, 20.6% of residents had mould in their homes in the past year, which is higher than the national average. You can get more insights on these Australian mould statistics from Compare the Market's full report.
Mould Cleaning Solutions: What to Use and Where
To make it even clearer, I've put the main options into a simple table. This should help you quickly see what to use and, just as importantly, what to avoid.
| Cleaning Agent | Best For (Surface Type) | How to Use | Safety Notes |
|---|---|---|---|
| White Vinegar | Porous Surfaces (Plasterboard, wood, wallpaper) |
Spray undiluted onto the surface and let it sit for at least one hour before scrubbing and wiping. | Ventilate the area well. The smell is strong but will fade as it dries. |
| Commercial Cleaner | Non-Porous Surfaces (Tiles, grout, sealed concrete) |
Follow the manufacturer's directions exactly. Pay close attention to the required 'dwell time'. | Always wear your PPE. These can be strong chemicals, so good ventilation is essential. |
| Bleach Solution | Hard, Non-Porous Surfaces (Ceramics, glass, sealed stone) |
Mix 1 part bleach to 10 parts water. Apply with a sponge and let it sit for 10-15 minutes before rinsing. | NEVER mix bleach with other cleaners, especially ammonia. This creates toxic chloramine gas. Use only in a very well-ventilated space. |
Remember, the goal is to kill the mould at its source, not just wipe away the surface stains. Using the wrong product can lead to regrowth and a much bigger headache down the track.
The All-Important Patch Test
Before you go spraying your chosen cleaner all over a visible wall, please do this one simple thing. It's a trick of the trade that has saved me from huge headaches over the years.
Always perform a patch test.
Find a small, hidden spot… maybe behind a piece of furniture or inside a closet… and apply a little bit of your cleaning solution. Let it dry completely. This lets you check for any discolouration or damage to the paint or wall surface before you commit to the whole area.
Trust me on this one. Taking five extra minutes to do a patch test is far better than having to repaint an entire wall because the cleaner you used stripped the colour right off.
By carefully matching your cleaning agent to your wall type and doing a quick safety test, you're setting yourself up for a successful removal. You'll not only get rid of the unsightly mould but do so safely and effectively, without causing any accidental damage along the way.
Your Practical Process for Removing Wall Mould
Alright, this is where the real work begins. You're geared up, the area is contained, and you've picked your cleaner. Let's walk through the actual cleaning process, turning what feels like a big chore into a clear, manageable plan.
First things first… let's talk scale. Not all mould patches are created equal, and knowing the size of the problem helps determine if this is a job for you or a professional. A useful guideline comes from the Canadian government, which is just as relevant here in Australia. They define small mould areas as 1 square metre or less, which you can typically handle yourself with the right precautions.
This is the point where safety and method really matter. Get these first steps right, and you're setting yourself up for success.
Starting with a patch test and choosing the right cleaner for your wall type is non-negotiable. It protects your surfaces and ensures the job gets done right the first time.
Applying Your Cleaner and Giving It Time
When you're ready to apply your solution… whether it's vinegar or a commercial product… don't just drench the wall. A spray bottle is your best tool here. It gives you control and helps you avoid messy drips and splashes.
Apply it evenly, making sure to cover not just the visible mould but also about 30cm around the patch. Mould isn't always visible to the naked eye, and this extra buffer helps catch any new growth that's just getting started.
Now for the most important… and most ignored… step: Dwell time.
You have to let the solution sit on the wall and do its job. This isn't like wiping a benchtop. The cleaner needs time to penetrate the surface and kill the mould at its roots. For vinegar, that’s at least an hour. For commercial products, follow the label's instructions to the letter. Don't rush this part. Seriously.
The Scrubbing and Rinsing Phase
Once the cleaner has had time to work its magic, it's time to scrub. But you don't need to go wild here. The goal is to physically remove the dead mould, not to gouge the wall.
- For painted plasterboard: A soft-bristled brush or a rough sponge is your best bet. A scrubbing brush that's too firm will damage the paint.
- For hard surfaces like tiles: A firm-bristled brush is perfect for getting into grout lines and removing stubborn spots.
After a gentle but thorough scrub, you need to rinse the area. Use a clean cloth dampened with plain water and wipe down the entire area to remove any remaining cleaning solution and dead mould residue. Use a fresh cloth for each pass if you can.
Don’t reuse the same mouldy cloths for other cleaning jobs. It's one of the fastest ways to spread spores to other parts of the building. Once you’re done, they go straight in the bin.
Drying Is Everything
This next step is absolutely critical. Leaving a wall even slightly damp is like rolling out a welcome mat for mould to come straight back. The area needs to be bone dry.
Get the windows open and use fans to circulate the air. If you're in a humid area or a poorly ventilated room like a basement, a dehumidifier is your best friend. Let it run for at least 24 to 48 hours to pull every last bit of moisture out of the air and the wall itself.
Safe and Final Disposal
You've done the hard work, so let's finish strong. All the materials you used… cloths, sponges, plastic sheeting… are now contaminated with mould spores.
Carefully roll up any plastic sheeting you put down, folding it inwards to trap the debris. Place it, along with your used cloths, sponges, and even your disposable gloves, into a heavy-duty rubbish bag. Seal the bag tightly inside the room you were working in, then take it straight outside to an external bin.
Cleaning up properly is just as important as the cleaning itself. It ensures you’re truly rid of the problem and not leaving any stray spores behind to start the cycle all over again. For larger, more complex situations where a DIY approach just won't cut it, it's always wise to look into expert mould remediation services to ensure the job is handled completely and safely.
Long Term Strategies for Mould Prevention
Okay, so you've done the hard work. The wall is clean, dry, and mould-free. Fantastic. But the last thing you want is to be doing this all over again in six months, right?
Now we shift from being reactive to proactive. It’s all about making your building an unwelcome place for mould to even think about settling down. The entire game plan comes down to one simple, powerful concept: moisture control.
Mould needs water to survive. It’s that simple. If you take away its water source, it can't grow. This means changing the environment so that dampness doesn't get a chance to build up in the first place.
Master Your Airflow and Humidity
Think about the usual suspects… bathrooms, laundries, kitchens, and basements. These are the hotspots where steam and moisture are constantly being generated. Without good airflow, that humid air just sits there, eventually condensing on cooler surfaces like walls.
Proper ventilation is your number one weapon.
- Exhaust Fans are Non-Negotiable: Make sure every bathroom and kitchen has a powerful, functioning exhaust fan. And don't just run it during a shower. Let it run for a good 20-30 minutes afterwards to properly clear the steam.
- Create Cross-Ventilation: Whenever possible, open windows and doors on opposite sides of a room or building to create a natural breeze that pushes stale, moist air out.
- Don't Block Air Vents: It sounds obvious, but you’d be surprised. Check that furniture, boxes, or equipment aren't blocking air vents, which would stop them from doing their job.
The goal is to keep your indoor humidity levels between 30% and 50%. In damp climates or during particularly wet seasons, a good quality dehumidifier can be an absolute game-changer. It actively pulls moisture from the air, making the environment much less inviting for mould. This is a critical part of knowing how to kill mould on walls for good, because you’re stopping it before it even starts.
It's worth remembering that this isn't just about property damage. The health benefits of getting this right are massive. In Australia, successfully managing indoor dampness and mould could lead to thousands of additional health-adjusted life years by reducing respiratory illnesses. You can learn more about these important findings on the connection between housing and health from this CSIRO research.
Become a Maintenance Detective
You don't need to be a builder to spot potential problems. A few simple, regular checks can save you a world of pain down the track.
Think of it like a routine health check-up for your building. Once every few months, take a walk around and look for these common trouble spots:
- Leaky Taps and Plumbing: Check under sinks for any signs of slow drips or water stains.
- Clear Roof Gutters: Clogged gutters cause water to overflow and run down external walls, where it can easily seep inside.
- Window and Door Seals: Look for cracked or shrinking seals that could be letting in moisture, especially during heavy rain.
- Check for Condensation: Take note of windows that regularly have condensation on them. This is a clear sign of high indoor humidity.
Beyond immediate cleaning, understanding the bigger picture of moisture management is crucial. You can explore further insights into how to avoid mold in your home and damp buildings to build on these strategies.
Finally, what about special paints? Mould-resistant paints can be a great final line of defence, especially in high-humidity areas. They contain antimicrobial agents that make it harder for mould to take hold. Just remember, they are not a magic bullet. You must still clean the mould and fix the underlying moisture issue first. Think of it as an extra layer of armour, not the entire solution. You can find more practical tips in our other article about how to get rid of mould.
Common Questions About Mould Removal
After tackling a mould issue, it’s natural to have a few lingering questions. It's a messy business, and you want to be certain you've done everything right.
Over the years, I've heard the same handful of questions from clients and even other contractors. Let's run through them with some clear, practical answers. No jargon, just what you need to know.
Can I Just Paint Over Mould?
Let's get this one sorted straight away. The answer is a hard no.
Painting over mould is like throwing a tarp over a leaky roof. It might hide the problem for a week or two, but it does absolutely nothing to fix it. Underneath that fresh coat of paint, the mould is still alive and well.
It will continue to grow, feed on the plasterboard, and release spores. Eventually, it will push right through the new paint, leaving you with a bigger, more stubborn mess than you started with.
You must always kill and remove the mould first. Once it's gone, let the area dry out completely. Only then should you apply a good quality, stain-blocking primer before you even think about painting.
What Is the Difference Between Mould and Mildew?
It's easy to confuse these two. They’re both types of fungi and both thrive in damp spots. The simplest way to think about it is that mildew is mould's less aggressive, surface-level cousin.
Here’s a quick way to tell them apart:
- Mildew is a surface fungus. It's usually powdery or fluffy and looks grey or white. You'll often spot it on shower grout or window sills. The good news is it's generally easy to wipe away with a standard cleaner.
- Mould is the one to worry about. It often looks fuzzy or slimy and comes in darker shades like deep green or black. The key difference is that mould grows roots (called hyphae) that dig deep into materials like wood and plasterboard, making it far more difficult to get rid of completely.
While neither is a welcome sight, mould is the one that poses a much greater risk to both your building's structure and people's health.
When Should I Call a Professional Mould Remover?
Knowing when to step back and call for help is the most critical part of dealing with mould. Some jobs are fine for a bit of DIY, but there are clear signs when a problem needs professional expertise.
It's time to call in an expert if you see any of these red flags:
- The mould covers a large area. If the patch of mould is bigger than one square metre, it's best to stop. The risk of sending a massive cloud of spores into the air is too high to manage without proper containment and specialised gear.
- You can smell mould but can't see it. A persistent, musty smell you can't trace is a huge warning sign. It often means mould is growing out of sight… inside a wall, under the floor, or in the ceiling space. A professional uses tools like moisture meters and thermal cameras to locate the source without having to tear your building apart.
- There’s a health risk involved. If anyone in the building has a compromised immune system, asthma, or other respiratory issues, don't risk it. Professionals are trained to handle remediation safely and thoroughly. For complex jobs, especially in commercial spaces, getting the right team for professional mould removal on the Central Coast is always the safest and most effective choice.
When mould problems go beyond a simple fix, you need a team you can rely on. That Cleaning Crew provides expert mould remediation services that don't just clean the surface but address the root cause, ensuring a safe and healthy environment for your staff and visitors. Get your free on-site quote today.