You can often tackle small spots of mould on your carpet yourself with a simple mix of white vinegar and water. Yep, that's it. But when you're facing a larger or deeper infestation, it's almost always a job for professional remediation. This is the only way you can be certain every last spore is gone. From the carpet, the underlay, and even the subfloor beneath.
Dealing With That Musty Smell in Your Carpet
That damp, musty smell… you know the one. It’s usually the very first sign that something isn’t quite right under your feet.
Finding mould on your carpet can feel a bit overwhelming. Your first thought is probably, "Where on earth do I even start?" Trust me, it’s a common headache in Australian homes, especially with our humid climates. You’re definitely not alone in this.
Why You Can't Ignore Carpet Mould
Mould isn't just an ugly stain or a bad smell. It's a living thing that pumps spores into the air, which can cause real problems for your home's air quality and your family's health.
Think of it like a weed. If you only pull the top off, the roots are still there… just waiting to pop back up as soon as the conditions are right again. This is especially true for carpets, where the dense fibres and thick underlay are perfect hiding spots for moisture. An ideal breeding ground, really.
Before you know it, a small, unnoticed spill has turned into a thriving mould colony.
It’s a surprisingly widespread issue. Research shows that mould is a persistent problem in Aussie homes, with some studies estimating that between 10% and 50% of dwellings are affected at any given time. Actually, one CSIRO report found that of nearly 600 households surveyed, a staggering 21.7% reported severe mould problems.
The Source Is Everything
So, what's causing it? Mould only needs one key ingredient to thrive. Moisture. Figuring out where that moisture is coming from is the most critical step in winning this battle.
Common culprits I see all the time include:
- High humidity from poor ventilation, especially in bedrooms or living areas.
- Spills that weren't cleaned up and dried out completely.
- Slow leaks from indoor plants, windows, or even hidden pipes.
- Condensation that builds up around windows and drips onto the carpet.
If that musty smell hangs around even after you've cleaned the visible mould, you might be dealing with a hidden issue. It's often worth getting professional help to detect hidden water leaks before you go any further. Finding and fixing the source is non-negotiable… otherwise, the mould will just keep coming back.
The biggest mistake people make is cleaning the visible mould without fixing the underlying moisture problem. It’s like mopping up a puddle while the tap is still running… you’re just creating more work for yourself later on.
Throughout this guide, we'll break down exactly what you're up against and give you a straightforward plan to tackle it. This isn't about getting bogged down in complex science. It's about practical, real world steps you can take right now.
For some more general tips, you can also check out our detailed guide on https://www.thatcleaningcrew.com.au/how-to-get-rid-of-mould/ around your home. Let's get into it.
Assembling Your Mould Removal Toolkit
Before you even think about scrubbing, let's get your gear sorted. This isn't your average cleaning job. You're dealing with something that can seriously impact your health, so we’re putting safety at the top of the list. No exceptions.
Think of it like being a surgeon for your carpet. You wouldn't want a doctor operating without the right tools and protective gear, would you? The same idea applies here. Having everything ready to go makes the whole process smoother, safer, and a lot more effective.
Your Personal Protective Equipment (PPE)
This is the non negotiable part of the list. Seriously. Mould spores are tiny and can easily get into your lungs or irritate your skin, so don't even think about skipping this. It might feel like overkill for a little spot on the carpet, but trust me, it’s not.
You will absolutely need:
- A P2 Mask: A standard paper dust mask just won’t cut it here. You need a proper P2 rated respirator designed to filter out fine particles like mould spores.
- Safety Glasses or Goggles: Keep cleaning solutions and airborne spores out of your eyes. It’s a simple step that prevents a lot of potential pain.
- Sturdy Gloves: Go for thick, reusable rubber gloves. Thin disposable ones can tear easily, leaving your hands exposed to mould and cleaning chemicals.
Getting this stuff together is your first line of defence. It’s what keeps you safe while you work on making your home safe again.
Choosing Your Cleaning Solutions
Now, let's talk about what you'll actually use to fight the mould. You don't always need to reach for the harshest chemical you can find. For small jobs, some everyday heroes from your pantry are often more than enough.
A simple mix of 50/50 white vinegar and water in a spray bottle can be surprisingly effective on minor spots. Vinegar is a fantastic natural cleaner that helps kill mould on the surface. Bi-carb soda is another great tool. Sprinkling it on first can help draw out moisture and odours before you start scrubbing.
However, if you're up against a more stubborn patch or just want extra peace of mind, a specialised store bought mould remover might be the better option. Just be sure to read the label carefully and test it on a hidden area of your carpet first to check for any discolouration.
If you want to stick with natural options, our guide on creating a powerful natural mould killer has some great recipes and tips.
The Right Tools for the Job
Finally, let's gather the hardware. Having these items on hand will make the actual cleaning process much less of a chore. And far more effective.
The goal isn't just to clean the mould you see. It's to create an environment where it can't come back. That means removing moisture is just as important as scrubbing the stain.
Here’s your essential toolkit:
- A Stiff Brush: You need something with firm bristles to work the mould out of the carpet fibres. Just make sure it’s not so harsh that it damages the carpet itself.
- Spray Bottles: Keep one for your vinegar solution and a separate one for plain water, which you'll use for rinsing the area afterwards.
- A Wet-Dry Vacuum: This is a total game changer. It’s brilliant for sucking up the cleaning solution and, more importantly, pulling as much moisture as possible out of the carpet when you're done.
- A Dehumidifier and Fans: These are crucial for the final, and most important, step. Drying. Getting the carpet completely bone dry is the only way to guarantee the mould won't just start growing again.
A Practical Process for Removing Carpet Mould
Alright, let's roll up our sleeves and get this done. You've got your gear ready, you know what you're up against, and now it's time to actually get that mould out of your carpet. We're going to walk through this logically, so you know exactly what to do and feel confident doing it.
First things first. Containment. People often skip this, and it’s a huge mistake.
Mould spores are microscopic travellers. Think of them like glitter. If you disturb them without any precautions, they’ll float off and settle everywhere, ready to start a new colony. We definitely don't want that.
Before you start scrubbing, close the door to the room. If it’s an open plan area, you can even hang plastic sheeting to section it off. Turn off any fans or air conditioning that might blow the spores around. The goal is to keep the problem contained.
This handy visual breaks down the core stages of the removal process.
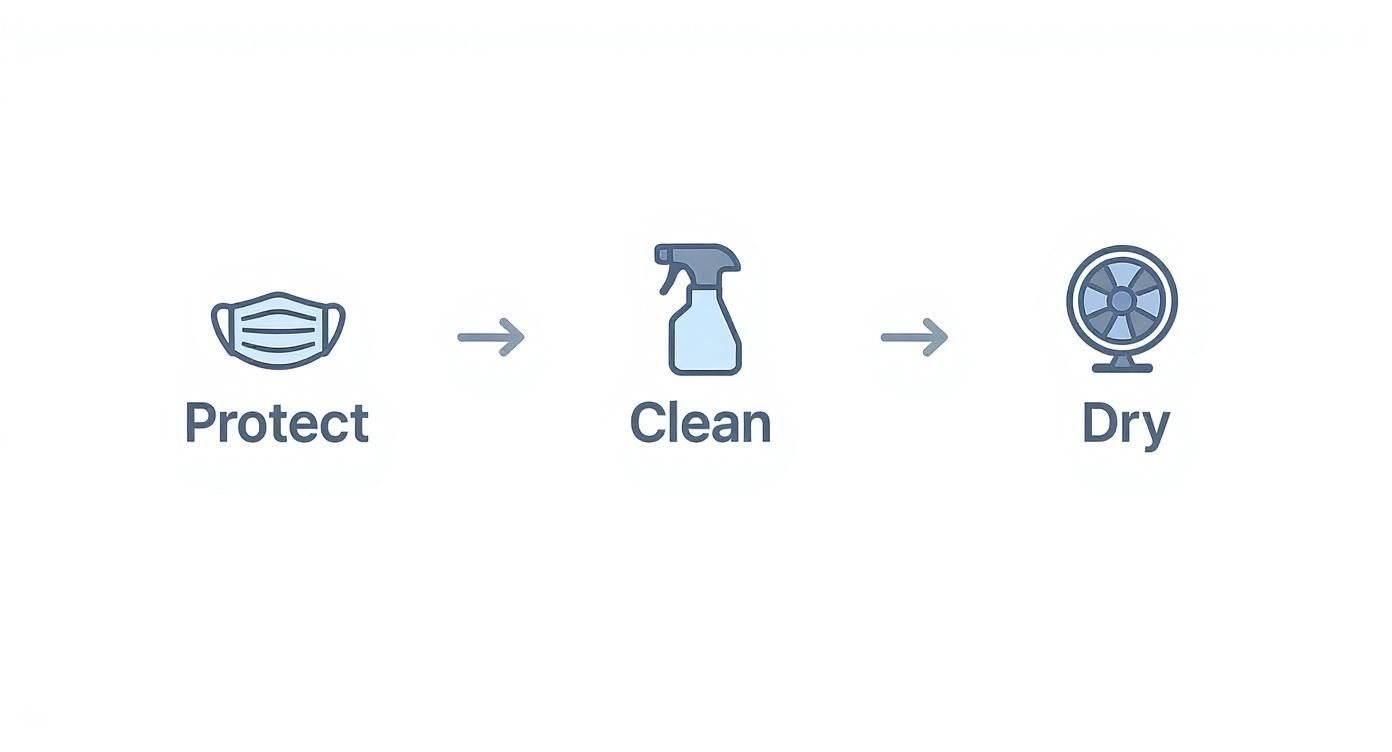
As you can see, the process is straightforward when you boil it down. Protect yourself, clean the mould, and then dry everything completely.
Applying Your Cleaning Solution
Now for the cleaning part. Whether you're using a vinegar solution or a store bought product, how you apply it is key. You don't want to absolutely soak the carpet. That would be counterproductive, right? Adding too much moisture is what got us into this mess in the first place.
Instead, lightly mist the affected area with your spray bottle. Let it sit for about 10 to 15 minutes. This gives the solution time to work its magic and start breaking down the mould.
After it has soaked in, it’s time to scrub. Grab your stiff bristled brush and work on the area using gentle, circular motions. You're trying to lift the mould out of the carpet fibres, not grind it further in or damage the carpet itself. Be firm but not aggressive.
You should start to see the visible mould lifting away. Once you’re satisfied, lightly spray the area with clean water and blot it with a clean, dry cloth. Don't rub… just blot. The idea is to soak up the cleaning solution and the loosened mould residue.
The Drying Stage is Non-Negotiable
Okay, this part is absolutely critical. If you take one thing away from this whole guide, let it be this: your carpet must get completely, totally, bone dry. Any lingering dampness is an open invitation for the mould to come right back. And it will.
This is where your fans and dehumidifier come into play. Set them up around the cleaned area and let them run for as long as it takes. We’re talking hours. Maybe even a full day or two, depending on the humidity in your home.
Point fans directly at the damp patch to speed up surface evaporation. Run a dehumidifier in the room to pull excess moisture out of the air, creating a much drier environment that helps the carpet release its own moisture.
Keep checking the carpet, the underlay, and even the floor beneath if you can. Don't just trust how it feels on the surface. Press down firmly with a dry paper towel. If it picks up any moisture at all, it's not dry enough. Keep going.
It’s also important to know when a DIY job is out of its depth. According to WorkSafe Queensland, you can often handle small spots of mould (less than one square metre) on your own. For these smaller jobs, they suggest a simple detergent and water mix.
However, for anything larger, it's a different story. The advice is clear that porous materials like carpets that have been wet for over 48 hours should be discarded, as cleaning is unlikely to be fully effective. You can find more detailed official guidance on managing mould safely from WorkSafe Queensland.
For those larger or more stubborn infestations, DIY methods often fall short. That's when calling for professional mould remediation services is the smartest and safest move. Professionals have the specialised equipment to extract all moisture and ensure every last spore is eliminated for good.
When Mould Reaches the Carpet Underlay
This is where things can get a lot more complicated. It’s a common question, though, and one we need to tackle head on: what happens if you lift a corner of the carpet and find the mould has spread to the underlay?
I'll be direct with you… this is usually the point where a DIY job turns into a much bigger task.
Carpet underlay acts like a giant, dense sponge. Once mould establishes itself in that porous material, it's almost impossible to completely remove every single spore. You might clean the surface, but the microscopic roots are often still there, deep inside… just waiting for the slightest hint of moisture to bloom all over again.
Why Cleaning Underlay Rarely Works
Trying to clean mouldy underlay often just delays the inevitable. You can scrub and treat the surface, but you can’t force a cleaning solution deep into every nook and cranny of that spongy material. It’s a bit like trying to get all the Vegemite out of a piece of toast once you've spread it. It’s in there for good.
Even if it looks clean on top, you're likely leaving behind a hidden network of mould spores ready to cause problems later.
This view is shared by experts right across Australia. For instance, even a popular DIY resource like the Bunnings Workshop advises that mould in carpet underlay isn't something you can typically fix. Their recommendation is clear. It should be replaced to stop the mould from simply growing back. You can discover more insights about their advice on their community forum if you'd like to read more.
Making the Tough Call
So, how do you know if the problem has gone beyond the carpet itself? There are a few dead giveaways.
- A strong, persistent musty smell that doesn’t go away even after cleaning the carpet.
- The carpet feels spongy or damp in certain areas long after any spills.
- Visible discolouration or dark stains on the underlay when you pull back a corner of the carpet.
- The floorboards beneath feel soft or show signs of water damage.
If you’re seeing any of these, replacement is almost always the safest and most effective solution. It can be a tough pill to swallow, I know. No one wants the extra expense and hassle. But trust me, making this call now can save you significant headaches and potential health concerns down the line.
It's better to invest in replacing the underlay and dealing with the issue properly once, than to find yourself fighting a losing battle with recurring mould every few months.
If the damage is extensive and replacement is the only real option, you may need to consider professional junk removal services for the safe and proper disposal of the contaminated materials. Dealing with large amounts of mouldy carpet and underlay requires care to avoid spreading spores elsewhere in your home. It's often a job best left to people who handle it every day.
Preventing Mould From Coming Back
You’ve done the hard work. The scrubbing, the drying, the worrying… and the mould is gone. That’s a fantastic feeling.
But now for the big question. How do you make sure it stays gone for good?
Mould doesn't just appear from nowhere. It’s not bad luck. It grows because the conditions are just right, and the number one condition it craves is moisture. So, the key to long term prevention is to become a bit of a detective and hunt down that moisture source.
Become a Moisture Detective
Think of your home as an ecosystem. When it’s out of balance, things like mould start to thrive. Our job is to restore that balance by controlling the one thing mould can’t live without.
So, where is this moisture coming from? In my experience with Australian homes, it’s usually one of a few common culprits.
- Sneaky Leaks: A slow drip from a pipe behind a wall or a dodgy window seal can introduce a steady, hidden supply of water.
- Poor Ventilation: Rooms without good airflow, like bathrooms, laundries, or stuffy bedrooms, trap humid air right where you don’t want it.
- Condensation: This is a big one, especially in winter. Moisture from the air collects on cold surfaces like windows and walls, eventually dripping down onto the carpet.
- Everyday Life: Even just cooking, showering, and breathing releases moisture into the air. Without a way for that moisture to escape, it builds up.
Getting to the root of the problem is everything. You have to stop the water source, otherwise you’ll find yourself cleaning up mould again in a few months.
Your Game Plan for a Dry Home
Keeping your home dry doesn't have to be complicated. It’s all about creating small, consistent habits that make your home a less inviting place for mould. This is your long term plan for a healthy, mould free space.
Here are some practical, easy to implement strategies that make a huge difference.
Your goal isn't just to have a dry carpet. It's to create an environment where moisture can't linger. Think of it as mould proofing your entire living space, one small change at a time.
Ventilation is Your Best Friend
- Open Windows Daily: Even for just 15-20 minutes a day, this simple act helps to flush out stale, humid air and bring in fresh, dry air. It's a game changer.
- Use Exhaust Fans: Always run the fan in your bathroom during and after a shower, and in the kitchen when you're cooking. Let it run for at least 10 minutes afterwards to clear the steam.
- Create Cross Breezes: Where possible, open windows on opposite sides of the house to create a natural airflow that literally pushes moisture out.
Invest in the Right Tools
A good dehumidifier is a lifesaver, especially for rooms that are naturally damp or have poor airflow. It actively pulls moisture from the air, keeping humidity levels in check. The goal is to keep your indoor humidity below 50%.
Smart Carpet Care Habits
Finally, let's talk about the carpet itself. How you care for it day to day plays a massive role in preventing mould from ever getting a foothold again.
The golden rule is simple. Deal with spills immediately.
Don't just wipe the surface. Blot the spill with a clean, dry towel, pressing down firmly to absorb as much liquid as possible from the carpet and the underlay. Once you've soaked up all you can, point a fan at the spot for a few hours to ensure it dries completely.
Regular vacuuming also helps. Using a vacuum with a HEPA filter can remove microscopic mould spores that might have settled on the carpet before they have a chance to find moisture and grow.
By combining these strategies—controlling moisture, improving ventilation, and practising good carpet care—you're not just cleaning up a problem. You're changing the environment so that the problem can't come back. You’re taking back control.
Common Questions About Carpet Mould Removal
Alright, let's wrap up by tackling some of the questions I hear all the time. These are often the thoughts that pop into your head right in the middle of cleaning, causing that moment of doubt.
Think of this as a quick fire round to give you that last bit of confidence before you get started.
Can I Just Use Bleach to Kill the Mould?
This is probably the number one question, and it's a really important one. The short answer is… please don't. While it feels like bleach should be the ultimate mould killer, it’s actually not a great choice for carpets.
Here’s the thing. Bleach is fantastic at killing surface mould on non porous things like tiles. But carpets are soft and porous. Bleach often just removes the colour from the visible mould, making you think it's gone, but it doesn't always kill the roots hiding deep in the fibres.
Even worse, bleach can damage and discolour your carpet fibres, leaving you with a permanent, faded patch. And if it soaks through, it can even start to break down the carpet backing over time. It’s just not worth the risk when things like vinegar are safer and more effective for this specific job.
What Is the Difference Between Mould and Mildew?
It's easy to get these two confused because they’re both types of fungi that love damp spots. The main difference is usually how they look and where they grow.
- Mildew is typically a surface fungus. It often looks powdery and is usually grey or white. You'll find it on damp surfaces like bathroom tiles or window sills where moisture collects.
- Mould is a bit more sinister. It's often fuzzy or slimy in texture and can be black, green, or even orange. The biggest difference is that mould tends to penetrate deeper into the material it’s growing on… like your carpet and underlay.
Basically, think of mildew as the annoying cousin and mould as the truly unwelcome house guest you need to evict properly.
How Can I Be Sure the Mould Is Really Gone?
This is the million dollar question, isn't it? After all that work, you want peace of mind. The most reliable way to tell is with your nose and your eyes.
Once the area is completely dry, the musty smell should be gone. If that odour lingers, it's a strong sign that there’s still moisture—and possibly mould—hiding in the underlay or subfloor.
If the visible stain is gone and the musty smell has completely disappeared after drying, you've likely succeeded. But if that smell creeps back after a few days, it's time to investigate deeper or call in a professional.
Another tell tale sign is recurrence. If you see the same spot reappear within a few weeks, it means the initial clean didn't get to the root of the problem, or the original moisture source hasn't been fixed.
Will Steam Cleaning Get Rid of Mould?
Steam cleaning can be a great tool, but it's a bit of a double edged sword when it comes to mould. Yes, the high heat from a steam cleaner can kill mould spores. That's the good news.
The bad news is that it also introduces a lot of moisture deep into the carpet and underlay. If that moisture isn't extracted immediately and completely with a powerful commercial grade vacuum, you've just created the perfect five star resort for mould to grow back even stronger.
So, while it can be part of a professional remediation process, just renting a machine and doing it yourself can easily make the problem worse. It's a risky move unless you're absolutely certain you can get the carpet bone dry very, very quickly.
When DIY methods aren't enough, you need a team you can trust to handle the problem safely and completely. That Cleaning Crew provides professional mould remediation services to ensure your home is healthy and mould-free for good. Get a free on-site quote from us today!