Bathroom mould remediation isn't just a fancy term for a big clean. It's a professional-grade process. You see, it's not about just wiping away what you can see on the surface. It's about finding the source, containing the problem, and completely removing mould from a bathroom… and then tackling the moisture issue that started it all so it doesn't just come roaring straight back. It's a process that's way more involved than a simple wipe-down. It's about getting rid of the mould spores for good and making sure your bathroom is no longer a happy home for them.
You've Found Mould In a Bathroom… What Now?
It’s a moment every facilities manager dreads, isn't it? You’re doing a routine walkthrough, you open a bathroom door, and there it is. Those tell-tale dark specks creeping across the ceiling or staining the grout lines. Your first thought might be to call for a cleaner with a spray bottle and a scrubbing brush.
Stop. Right there. For any commercial property, that's often the worst move you could make.
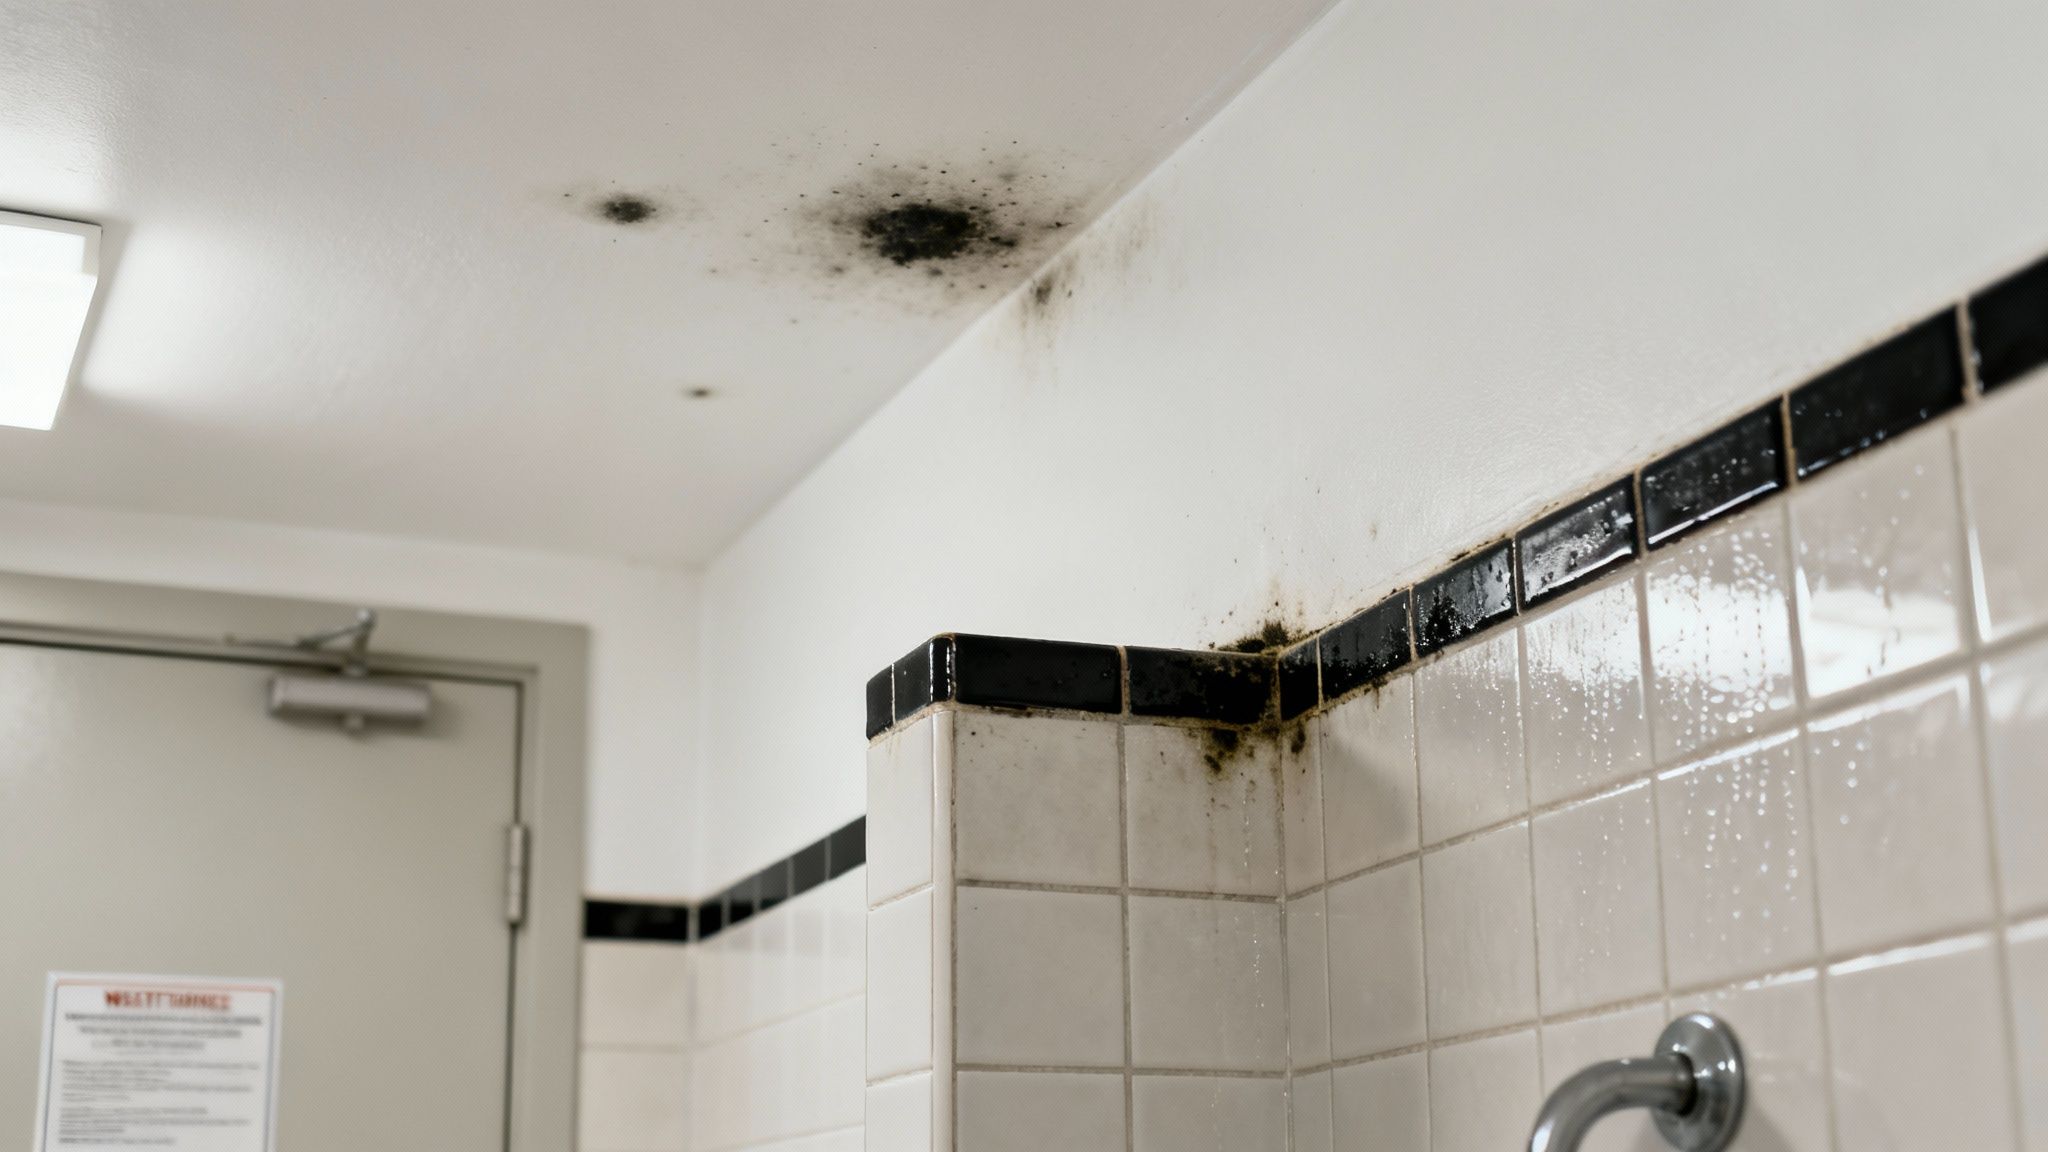
What you’re looking at isn’t just a cleaning task. It's a potential threat to the health of anyone using the space, to the building's structural integrity, and even a liability risk for your organisation.
Why a Quick Scrub Isn't Enough
When you attack visible mould with a brush, you disturb the colony. Picture kicking the head off a dandelion. Sure, the yellow flower is gone, but you've just launched thousands of tiny seeds into the wind. It's a perfect storm. And mould spores behave in exactly the same way. A vigorous scrub sends them airborne, where they can easily float off to find other damp spots to land and start new colonies all over again.
This is a massive issue across Australia. A 2023 study highlighted that 18% of Australian rental properties had mouldy bathrooms. This isn’t just about looks; exposure to mould is linked to a 20% increase in asthma-related hospitalisations in affected regions. That statistic alone shows just how serious the health implications can be for anyone using your facilities.
Your first job isn't to clean, it's to contain. Your immediate goal is to stop a small, localised problem from becoming a building-wide contamination nightmare.
Your Immediate Action Plan
So, what should you do in that first minute? Don't panic. A methodical approach is your best friend here. Your immediate priorities should be:
- Pinpointing the moisture source. Mould can't survive without water. Is there a leaky pipe? Poor ventilation from a faulty exhaust fan? Or just persistent condensation? Often, the very first step is getting the moisture under control, like fixing shower leaks, to cut off the mould's life support.
- Assessing the scale of the problem. Is it a small surface patch, or are there signs it’s creeping out from behind the plasterboard or tiles?
- Preventing cross-contamination. This means thinking strategically about how to deal with the area without accidentally spreading spores to other parts of the building.
Consider this guide your roadmap. We'll walk you through a professional-grade process, helping you turn that initial moment of discovery into a calm, controlled, and effective response.
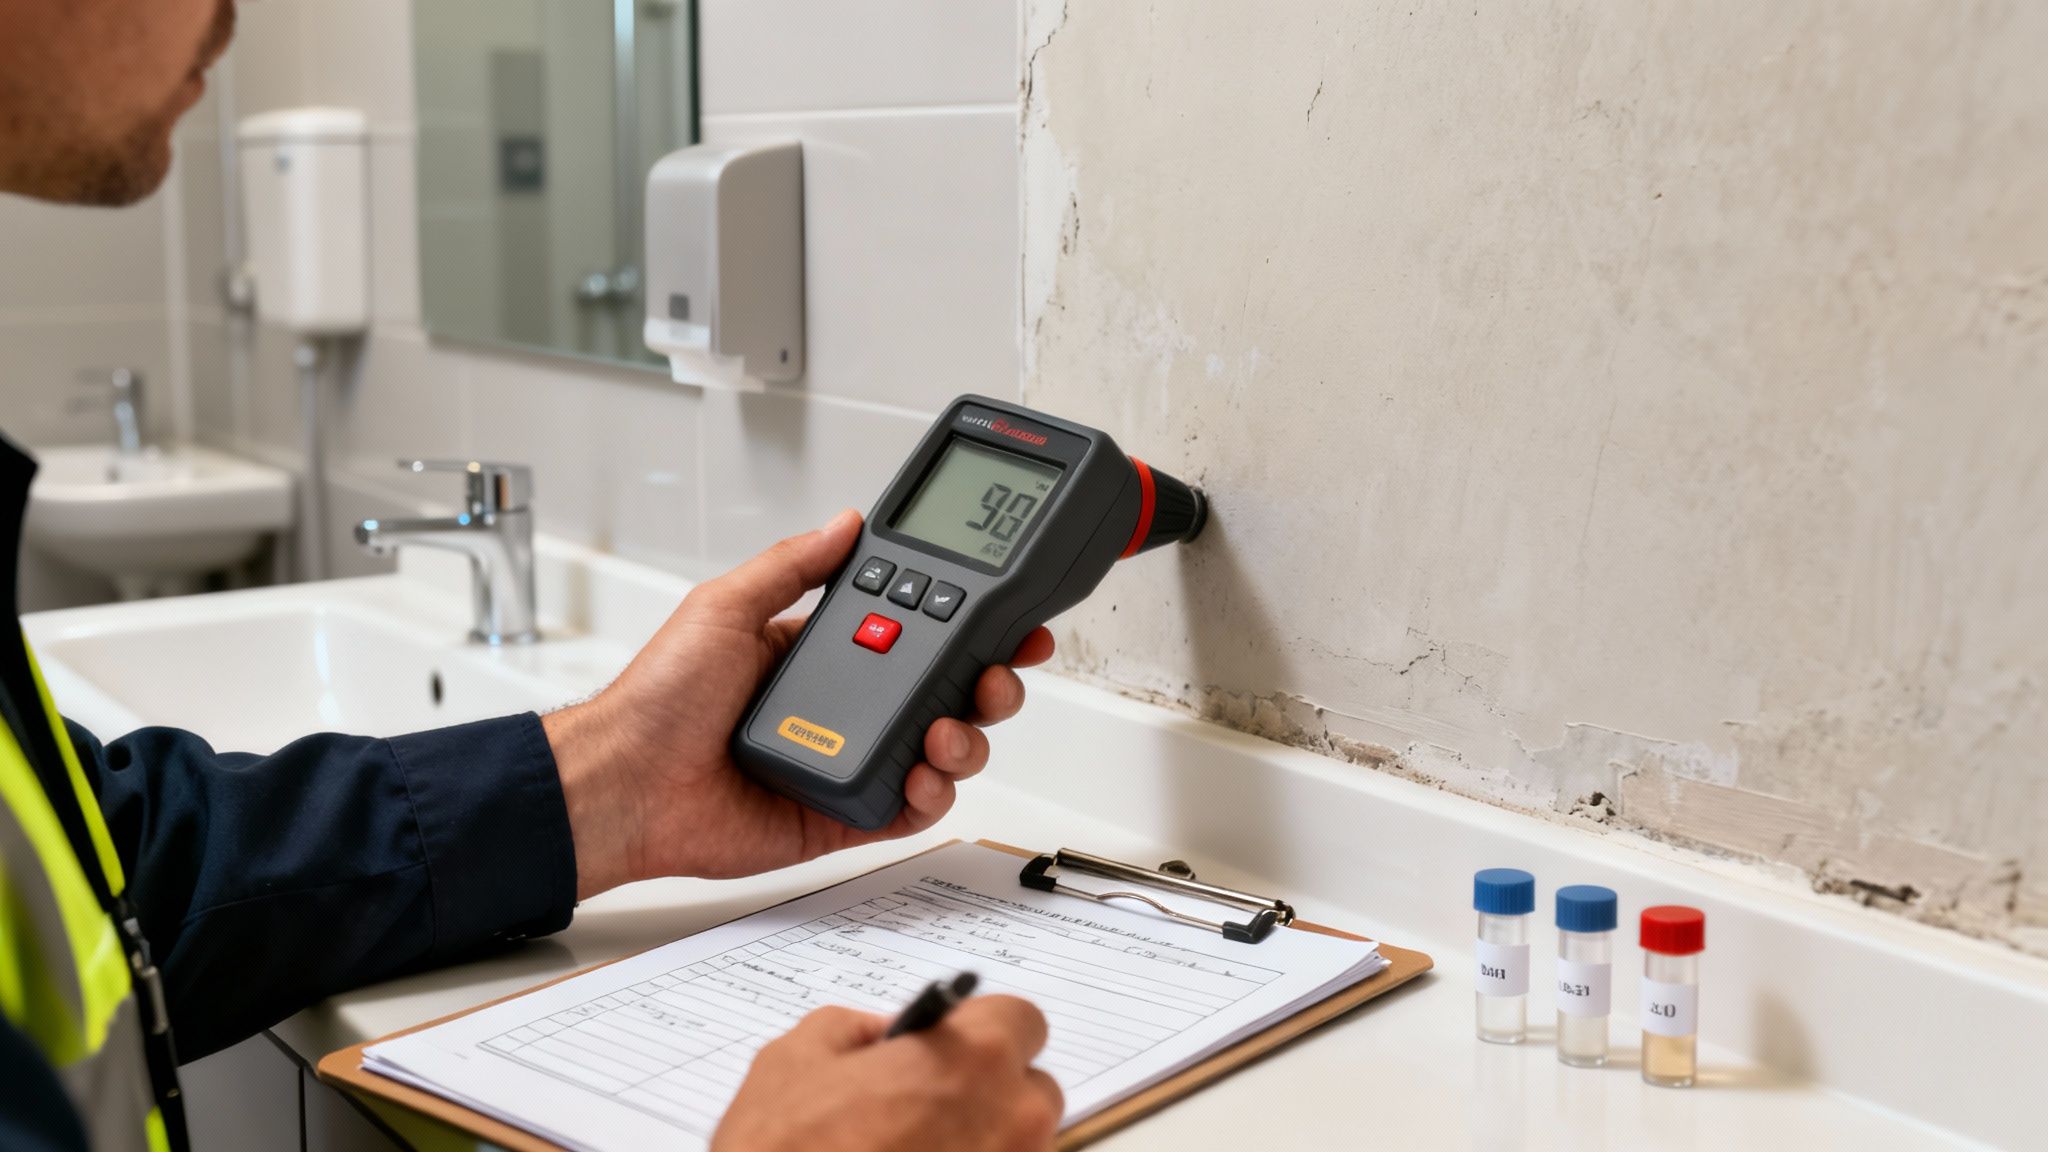
How to Properly Assess and Test for Mould
So, you’ve spotted what looks like mould. Before you even think about touching it, you need to put on your detective hat. As a facilities manager, you know that what you can see on the surface is often just the tip of the iceberg.
The real challenge, and where a professional mindset is so important, is figuring out what’s lurking behind the plasterboard, under the flooring, or inside a ceiling cavity. This is where a proper assessment comes in, and it's less about cleaning and more about a thorough investigation.
Your primary mission, above all else, is to find the moisture source. This is the golden rule of bathroom mould remediation. If you don't find and fix the leak, the chronic condensation, or the ventilation failure, the mould will come straight back. Guaranteed. It’s like bailing water out of a boat without first plugging the hole… you're just wasting your time.
Starting with a Visual Inspection
Every assessment begins with a thorough visual check. You’re looking for more than just the obvious black spots on the grout. You need to expand your search and look for the subtle clues that tell the real story.
Grab a good torch and get methodical. I always look for:
- Discolouration or Stains: Faint yellow or brown water stains on ceilings and walls are classic signs of a slow, hidden leak. Don't ignore them.
- Peeling or Bubbling Paint: This is a dead giveaway. Moisture building up behind a layer of paint will cause it to bubble or flake away from the surface.
- Warped Materials: Run your hand along skirting boards, plasterboard, and vanity cabinets. Do they feel soft, warped, or are they starting to swell up?
- A Musty Smell: Your nose is one of the best tools you have. That persistent damp, earthy smell means there's a moisture issue hiding somewhere, even if you can't see it yet.
Context is everything. Assessing a gradual mould buildup in a poorly ventilated staff shower block is completely different to investigating a sudden bloom after a pipe bursts behind a vanity. One points to a long-term atmospheric moisture issue; the other is a clear-cut plumbing failure. Your approach has to adapt to the evidence you find.
When to Move Beyond a Visual Check
A visual inspection tells you a lot, but sometimes it just doesn't give you the full picture. For facilities managers, knowing when to call for more advanced testing is key, especially when you suspect hidden contamination or when the health of building occupants is a major concern.
This is where things get a bit more scientific. Professional testing isn't always necessary, but it’s critical when you're dealing with potential liability or a duty of care.
An expert assessment isn't just about finding mould. It’s about creating a documented, evidence-based plan that proves you've tackled the problem correctly from start to finish.
This documentation is your best friend in any commercial setting. It shows you've been diligent and responsible.
Understanding Air and Surface Sampling
If you decide testing is needed, a professional hygienist will typically use two main types. Each one answers a different, very important question about your mould problem.
Surface Sampling
This involves taking a swab or a tape lift from a surface to identify the exact type and concentration of mould in a specific spot. It’s incredibly useful for:
- Confirming if that suspicious-looking stain is actually mould.
- Determining the species of mould, which can be vital for assessing health risks.
- Providing clear, scientific proof that a surface has been properly cleaned after remediation.
Air Sampling (or Spore Traps)
This is where things get really interesting. Air samples are collected to determine the concentration of mould spores floating in the air. We then compare the indoor air sample from the bathroom to an outdoor air sample taken on the same day.
Why do we do this? Because mould spores are literally everywhere, both inside and out. The goal is to see if the indoor spore count is significantly higher or if we find types of mould inside that aren't present in the outdoor sample. This is the clearest indicator of an active, indoor mould colony that's polluting the air quality. It helps us definitively answer the question, "Is there a hidden mould factory somewhere in this room?"
Ultimately, a proper assessment combines what you can see, what you can smell, and what you can test. It's a methodical process that moves from the obvious visual clues to the microscopic evidence… all while relentlessly hunting for that crucial moisture source. Get this part right, and your entire remediation project is built on a solid foundation.
Implementing Containment and Safety Protocols
Alright, you've done the detective work and have a solid handle on what you're up against. Now it's time to move from planning to action, and this is where safety becomes priority number one. You can't just go in and start tearing out contaminated materials. That’s like trying to carry a bucket of fine dust through a windy hallway. You’ll just spread the problem everywhere.
This stage is all about building a bubble. A controlled work zone. The goal is to completely isolate the affected bathroom to stop those microscopic mould spores from hitching a ride on air currents and contaminating the rest of your facility. Get this wrong, and you can easily turn a single-room headache into a building-wide nightmare.
Building Your Containment Zone
Think of this like setting up a cleanroom for a delicate operation… but in reverse. You’re focused on keeping the bad stuff in, not out. For any professional bathroom mould remediation, this isn't a suggestion; it’s a non-negotiable step.
Your main tool here is heavy-duty plastic sheeting. We're talking at least 6-mil thick polyethylene. You'll use this to:
- Seal off doorways: Create a double-flap entry, almost like an airlock, using sheeting and quality tape. This lets your team move in and out while keeping air exchange to a bare minimum.
- Cover air vents: Shut down the HVAC system connected to the bathroom and seal all supply and return vents with plastic. This is absolutely critical. Your ventilation system can become a super-spreader if you skip this.
- Protect unaffected fixtures: If the toilet or basin is clear, wrap it up completely to keep it clean and free of airborne spores.
Once everything is sealed, the next move is to control the environment itself. You do this by creating negative air pressure inside the contained area. It sounds complex, but the idea is simple. You use a specialised air filtration device (often called an air scrubber) fitted with a HEPA filter and vent it to the outside of the building. This machine constantly pulls air from the bathroom, filters out the spores, and pushes clean air outside.
This process ensures that air flows into the contained bathroom from the rest of the building, not the other way around. It’s your ultimate safety net, making sure any rogue spores get captured instead of escaping under the door.
Gearing Up With the Right PPE
Now, let's talk about protecting your people. This is another area with zero room for shortcuts. The health risks from mould exposure are real, ranging from nagging respiratory issues to skin irritation. A simple dust mask and a pair of Bunnings gloves just won’t cut it.
Personal Protective Equipment (PPE) is your team's armour. Without it, they're directly exposed to a biological hazard.
A professional approach to remediation is defined by how seriously you take containment and safety. It's the clear line that separates a quick fix from a genuine, long-term solution.
Before anyone even thinks about stepping inside the contained area, they need this essential kit:
- Respirator: A half-face or full-face respirator with P100 cartridges is the minimum standard. These filters are designed to capture microscopic particles, including mould spores.
- Eye Protection: Non-vented safety goggles are a must. Spores can easily irritate or enter the body through the mucous membranes in the eyes.
- Disposable Coveralls: A full-body suit, complete with a hood and booties, protects skin and clothing from contamination. When the job’s done, the suit is carefully taken off and disposed of, stopping spores from being tracked out of the work zone.
- Gloves: Heavy-duty, disposable gloves are essential. For heavy cleaning, I often recommend double-gloving.
To give you a clearer idea, the level of PPE needed can vary slightly depending on what your team is doing. Here’s a quick reference table I use to guide our crews.
Essential PPE for Mould Remediation Tasks
| Task | Minimum Required PPE | Recommended Upgrade |
|---|---|---|
| Initial Inspection | N95/P2 respirator, gloves, safety glasses | Disposable shoe covers |
| Minor Spot Cleaning (<1 sqm) | Half-face respirator (P100), gloves, goggles | Disposable coveralls |
| Heavy Remediation (>1 sqm) | Full-face respirator (P100), disposable coveralls with hood & booties, double-layered gloves | Full waterproof gear if significant water is present |
| Demolition/Material Removal | Full-face respirator (P100), full disposable suit with hood & booties, heavy-duty gloves | Cut-resistant gloves over disposable ones for sharp debris |
Always remember to err on the side of caution. Providing more protection than you think is necessary is always better than the alternative.
Ultimately, proper ventilation is the backbone of preventing mould in the first place. You can learn more about improving ventilation in bathrooms to help stop these issues from cropping up again. By creating a sealed, controlled, and safe work zone, you're not just preparing for the removal process. You're guaranteeing it can be done right, without putting anyone's health on the line.
Tackling the Mould: The Removal and Treatment Process
Alright, the affected area is sealed off and your team is kitted out in the right PPE. Now it’s time for the main event: actually getting rid of the mould. This is where the real work begins, and let me be clear, professional bathroom mould remediation is a world away from a simple surface wipe-down. We're aiming to physically remove the contamination and completely disrupt the conditions that let it thrive in the first place.
Think of it like pulling weeds. You can’t just snip the tops off and call it a day; you have to dig down and get the roots out, or they’ll just sprout again. This is the heavy lifting part of the job, and it needs to be done right.
The image below breaks down the core safety principles that are non-negotiable for any remediation project we undertake.
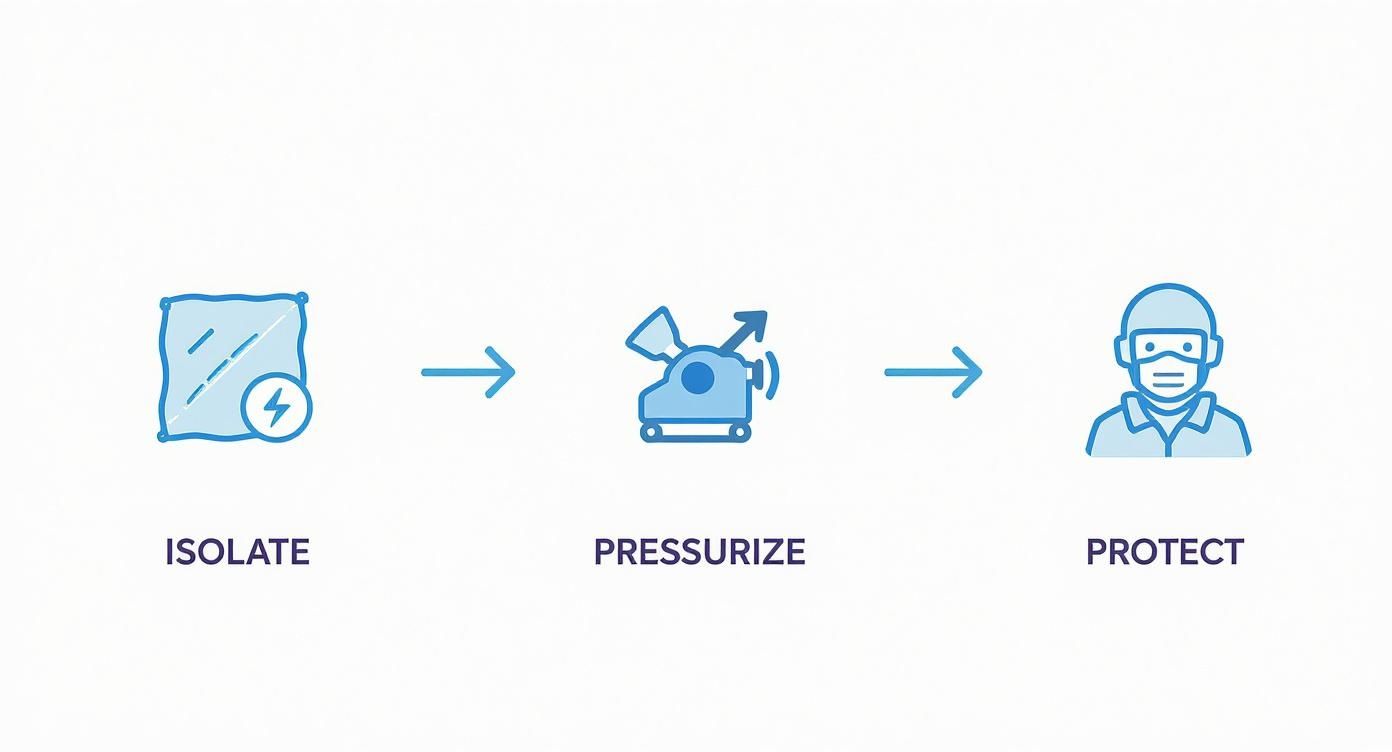
It always comes down to those three fundamentals. Isolate the work zone. Manage the airflow to prevent cross-contamination. And make sure your people are protected before a single tool is lifted.
Dealing with Non-Salvageable Materials
First up, you have to be ruthless. Some materials are simply beyond saving. Porous items like plasterboard or insulation act like sponges for mould. Once the mould’s hyphae… its root-like structures… penetrate deep into the material, you’ll never truly get it all out. Trying to clean them is a waste of resources and practically guarantees the problem will return.
Here’s a quick list of materials that almost always need to be cut out and disposed of:
- Plasterboard: If it feels soft, is discoloured, or has visible growth, it’s got to go. No exceptions.
- Insulation: Once damp, fibreglass and cellulose insulation become a breeding ground for mould.
- Ceiling Tiles: These are far too absorbent to be cleaned effectively.
- Caulking and Grout: While some grout can be salvaged, if it’s crumbling or deeply stained, removal is the safer bet. Contaminated silicone sealant is a common headache, which is why we have a specific guide on how to properly remove mould from silicone.
The key here is methodical removal. Don't just go in with a sledgehammer. Carefully cut contaminated materials out in large, manageable pieces. We always mist them lightly with water first to keep dust and spores from becoming airborne, then immediately double-bag them in heavy-duty rubbish bags inside the containment area.
Cleaning and Treating Surfaces That Can Be Saved
With the lost causes out of the way, you can focus on the non-porous surfaces that can be salvaged. This typically includes ceramic tiles, concrete, metal fixtures, and porcelain. With the right technique, these can almost always be restored.
And no, that technique doesn't involve bleach. Professionals rarely, if ever, use bleach for mould remediation. It’s corrosive, and its high water content can sometimes feed the very mould roots you're trying to kill. We stick to professional-grade, TGA-approved antimicrobial cleaners.
The process itself is meticulous. We start with a thorough HEPA vacuuming of all surfaces to capture any loose spores. Then, we get to scrubbing with the antimicrobial solution and a stiff brush, making sure to work it into every grout line and corner. Finally, everything is wiped down until it's perfectly clean.
Mould is a massive issue across Australia, with estimates suggesting it affects anywhere from 10% to 50% of homes, and bathrooms are a prime culprit. A recent survey highlighted that renters are hit hardest, accounting for 55.2% of households reporting mould. Of those cases, around 21.7% were classified as severe, requiring this exact level of intensive, professional-grade cleaning. These numbers show just how critical it is to get this stage right.
The All-Important Drying Process
I can’t stress this enough: getting the area completely bone-dry is the most critical step in the entire process. If you leave even a hint of moisture behind, you’ve just rolled out the welcome mat for the mould to return.
Simply letting the area "air dry" is never good enough. It's too slow and won't pull moisture out from within the building materials.
The job isn't finished when the mould is gone. The job is finished when the moisture is gone. This is the single biggest factor that determines whether the remediation will last.
To hit that professional dry standard, you need to bring in the heavy machinery.
- High-Velocity Air Movers: These aren’t your average fans. They're powerful turbines designed to blast a high volume of air directly across surfaces, massively accelerating evaporation.
- Commercial Dehumidifiers: As the air movers turn moisture into vapour, these units suck that dampness right out of the air. We rely on low-grain refrigerant (LGR) dehumidifiers, which are incredibly effective at creating desert-dry conditions.
We don't guess when it's dry. We use professional moisture meters… both penetrating and non-penetrating models… to take precise readings from deep inside walls and floors. We're aiming for a pre-determined "dry standard," which confirms the materials have returned to their normal moisture content. Only when our meters give us the all-clear do we consider this phase complete.
Verifying Success With Post-Remediation Reporting
You’ve done the hard work. The containment is down, the mould is gone, and the bathroom is finally dry. It looks clean, but how can you be absolutely, one hundred percent certain the job is truly finished? Well, you can't just trust your eyes.
This is where verification comes in. It’s the final, vital stage of any professional bathroom mould remediation project and the quality assurance checkpoint that moves you from thinking the air is clean to knowing it is. This step is what gives you, your team, and your building’s occupants complete peace of mind.
Proving the Air is Safe Again
After a remediation job, the biggest question is always about air quality. Have all those airborne spores really been captured and eliminated? To answer that, we turn back to science. Post-remediation air sampling is the only way to get a concrete, data-backed answer.
The process mirrors the initial assessment. An independent hygienist takes air samples inside the remediated bathroom and compares them to the ambient air outside. The goal is straightforward: we need to see that the indoor spore count is back to a normal, healthy level, consistent with the outdoor environment.
This isn't just about ticking a box. It’s about generating impartial, scientific proof that the remediation was a success and the space is safe for people to use again. Using a third party for this testing is crucial for transparency and credibility.
The Power of a Detailed Report
Once testing confirms success, the final piece of the puzzle is the post-remediation report. For a facilities manager, this document is gold. It's not just a bit of admin to file away. It’s your official record and your proof of due diligence, protecting your organisation by showing a documented commitment to health and safety.
A proper report isn’t just an invoice. It’s a complete project summary that should give you a clear, comprehensive overview of what happened from start to finish.
What Your Final Report Must Include
Every report we deliver is designed to be a definitive record. It's the story of the project, told with facts and data. Here’s what you should always expect to see:
- Initial Assessment Findings: A clear summary of the original problem—where we found the mould and the results of any initial tests.
- The Moisture Source: A specific breakdown of what caused the mould in the first place and, crucially, what was done to fix it.
- Remediation Scope of Works: A detailed, step-by-step account of the work performed, covering containment procedures, materials removed, and the cleaning methods used.
- Post-Remediation Verification Results: This is the key part. It includes the lab results from the final air and surface samples, providing that all-important clean bill of health.
- Recommendations for Prevention: We always include practical, actionable advice to help you prevent the mould from ever coming back, like improving ventilation or conducting routine checks.
This report officially closes out the project with confidence. It’s the final handshake that says the job wasn't just done, it was done right. And you have the paperwork to prove it.
Knowing When to Call a Professional Remediation Service
As a facilities manager, your world is a constant juggling act. You’re always weighing up what your team can handle in-house versus what demands a specialist. But when it comes to bathroom mould remediation, making the wrong call can spiral into serious headaches. From recurring structural damage to health complaints from occupants.
So, where do you draw the line?
It really boils down to understanding the risks. A small patch of surface mildew on a tile is one thing… but a persistent, musty odour that just won't go away is something else entirely. That smell is a dead giveaway that the problem is hiding, most likely behind a wall, under the floor, or deep within the vanity. Trying to tackle that kind of hidden issue yourself can make things much, much worse.
Red Flags That Demand a Professional
There are a few clear signals that tell you it’s time to pick up the phone. Think of these as the non-negotiables for calling in the experts:
- Size Matters: The general rule of thumb is if the affected area is larger than one square metre. At that point, you're not just cleaning anymore; you're dealing with a significant contamination event that requires professional containment to stop spores from spreading facility-wide.
- The Mould Keeps Coming Back: If you’ve cleaned a spot only to see it reappear a few weeks later, stop what you're doing. This is the biggest sign of an undiscovered moisture source that your team hasn’t found. A professional has the gear, like moisture meters and thermal cameras, to trace that water to its origin.
- That Musty Smell: If the bathroom has that persistent damp, earthy smell even after a deep clean, you have an active mould colony somewhere. Your nose is telling you what your eyes can’t see.
This is especially true in certain parts of Australia. The environmental factors in coastal cities like Byron Bay or Sydney's eastern suburbs create a perfect storm for mould, with humidity levels often pushing past 70%. This isn't just a cleaning issue; it demands a proper strategic approach.
Bringing in a certified, insured professional isn't just about getting the job done right. It's about compliance and liability. It provides a critical layer of protection for your organisation, proving you took the problem seriously and acted responsibly.
Ultimately, it’s about making a smart, strategic call. For long-term prevention, you might even consider building upgrades like installing a skylight exhaust fan for better bathroom ventilation. But for comprehensive removal and genuine peace of mind, exploring professional mould remediation services is always the most reliable path forward.
Common Questions About Commercial Bathroom Mould
As a facilities manager, you’re constantly juggling problems. When mould pops up, you need straight answers, not jargon. Let's tackle some of the questions I hear all the time out in the field.
You’ve probably heard the old advice a million times: just splash some bleach on it. It’s a common go-to, but honestly, it’s one of the worst things you can do for a genuine mould problem.
Can You Just Use Bleach to Kill Mould?
The short answer is a hard no. It’s a persistent myth that causes more harm than good. Bleach might kill surface mould and whiten the stain, giving the illusion that the problem is fixed. But it doesn’t penetrate porous materials like plasterboard, timber, or even grout.
So, what’s really happening? The high water content in bleach actually soaks into the surface, feeding the mould's "roots" (mycelia) that are still lurking inside. It’s like trimming the leaves off a weed while watering its roots. The mould will almost certainly return, often stronger than before. Plus, the harsh fumes create an unpleasant and potentially hazardous environment for staff and visitors.
It's not just my opinion. Key bodies like OSHA and the EPA in the United States specifically advise against using bleach for routine mould remediation. It’s simply not the right tool for the job.
What's the Real Difference Between Mould and Mildew?
This one causes a lot of confusion. The easiest way to think about it is that all mildew is a type of mould, but not all mould is mildew.
Mildew is that annoying, powdery stuff you often find on the surface of tiles or grout. It’s typically grey or white and doesn’t penetrate the surface, making it relatively easy to clean off.
Mould, on the other hand, is the more serious cousin. It can be black, green, or even orange, and it has a nasty habit of burrowing deep into whatever material it’s growing on. While mildew is mostly a surface-level nuisance, mould can cause real structural damage and presents a much greater health risk.
How Can You Improve Bathroom Ventilation?
This is the big one for preventing mould from coming back. Mould thrives on moisture, and in a high-traffic commercial bathroom, that usually comes from steam and condensation. Improving your ventilation is your best long-term defence.
- Check Your Exhaust Fans: Are they actually venting to the outside, or just into the ceiling cavity? A fan that isn't ducted properly is just relocating the humid air from one problem spot to another. I’ve seen this countless times.
- Run Them Longer: Install timers or encourage staff to leave fans running for at least 30 minutes after peak usage times. This gives them a real chance to clear out all that lingering moisture.
- Keep Them Clean: Dust and grime can clog fan blades and grilles, dramatically reducing their effectiveness. A quick clean every few months makes a world of difference.
Getting your ventilation right is the absolute key to stopping the cycle of bathroom mould remediation for good.
Dealing with mould can feel like a never-ending battle, but you don't have to fight it alone. If you're facing a stubborn mould issue and need a professional solution that guarantees results, reach out to That Cleaning Crew. We provide a free on-site quote to give you a clear, actionable plan. Learn more about our commercial services.