Cleaning venetian blinds. It’s one of those jobs we all put off, right? You see the dust building up, you know it needs doing, but the thought of wiping every single slat… well, it’s a lot. If that sounds familiar, you’re definitely not alone. The whole process can feel so fiddly and incredibly time-consuming.
It often feels like a task where the effort doesn't quite match the reward. You spend ages on one window, only to look up and realise there are three more to go. It's the sheer repetition that gets you. Wiping one slat is easy. Wiping fifty? That's a different story entirely.
So, Why Does It Feel So Frustrating?
The main reason this job feels so tough is that we often try to do too much at once, or we’re simply using the wrong tools. A feather duster, for example, often just pushes dust into the air, only for it to settle right back onto the slats a few minutes later. It’s a bit like trying to bail out a boat with a leaky bucket. You’re working hard, but not really getting anywhere.
The good news? It really doesn’t have to be a nightmare. We’re going to break down the entire process into simple, manageable chunks. We'll cover everything from a quick weekly wipe-down to a proper deep clean for that serious grime.
You’ll learn about:
- The difference between a quick dust and a deep clean (and when you'll need each one).
- Cleaning methods tailored to your blind's material—because what works for aluminium won't work for wood.
- The simple tools that make the job faster and far more effective.
Forget the frustration of a job half-done. This guide gives you simple, practical advice that actually works. We’ll show you the right techniques so you can get your blinds looking fantastic again, without losing your entire weekend. Ready to get started?
Your Simple Blind Cleaning Toolkit
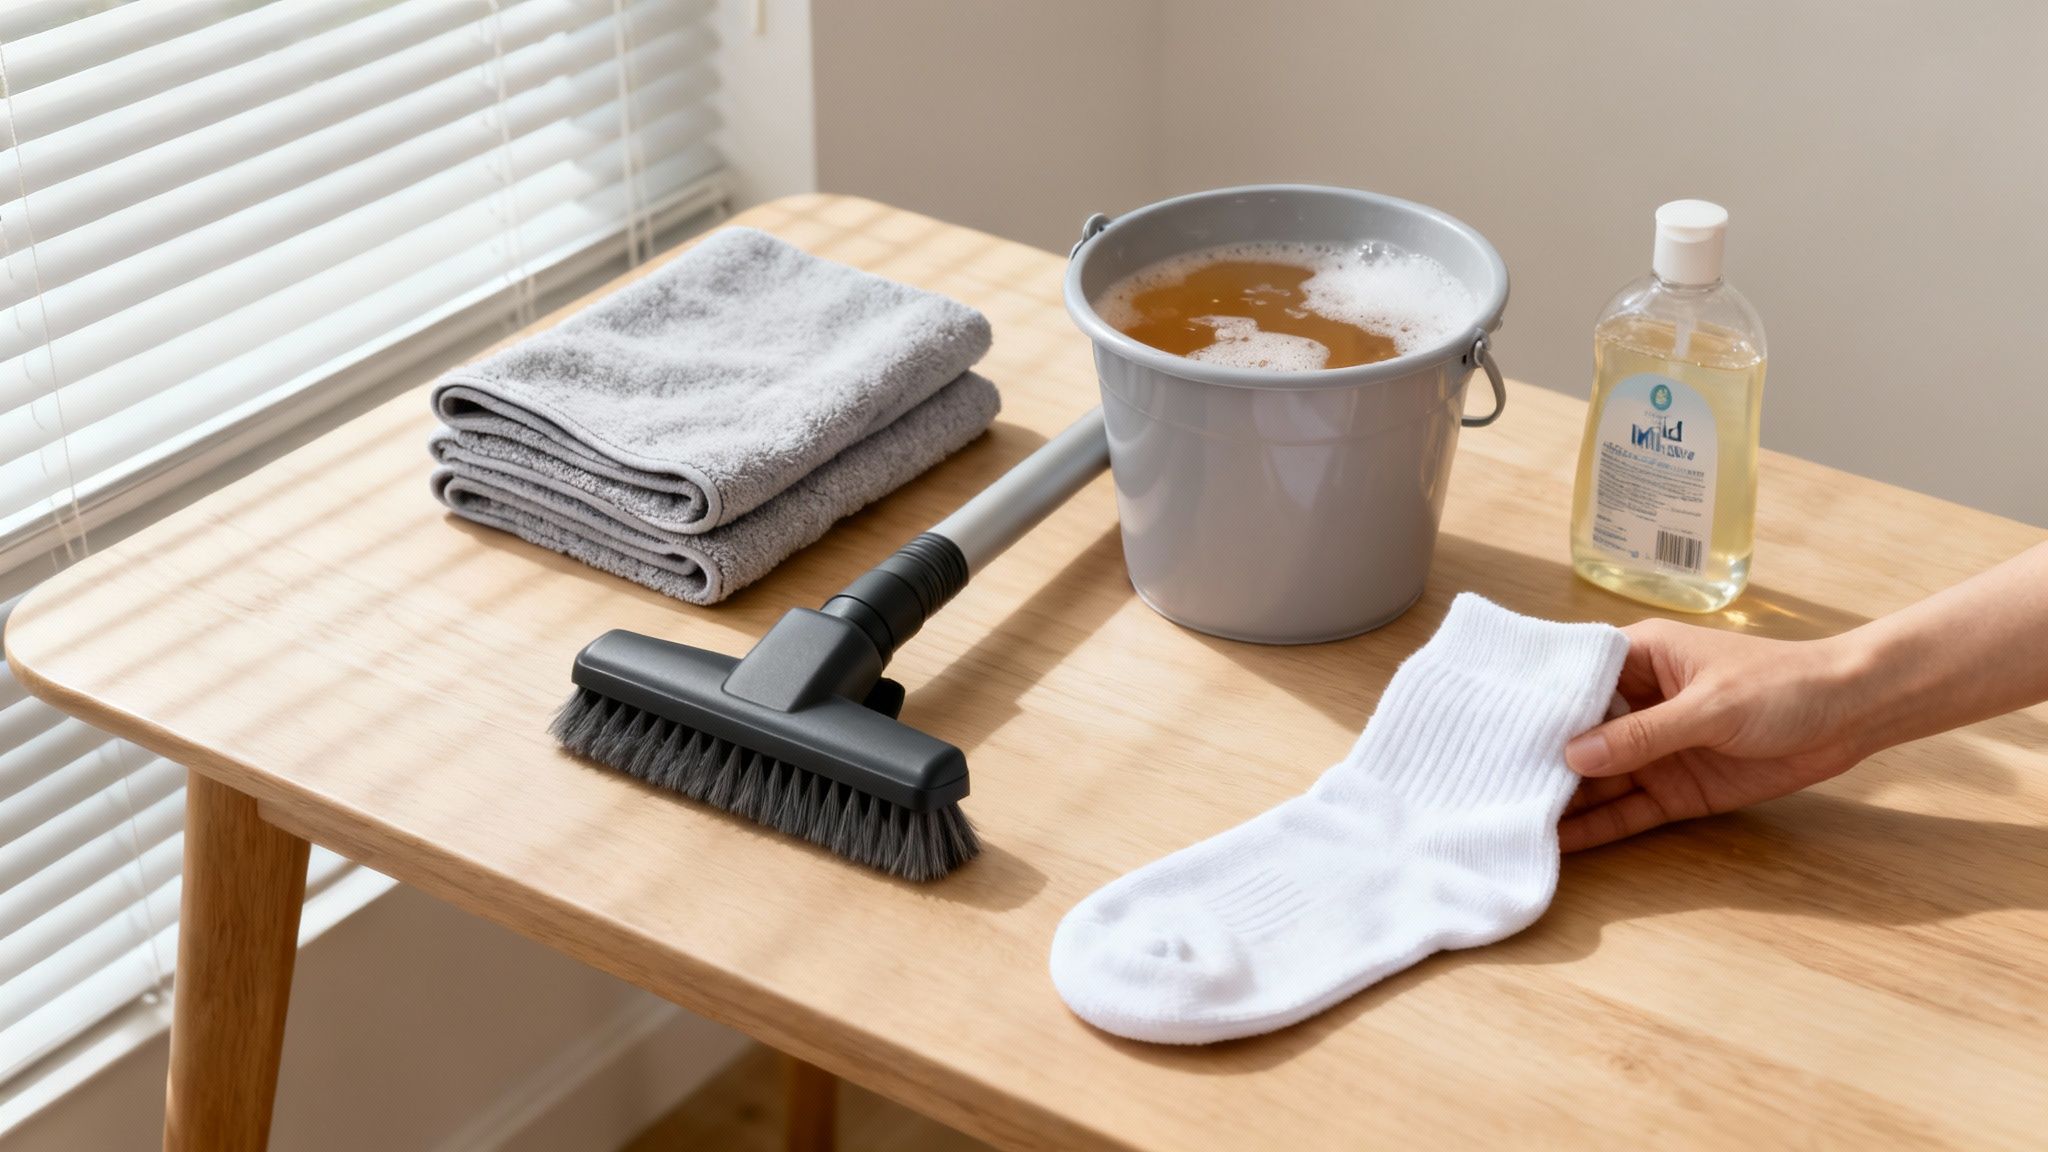
Before you even think about tackling those dusty slats, let's get your supplies sorted. Trust me, having everything you need within arm's reach makes the whole process smoother and a lot less of a chore. You really don't need any fancy gadgets or expensive chemicals for this.
Honestly, the best tools are probably already hiding in your cupboards. It's like making a good meal. You just need a few quality ingredients, not the whole supermarket aisle.
The Essentials for Dusting
Your absolute number one friend for this job is a good microfibre cloth. Or two. They’re brilliant because they actually trap and hold onto dust, instead of just flicking it into the air to settle somewhere else five minutes later.
A vacuum cleaner with a soft brush attachment is another hero, especially for a quick, regular clean. It gently sucks up the dust without you having to wipe every single slat by hand. Just be sure to use it on a low suction setting to avoid accidentally bending or breaking anything.
A Quick Tip… If you've ever battled with mould around your windows, you'll know that moisture and dust can be a bad combination. While you're cleaning, it's a good idea to check the window frames and sills for any dark spots. If you see any, you can learn more about tackling it with our guide to a natural mould killer that's safe to use around the home.
Supplies for a Deeper Clean
When your blinds need more than just a dust-off—think greasy kitchen blinds or grimy bathroom ones—we need to bring in the big guns. And by big guns, I mean a bucket of warm water and some gentle dish soap. That’s usually all it takes to cut through everyday grime without being harsh on the blind’s surface.
Here's a simple checklist of what to gather:
- Microfibre Cloths: Have at least two on hand—one for washing and one for drying.
- Vacuum with Brush Attachment: The soft bristles are key to preventing scratches.
- A Bucket: Fill it with warm water. Not hot, just comfortably warm.
- Mild Dish Soap: A few drops are all you need to create a gentle cleaning solution.
- An Old (Clean) Sock: Yes, really. This is my favourite hack.
The sock trick is a genuine game-changer. Just slip it over your hand, dip it lightly into your soapy water, and you can grip and wipe both sides of a slat at the same time. It’s surprisingly effective and much faster than messing around with a cloth. It's one of those "why didn't I think of that sooner?" moments.
Once you have these simple items ready, you're all set to get started. No fuss, no stress.
The Five Minute Weekly Dust Down
Alright, let's talk about the secret weapon for keeping your Venetian blinds looking sharp without you having to sacrifice a whole Saturday afternoon. I'm talking about the five-minute weekly dust-down. Seriously, that's often all it takes.
If you can find just five minutes once a week, you'll stop that fuzzy, grey layer of dust from ever getting a foothold. It’s a bit like brushing your teeth. You do it for a couple of minutes every day to avoid a massive, painful trip to the dentist later on. This is the exact same principle, just for your windows.
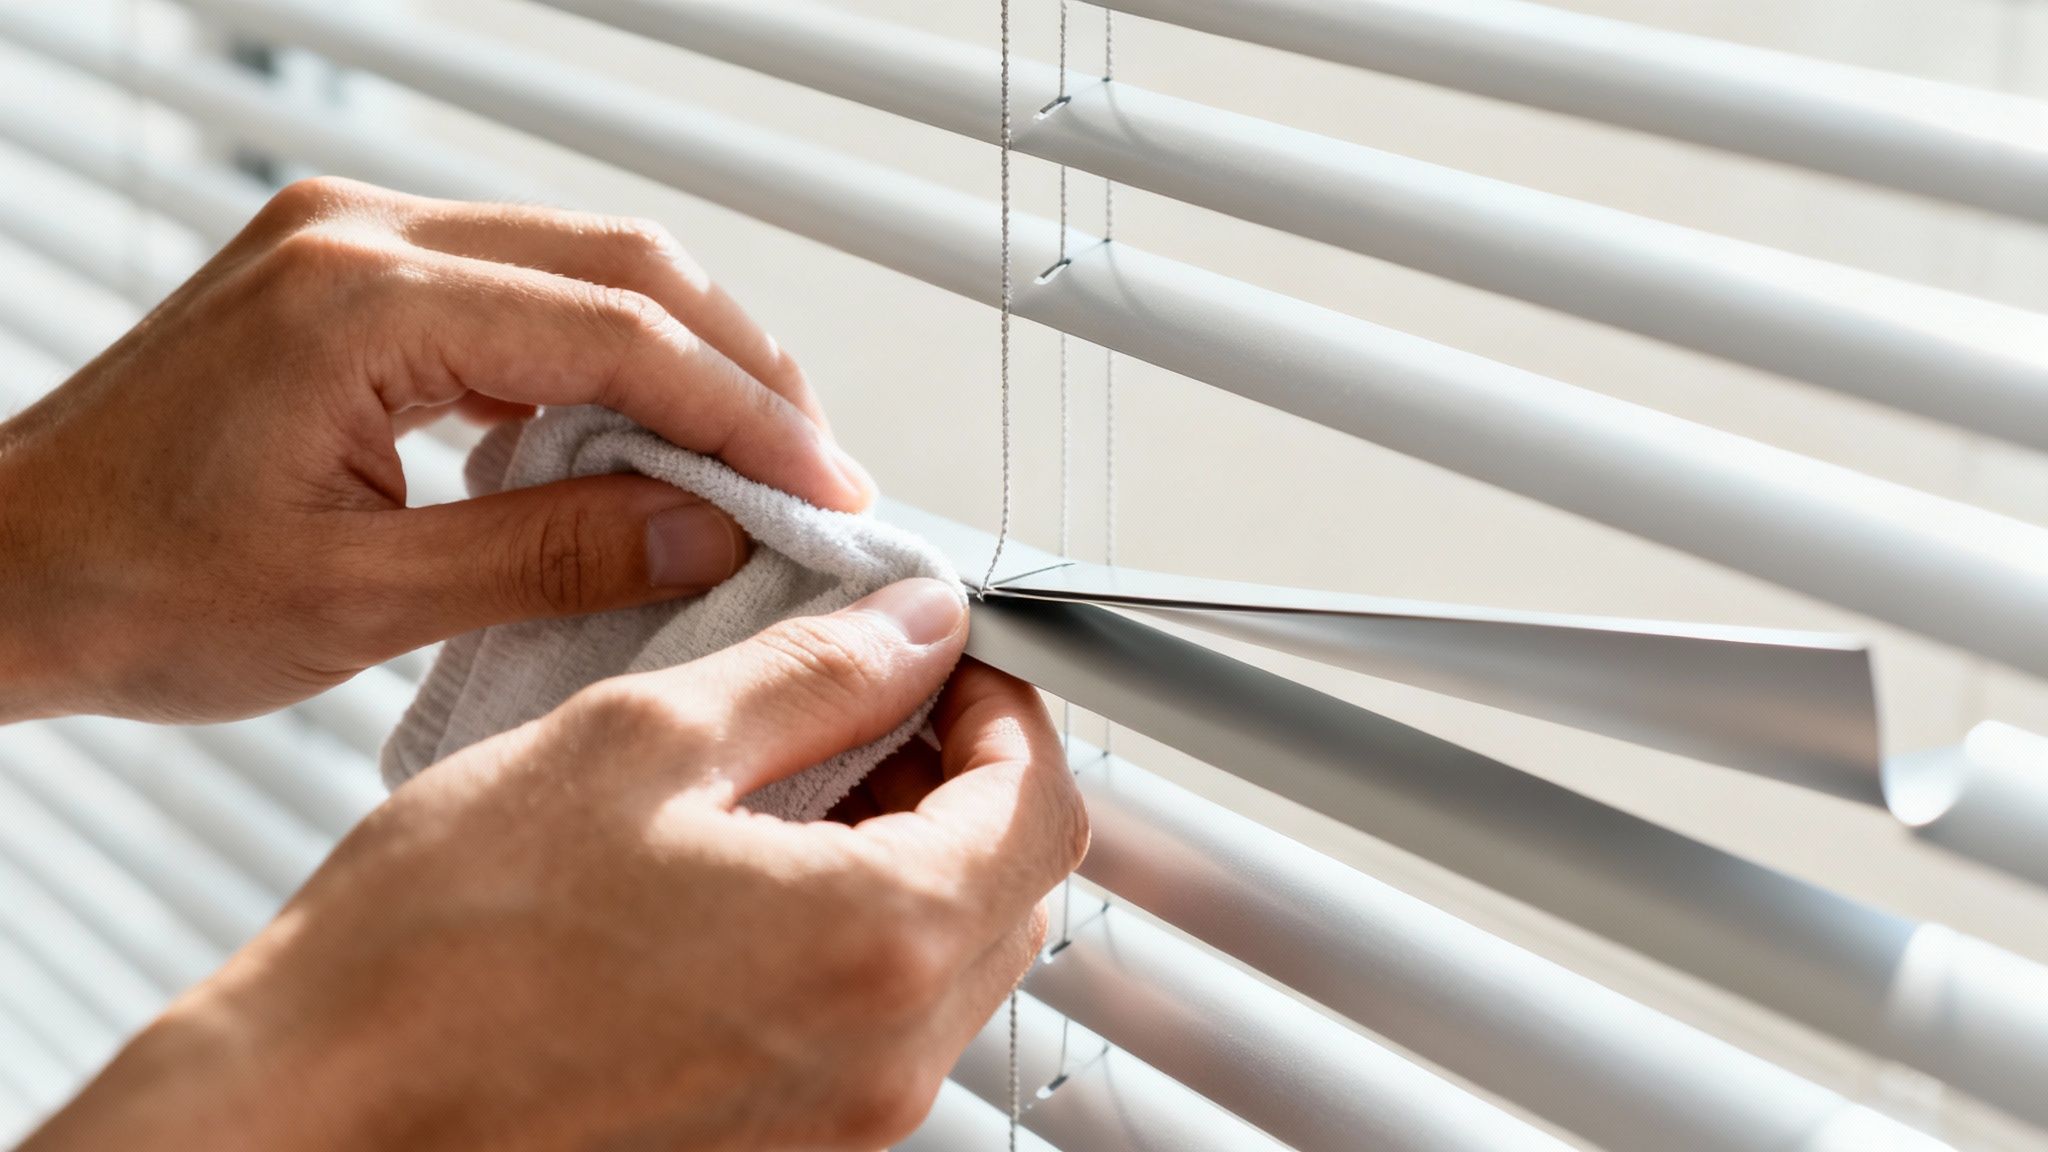
Getting Started The Right Way
First up, make sure your blinds are fully closed. Tilt the slats so they’re all facing downwards, creating a smooth, flat-ish surface. Trust me, this simple move makes the job about a hundred times easier.
Now, grab your weapon of choice: a microfibre cloth or the soft brush attachment on your vacuum. Whatever you do, don't reach for a feather duster. It just flicks dust around the room, which is the cleaning equivalent of kicking a pile of mess under the rug. Pretty pointless. A microfibre cloth, on the other hand, actually traps the dust.
Start at the very top slat and wipe or vacuum horizontally, moving from one side to the other.
Work your way down, one slat at a time. It might feel a bit repetitive, but you’ll get into a rhythm pretty quickly. Always working from top to bottom is a golden rule in cleaning. Why? Because gravity is a thing. Any dust you knock loose will fall downwards, so you'll catch it on the way down instead of cleaning the same spot twice.
Once you’ve hit the bottom slat, you’re halfway there.
The Flip and Repeat
Now for the clever part. Use the cord to flip the slats the other way so they're facing upwards. This reveals the other side that's been hiding all this time.
Just repeat the exact same process. Start at the top again and wipe each slat horizontally until you reach the bottom. And that’s it. You’re done.
This quick routine isn't about achieving surgical-grade perfection. It's all about maintenance. It’s about preventing the kind of dust build-up that practically glues itself to the slats and needs a full-on scrub to remove.
A Quick Pro Tip: As you wipe, use your free hand to gently hold the bottom rail of the blinds. This keeps them steady and stops them from swinging all over the place, which is especially helpful for lighter aluminium or PVC blinds that can bend easily if you get a bit too enthusiastic.
Making It a Habit
The real key here is consistency. Five minutes every week is so much less painful than an hour-long deep clean every six months. You could tack it onto another weekly chore, like right after you vacuum the floors or while you're waiting for the kettle to boil for your morning cuppa.
Here’s why this small habit makes such a big difference:
- Prevents Grime Build-up: Dust that sits around for ages can mix with moisture in the air (especially in kitchens and bathrooms) and turn into a sticky, stubborn grime.
- Improves Air Quality: Blinds are dust magnets. A regular clean-up means less dust, pollen, and other allergens floating around your space.
- Keeps Blinds Looking New: Regular dusting stops the surface from getting dull and discoloured over time.
Think of it as a tiny investment of your time that pays off big in the long run. It keeps the much bigger, more annoying cleaning job at bay and ensures your blinds always look fresh and looked-after. A small effort for a surprisingly satisfying result.
Deep Cleaning Your Blinds The Right Way
Sometimes, that quick five-minute dust-down just doesn't cut it. You know the feeling. The blinds in the kitchen start to feel a bit… sticky. That’s the greasy film that cooking sends into the air, and it loves to cling to every surface. Or maybe the blinds in the bathroom have gathered a layer of grime from all the steam and moisture.
This is when we need to roll up our sleeves and give them a proper deep clean. Don't stress, it's not as scary as it sounds. Think of it as hitting the reset button, getting them back to the state they were in when you first had them installed.
The method you choose depends entirely on what your blinds are made of. This is really important. What works wonders for one material can be a complete disaster for another.
For Aluminium and PVC Blinds
If you have durable aluminium or PVC blinds, you're in luck. These materials are pretty tough and can handle a bit of water, which makes the job much easier. Our go-to method for these is what I like to call 'the bathtub soak'. It's incredibly effective.
First, you’ll need to carefully take the blinds down from the window. Most have a simple clip or bracket system in the headrail. Just lift the front flap of the bracket, and the blind should pop right out. Be gentle and take your time here… no need to rush.
Once they're down, lay them in your bathtub. To avoid any scratches, you could pop an old towel down first. Then, fill the tub with enough warm water to cover the blinds completely and add a generous squirt of mild dish soap. Give the water a bit of a swish to get it nice and soapy.
Let them soak for about an hour. This does most of the hard work for you, loosening up all that stubborn grime and grease. After they’ve had a good soak, you can use a soft cloth or a non-abrasive sponge to wipe down each slat. You'll be amazed at how easily the dirt comes away.
When you’re happy they're clean, drain the tub and give the blinds a good rinse with the shower head to get rid of any soap residue. This step is crucial, as leftover soap can leave them feeling sticky and attract even more dust later on. For a detailed rundown of this process, this guide on how to wash blinds offers some great extra tips.
To finish, hang them over the shower rail or outside on a clothesline to dry completely before you put them back up.
Dealing with Wooden Blinds
Now, for wooden blinds, we have to change our approach completely. Water is the absolute enemy of real wood. Soaking them in a bathtub would cause the slats to warp, swell, and even crack. We need a much gentler, drier method.
For a deep clean on wooden blinds, you'll still want to wipe each slat individually, but with minimal moisture.
- Mix a tiny amount of wood-safe cleaner or mild soap with warm water in a small bowl.
- Dampen a microfibre cloth with the solution. When I say dampen, I mean it should be barely moist… wring it out until it's almost dry to the touch.
- Carefully wipe down each slat, one by one. Follow up immediately with a second, completely dry microfibre cloth to remove any lingering moisture.
It’s a bit more hands-on, I know. But taking this extra care is the only way to deep clean wooden blinds without risking damage. Think of it like polishing a nice piece of furniture; you wouldn't drench it in water, would you? The same principle applies here.
The infographic below shows the simple flow for your regular dusting, which is the best way to prevent the need for frequent deep cleans.
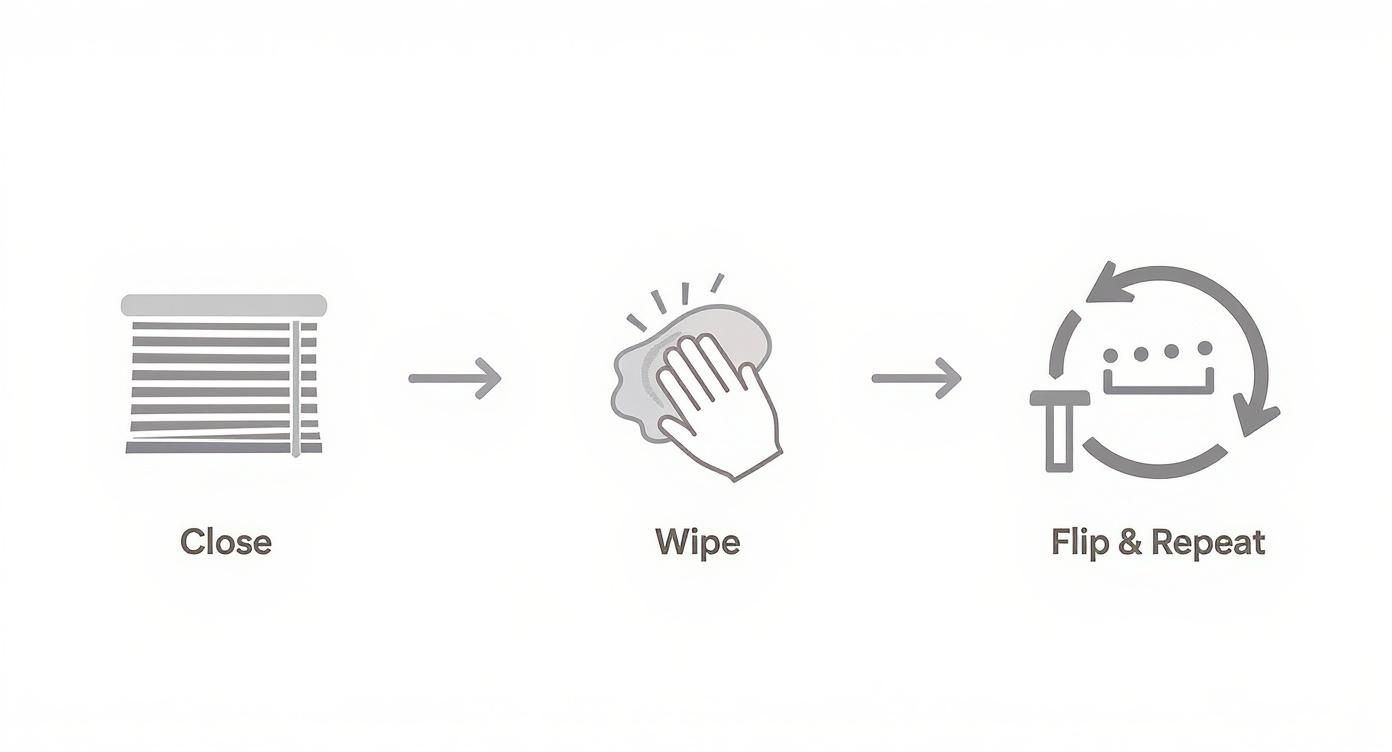
This simple three-step process—close, wipe, and flip—is your best defence against dust build-up between deeper cleaning sessions.
Tackling Tough Spots and Mould
Occasionally, you’ll come across a stubborn spot that just won’t budge. For greasy marks on PVC or aluminium, a 50/50 solution of white vinegar and water can work wonders. Just apply it with a cloth to the specific area, let it sit for a minute, and then wipe clean.
If you spot any signs of mould, especially in a damp area like a bathroom, it's important to deal with it properly. Small spots can often be treated with that same vinegar solution, as vinegar is a natural mould killer.
If the problem is more widespread, it's a sign of a bigger moisture issue that needs addressing. You can find out more by reading our guide on how to get rid of mould for a more robust approach.
This deep clean is the full reset your blinds need every now and then to look as good as new.
Keeping Your Blinds Working Perfectly
So, you’ve done the hard work. Your blinds are sparkling clean, and the room feels instantly brighter and fresher. It’s a great feeling, isn't it? The goal now is to keep them that way. And not just looking good, but working smoothly, too.
A little bit of ongoing care is all it takes to protect your investment and make sure your blinds function as beautifully as they look for years to come. Think of it less as a chore and more like simple maintenance, like topping up the oil in a car. It prevents the small, annoying issues from turning into big, expensive problems.
Over time, it’s pretty common for things to get a little out of whack. A slat gets slightly bent. The cords get tangled. Or the tilt mechanism starts to feel a bit stiff. Don’t worry, these are usually easy fixes you can handle yourself.
Straightening Out Life’s Little Dents
Let's start with one of the most common issues, especially with aluminium blinds: the dreaded bent slat. It can happen so easily. A window slammed shut by the wind or even a bit of over-enthusiastic cleaning. Before you think it’s ruined forever, there's a gentle trick you can try.
Most of the time, you can gently bend it back into shape with just your hands. The key is to be slow and patient. Use your thumbs and forefingers to carefully work along the crease, applying steady, even pressure. It's more of a gentle persuasion than a forceful fix, so don't try to flatten it all at once, as that can make the crease worse. While it might not be 100% perfect, you can often make it so subtle that nobody but you will ever notice.
Tackling Tangled Cords and Stiff Mechanisms
Tangled cords are another one of those things that can drive you mad. They look messy and can stop the blinds from operating properly.
Here’s what to do when they get twisted:
- First, fully lower the blinds. This gives the cords as much slack as possible to work with.
- Gently separate the cords with your fingers, following the tangle down from the headrail. Most of the time, a simple untwisting is all that’s needed to get them hanging freely again.
- Avoid yanking on them, as that just cinches the knot and makes everything worse. Patience is your best friend here.
What if the wand or cord that tilts the slats feels stiff? This is often just a build-up of dust inside the headrail mechanism. Before doing anything else, try tilting the slats back and forth a few times to work it loose. If that doesn't help, a quick puff of compressed air (the kind you use for computer keyboards) aimed into the headrail can sometimes dislodge whatever is causing the jam.
You’re not just cleaning your blinds; you're extending their lifespan. Regular checks for wear and tear, tangled cords, or stiff mechanisms can prevent small issues from becoming permanent damage, saving you from the cost and hassle of a full replacement.
Creating a Simple Maintenance Rhythm
The best way to keep everything in great shape is to get into a simple rhythm. You don’t need a complicated spreadsheet. Just a mental note or a reminder in your phone.
Think of it like this:
- Weekly: A quick five-minute dust-down. This is your first line of defence against build-up.
- Every Other Month: A proper wipe-down with a damp cloth to catch any grime that the dusting missed.
- Twice a Year: Check the mechanisms. Look for tangled cords, stiff tilting wands, and anything else that doesn't feel right.
Putting a recurring reminder in your calendar makes it happen. This small amount of effort ensures your blinds not only stay clean but continue to work perfectly, adding to the comfort and look of your space for a long, long time.
When to Call in the Professionals
Look, sometimes a DIY job just doesn't cut it. There's no shame at all in stepping back and deciding that this particular task is one you’d rather hand over to an expert.
We've all been there. You look at the job, you look at your schedule… and the two just don't line up. Or maybe you're staring up at blinds on a second-storey window and thinking, "Nope, not getting on a ladder for that one."
That's when calling in a professional cleaner is not just a good idea, it's a smart one. It's about trading a bit of money for a lot of peace of mind. And honestly? Sometimes that's the best deal you can make.
Signs It’s Time to Get a Quote
Think about your specific situation for a moment. Are your blinds made from a delicate material you're nervous about damaging? Real wood, for instance, is notoriously unforgiving if you use too much water. A pro knows exactly how to clean them without a single slat warping.
Or maybe you just don't have the time. Life gets busy, and spending a whole Saturday wiping down blinds might not be how you want to use your precious downtime.
Here are a few classic scenarios where a professional is your best bet:
- You have very high or hard-to-reach windows. Safety first, always. Professionals have the right equipment and training to tackle heights without any risk.
- Your blinds are made of a delicate material. Think real wood, custom fabrics, or anything you're worried about ruining with the wrong technique.
- There’s significant, stubborn grime. Years of built-up kitchen grease or heavy nicotine staining are tough battles to win with just dish soap and a cloth.
- You're simply short on time. Your time is valuable. Outsourcing a job you dread frees you up for things that are far more important.
What to Expect When You Hire a Pro
A professional cleaning service brings more than just a bucket and some cloths; they bring experience and efficiency. They have specialised tools, like ultrasonic cleaning tanks, that can deep clean every single part of your blinds, including the cords and headrail mechanisms. This process gets a result that's almost impossible to replicate at home.
The cost can be surprisingly reasonable, too. In Australia, professional cleaning for venetian blinds typically ranges from $15 to $200 per blind, depending on the material and size. PVC blinds are usually at the lower end, while delicate wooden blinds require more specialised care and are priced accordingly.
Hiring a professional is an investment in getting the job done right, without the stress or the risk. It’s for when you want a perfect, hassle-free result and you're ready to let an expert take the lead.
When you're weighing up the costs, it's also worth thinking about the bigger picture of your property's upkeep. Sometimes bundling services can be a smart move. If you're curious, you can get a clearer picture by reading about our window cleaning service costs. It all helps you make the best decision for your home or business.
Your Venetian Blind Cleaning Questions Answered
We get a lot of questions about cleaning Venetian blinds, so we've pulled together answers to some of the most common ones. It's totally normal to have questions. Blinds can feel a bit tricky, but with the right approach, they're straightforward to maintain.
One of the biggest questions is about using harsh cleaners. Please don’t. It’s best to avoid things like bleach, abrasive powders, and aggressive chemical sprays entirely. They can do some serious damage, like discolouring PVC, stripping the protective finish off wood, and even corroding aluminium slats over time.
A simple mix of warm water with a few drops of mild dish soap is almost always the safest and most effective solution you can use. For a bit of extra power on tough, greasy spots, a 50/50 vinegar and water solution can work well, but always start gentle.
How Often Should I Deep Clean My Blinds?
This really depends on where they are. For blinds in the kitchen that are exposed to grease and steam, a deep clean every two or three months is a good rhythm to get into. It stops that sticky film from building up into a bigger problem.
For blinds in a bedroom or a less-used room, you can likely get away with a deep clean once or twice a year, as long as you're keeping up with that quick weekly dusting we talked about. The goal is to prevent grime from settling in and becoming a huge, time-consuming task.
For additional insights or alternative approaches to maintaining your Venetian blinds, you might want to explore another complete guide on how to clean Venetian blinds.
Don't forget the cords, either. They can get surprisingly grubby. The easiest method is to dampen a microfibre cloth with your soapy water, pinch the cord between the cloth, and just run it down the full length. Simple and effective.
If the thought of tackling stubborn grime or just finding the time feels like too much, remember you don't have to do it alone. The team at That Cleaning Crew has the experience and tools to get your blinds looking immaculate, safely and efficiently. Get in touch for a free, no-obligation quote today!