To properly clean mould from a carpet, you have to get to the root of the problem. That means fixing the moisture source first, then using the right cleaning solution… like a simple vinegar and water mix… to tackle the affected area. After that, getting the carpet completely dry is non-negotiable if you want to stop the mould from coming right back.
That Musty Smell Is a Big Red Flag. What to Do First.
So, you've noticed it. That slightly damp, musty odour that hangs in the air. Or maybe you've spotted a small, dark patch on the carpet that definitely wasn't there last week.
Your gut is telling you it's mould, and nine times out of ten, it's right.
But before you grab a scrubbing brush and go to war, we need to have a quick chat. This isn't just a bit of stubborn dirt; you're dealing with a living organism that can cause real headaches for your property and your health. Let’s walk through the essential first steps together. It’s all about working smart, not just hard.
Assessing the Situation Safely
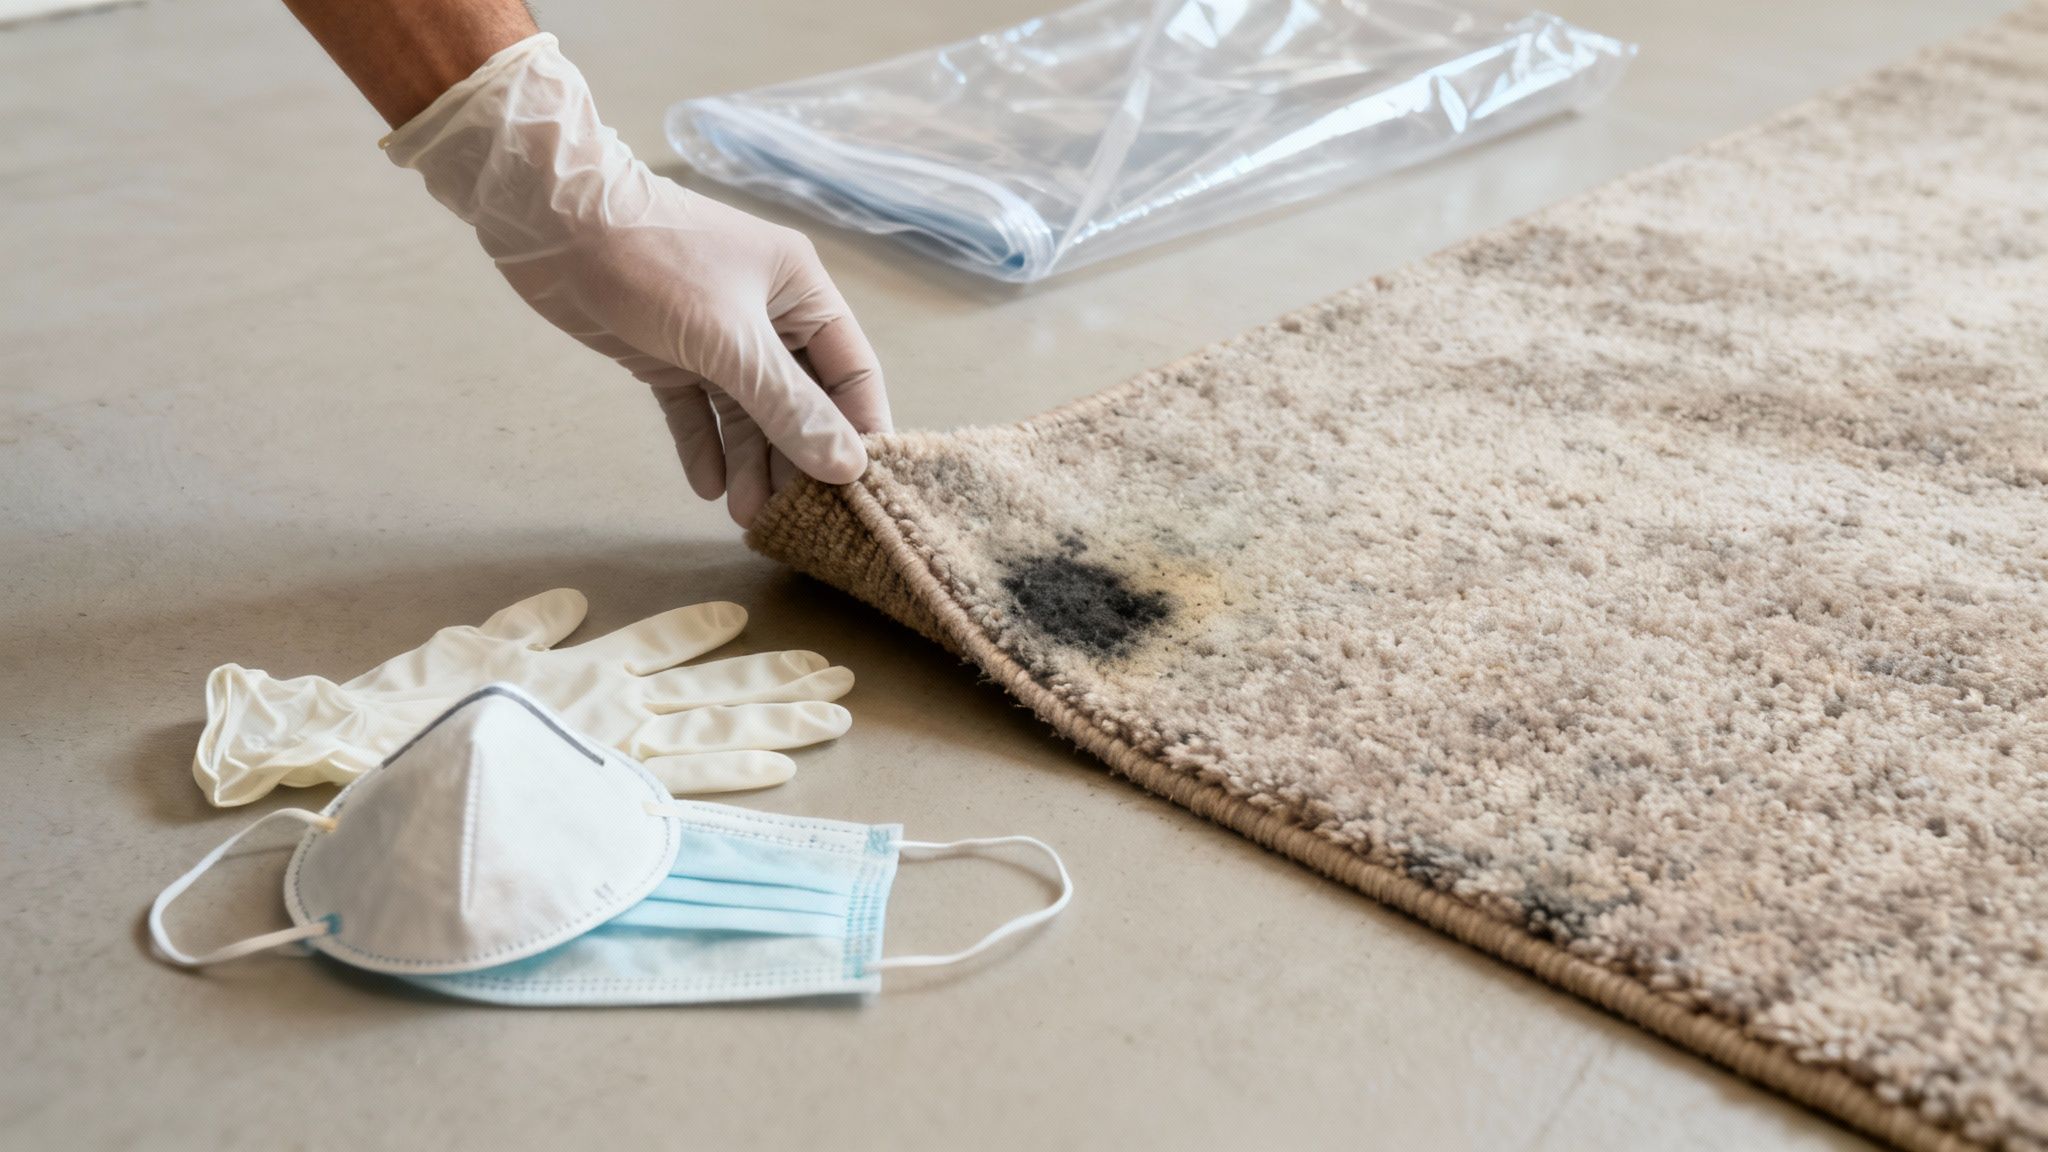
First things first, let's play detective… but from a safe distance. The goal is to figure out what you're up against without making things worse. If you disturb a patch of mould, it can release a cloud of spores into the air, and that’s the last thing you want. Think of them as microscopic seeds ready to start new colonies all over your space.
Grab a torch and take a good look, but don't touch it yet. Is the mould just on the surface, or does it look like it's coming from deep within the carpet fibres? Gently press the area around the patch. Does it feel damp or squishy? That’s a bad sign. It could mean the underlay is soaked, which is a much bigger problem.
The size of the mould patch is also a major clue. If it’s a small spot, say smaller than your hand, you can probably handle this yourself with the right approach. If you're looking at a large area… think bigger than a dinner plate… it might be time to call in the professionals. For a deeper dive, check out our guide on how to get rid of mould in different situations.
Before you touch anything, run through this quick mental checklist. It'll help you safely assess the situation and prepare for what comes next.
Your Initial Mould Assessment Checklist
| Check Point | Why It Matters | Action Required |
|---|---|---|
| Size of the Patch | Small spots are often manageable DIY jobs. Large areas (bigger than a dinner plate) suggest a deeper, more widespread issue that needs professional equipment. | Measure or estimate the size. If large, stop and call a professional. |
| Dampness Check | A damp carpet or squishy underlay means the moisture source is still active. Cleaning is pointless until the leak or condensation is fixed. | Gently press the area around the mould. If it's wet, find and fix the water source first. |
| Identify the Source | Mould needs moisture. Is it from a leaky pipe, a spill, high humidity, or a damp subfloor? Knowing the cause is key to preventing its return. | Look for nearby water sources, condensation on windows, or signs of water stains on walls or ceilings. |
| Airflow in the Room | Poor ventilation traps moisture and helps mould thrive. Stagnant, humid air is a mould-friendly environment. | Check if the room has fans, windows, or an HVAC system. Note if the air feels stuffy. |
Going through these points gives you a clear picture of what you're dealing with. It’s the difference between a quick fix and a recurring nightmare.
Gearing Up The Non Negotiable Safety Steps
I know, I know. Putting on a full set of safety gear to clean a little spot on the carpet can feel like overkill. But trust me on this one. It's absolutely necessary.
Mould spores can trigger a whole host of health issues, from sneezing and coughing to more serious respiratory problems. Your long-term health is not worth the risk.
Here’s your essential personal protective equipment (PPE) list. Think of it as your mould-fighting uniform.
- A P2 or N95 Respirator Mask: A simple cloth or paper dust mask won't cut it. You need a proper respirator designed to filter out those tiny airborne spores.
- Gloves: Go for non-porous gloves, like heavy-duty rubber or vinyl. If you can get ones that extend up your forearms, even better.
- Safety Goggles: You really don't want mould spores getting in your eyes. It’s incredibly irritating and can lead to nasty infections.
The health risks are very real. Research from the Australian Institute of Health and Welfare shows that indoor mould exposure can increase asthma symptoms by approximately 38-50% in affected individuals. That statistic alone highlights just how important it is to protect yourself properly.
Containing the Area
Before you even think about cleaning, you need to quarantine the area. This is a critical step to stop you from accidentally tracking spores through the rest of the building.
First, close any doors leading into the room. If it's an open-plan space, you can hang up plastic sheeting with tape to create a temporary barrier. It might look a bit dramatic, like something out of a movie, but it’s a highly effective containment strategy.
Next, turn off any fans, air conditioners, or heating systems that could circulate air. You want the air in the room to be as still as possible to prevent spores from being blown around. Understanding this principle is crucial, and you can learn how to get mildew out of carpet for good by applying similar containment rules. Mildew is just a specific type of mould, and the same safety principles apply.
Choosing Your Cleaning Solution: Natural vs. Chemical
Alright, you're geared up and ready to face that mould patch head-on. Now for the big decision: what are you actually going to fight it with?
If you spend five minutes online, you’ll be flooded with suggestions. They range from pantry staples like vinegar and bicarb soda to heavy-duty chemical cleaners you'd find at Bunnings. So, which one is right for your situation? Let's cut through the jargon and get straight to it.
This isn't about finding one magical "best" answer. It's about arming you with the right knowledge to choose the best tool for the job, depending on your carpet and just how bad that mould problem is.
The Power of Natural Solutions
You might be surprised by what you already have hiding in your cupboard. For small, surface-level mould spots, natural cleaners are often the best first port of call. They're generally safer to have around pets and kids, much better for the environment, and won't fill your building with harsh fumes.
The undisputed champion in this category? Plain old white vinegar. Seriously, don't underestimate it.
- White Vinegar: This stuff isn't just for fish and chips. The acetic acid in white vinegar is brilliant at killing many common types of household mould. In fact, studies show it can be effective against over 80% of mould species. Just mix it in a spray bottle with an equal amount of water, and you've got a powerful, non-toxic mould fighter ready to go.
- Baking Soda (Bicarb Soda): Think of this as vinegar's trusty sidekick. While vinegar does the heavy lifting of killing the mould, baking soda is fantastic for absorbing leftover moisture and deodorising that awful musty smell. You can sprinkle it on after the vinegar treatment has done its work or even make a paste for a bit of extra scrubbing power.
For a minor issue, these simple ingredients are often all you need. To get a better sense of what you can achieve with items from your pantry, we've put together a detailed guide on using a natural mould killer that goes into much more depth.
The real beauty of starting with a natural approach is that you’re using the least aggressive method first. It’s always easier to escalate to a stronger chemical if needed than it is to reverse damage from a product that was too harsh for your carpet.
Of course, natural solutions have their limits. If you're dealing with a more stubborn or widespread problem, it might be time to bring in the big guns.
When to Reach for a Chemical Cleaner
Sometimes, you just need something with a bit more punch. Commercial mould removers are specifically formulated not only to kill mould but also to inhibit its regrowth. You’ll find them in any cleaning aisle, and they can be incredibly effective… but you have to know what you’re looking for.
When you're reading the labels, you'll see a lot of different active ingredients. The most important thing is to find products designed for use on fabrics or upholstery. Many general-purpose mould killers contain bleach, which is a massive no-no for carpets as it will almost certainly cause permanent discolouration.
Here's what to check for:
- Is it safe for carpets? The label must explicitly say so. If it doesn’t mention fabrics or carpets, assume it isn’t safe and put it back on the shelf.
- Does it contain bleach? Avoid chlorine bleach products at all costs. Some cleaners use hydrogen peroxide or quaternary ammonium compounds, which can be safer for colours, but you still must test them first.
- What are the safety instructions? Chemical cleaners demand respect. Follow the directions on the bottle to the letter, especially when it comes to ventilation. You’ll definitely want to keep your PPE on for this part of the job.
The Non-Negotiable Patch Test
I cannot stress this enough. No matter what cleaning solution you choose… vinegar, a commercial spray, anything… you must do a patch test first. It’s a simple, five-minute step that can save you from a massive, expensive headache later.
Find a small, hidden spot on the carpet. Under a sofa or in the corner of a built-in wardrobe is perfect. Apply a tiny amount of your chosen cleaner, let it sit for the recommended time, then blot it dry. Now, walk away and wait 24 hours.
If there’s no discolouration, fading, or damage to the carpet fibres, you're good to go. If you come back and find a bleached-out spot… well, just imagine that ugly patch in the middle of your main floor. You’ve just saved your carpet. It's a tiny bit of effort that prevents a permanent disaster. Don't skip it.
Your Step-by-Step Carpet Mould Removal Method
Alright, let's get our hands dirty. This is where we shift from theory to action and walk through the cleaning process together. Forget those overly technical guides you find online; think of this as me being right there in the room with you, pointing you in the right direction.
We'll start with prepping the area and applying your chosen cleaner correctly. I'll also share a few tricks of the trade I've picked up over the years… things like how to work the mould out of the fibres without wrecking your carpet and the proper way to blot the area dry (a hint: rubbing is your enemy here). Let's get it done.
Before you jump in, here’s a quick visual to recap the decision-making process for choosing your cleaning solution, which we just covered.
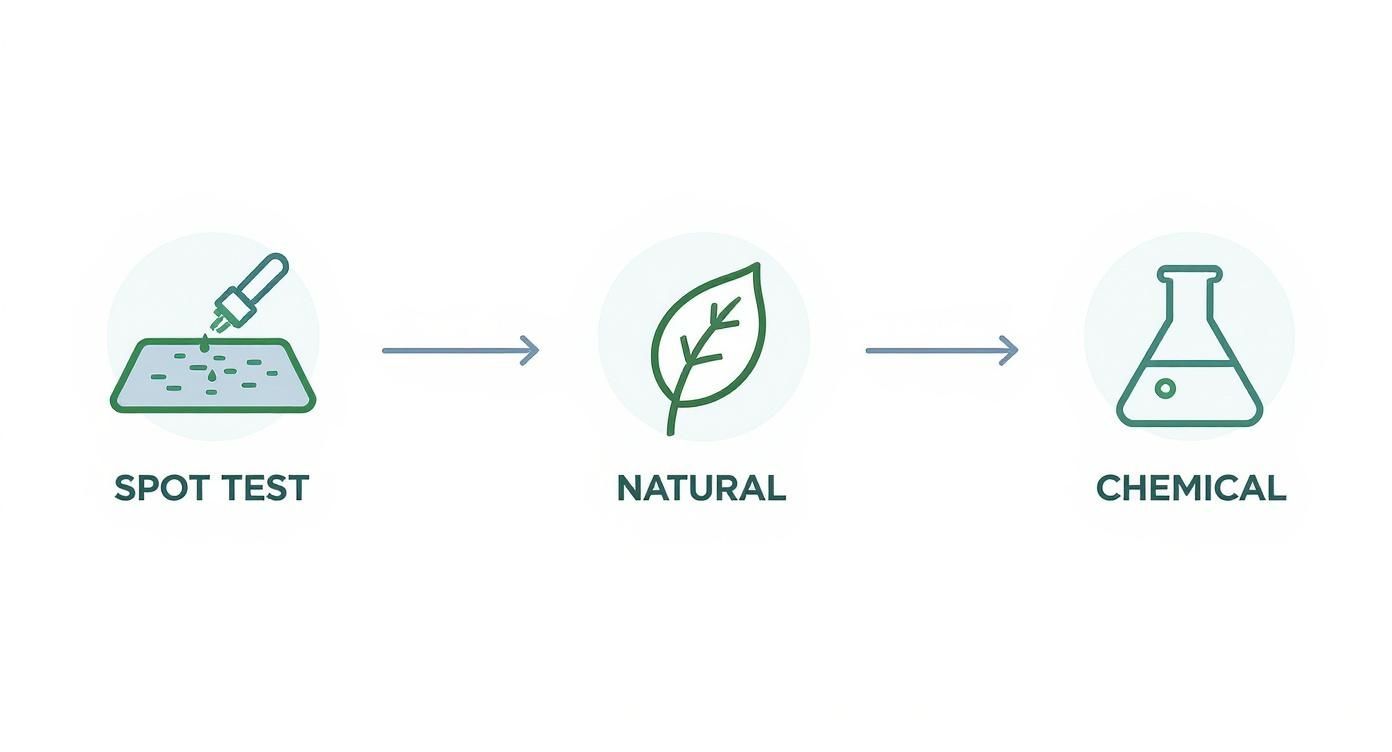
This little flowchart is a great reminder to always spot-test first, then decide if a natural or chemical approach is the best fit for your specific situation.
Preparing and Applying Your Cleaner
With your solution mixed and patch-tested, it’s time for application. The golden rule here is simple: less is more. One of the biggest mistakes people make is drenching the carpet. All you're doing is creating a new moisture problem deep in the underlay, which is the perfect breeding ground for… you guessed it, more mould.
Instead, work in small, manageable sections.
- Lightly Mist the Area: Grab a spray bottle and lightly mist the mouldy patch and a small border around it. You’re aiming for the fibres to be damp, not sopping wet.
- Let It Sit: Don't rush into scrubbing. You need to give the solution time to do its job. For a simple vinegar solution, 15-30 minutes is usually enough for it to start breaking down the mould. If you're using a commercial product, stick to the instructions on the label.
This waiting period is absolutely crucial. It’s when the active ingredients are actually killing off the mould spores. Get impatient here, and you’ll just make the next step much harder for yourself.
Gently Agitating the Carpet Fibres
Now that your solution has had time to penetrate, you need to gently work the mould loose from the carpet fibres. The key word is gently. Your carpet isn't a dirty pot you can attack with a steel scourer.
Find a stiff-bristled brush (but definitely not a wire one) and start scrubbing the area in small, circular motions. The idea is to work the cleaner deeper into the base of the carpet and physically break up the mould colonies that have taken hold.
You should start to see the mould lift away and the stain begin to fade. That's a good sign you're on the right track. Be methodical and cover the entire affected patch, giving a little extra attention to the darkest spots.
A Quick Tip from Experience: For a really stubborn spot, try using an old toothbrush. It gives you far more control and allows you to apply targeted pressure without fraying the surrounding carpet fibres.
The Art of Blotting and Rinsing
Once the scrubbing is done, it's time to lift the cleaning solution and all that dislodged mould gunk out of the carpet. Whatever you do, do not rub the area with a cloth. Rubbing just shoves the moisture and mould particles deeper into the pile and backing.
This is where blotting comes in.
Take a clean, dry, absorbent cloth… microfibre works brilliantly for this… and press it firmly down onto the damp spot. You’ll literally see the moisture transfer from the carpet to your cloth. Lift it, find a clean section of the cloth, and press down again. Keep repeating this process until the area is as dry as you can possibly get it. I know it's a bit tedious, but it's the only way to do it right.
Next up, the rinse. Even if a product claims to be 'no-rinse', I always recommend a very light one. It helps remove any leftover residue that could attract dirt down the line. Just lightly spray the area with clean water and then repeat the entire blotting process until the carpet feels almost dry to the touch.
Ensuring a Thorough Job
Being thorough is what separates a quick fix from a genuine, long-term solution. Remember, you’re not just trying to make a stain disappear; you’re trying to completely eradicate the mould colony. For a slightly different take on the process, you can check out another quick, safe guide on how to remove mould from carpet to compare notes.
This whole cycle… from applying the cleaner to the final blot… might need a second round. If you can still see traces of mould after round one, don't get discouraged. Just run through the steps again until the patch is completely gone.
Now, we're heading into the most critical part of the entire job: drying. Getting this next stage wrong can undo all of your hard work in a flash.
Drying and Monitoring: The Most Crucial Step
You might think the job is done once the cleaning is finished. Wipe your hands, pack up your gear, and move on. But this next part… this is arguably the most important step in the entire process of how to clean mould from carpet.
Getting your carpet properly dry is the final boss battle. And I mean completely dry, right down to the underlay and the subfloor. Why? Because mould adores moisture. It’s like a five-star resort for those nasty spores. Getting this stage right is the only way to guarantee the mould won’t just pack its bags and move back in next week.
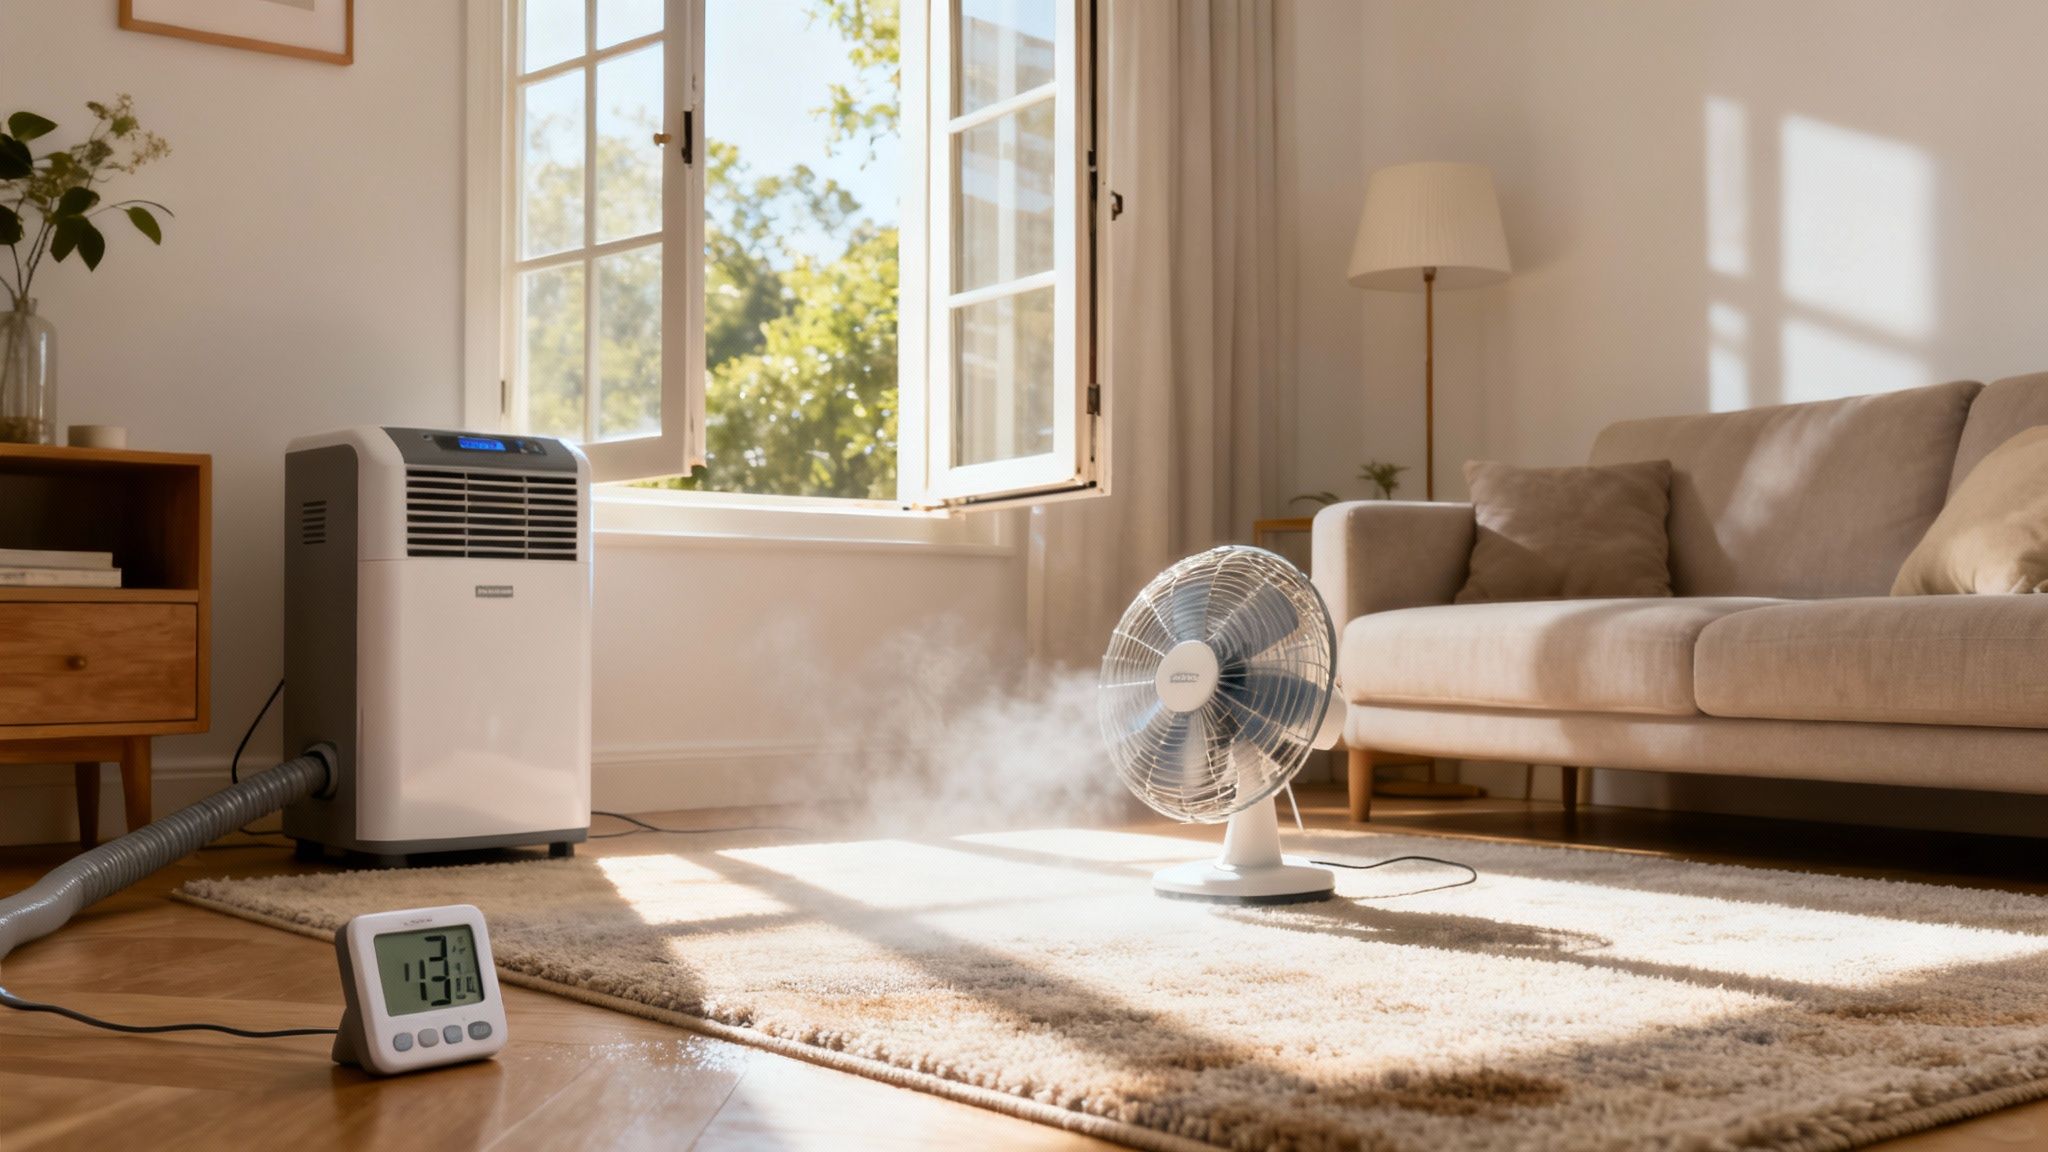
Creating a Drying Vortex
Just letting the carpet ‘air dry’ in a closed-off room is a recipe for disaster. It’s like inviting the mould to a comeback party. You need to be proactive and create an environment where moisture simply can’t survive. Think of it as creating a mini-drought right there on your floor.
Your best friends in this fight are airflow and low humidity.
- Bring in the Fans: Don't just point one fan at the damp spot. Position several fans at different angles to create a cross-breeze. You want the air constantly moving across the surface of the carpet to whisk away moisture as it evaporates.
- Deploy the Dehumidifier: This is your secret weapon. A good dehumidifier will actively pull moisture out of the air, making it much easier for the carpet to release its own dampness. Let it run continuously until the area is bone dry.
- Crack a Window (If You Can): On a dry, breezy day, opening a window can be a fantastic way to boost ventilation and speed up the process. Just be sure it’s not a humid or rainy day, as that would be counterproductive.
Drying isn't a passive activity. It's an active, aggressive assault on moisture. The faster and more thoroughly you dry the carpet, the less chance mould has to even think about making a reappearance.
How Dry Is Dry Enough?
So, how do you know when it’s truly dry? Don’t just trust your hand. The surface might feel dry, but the underlay could still be holding onto moisture. One good trick is to place a square of plastic wrap or a clear glass bowl upside down on the cleaned area. Leave it for a few hours. If you come back and see condensation has formed underneath, you’re not done yet. Keep those fans and the dehumidifier running.
The Vigilant Monitoring Phase
Once you’re confident the area is completely dry, your job shifts from cleaner to detective. For the next few days and weeks, you need to be vigilant. This isn’t about being paranoid; it's about being smart.
Every day, do a quick check on the area.
- The Sight Test: Look closely at the spot where the mould was. Are there any signs of regrowth? Any discolouration returning?
- The Smell Test: Get down close and have a sniff. Does it smell fresh and clean, or is that familiar musty, earthy odour starting to creep back in? Your nose is one of the best mould detectors you have.
This constant monitoring is what separates a temporary fix from a long-term solution. If you catch any signs of regrowth early, you can act immediately. But if the mould does come back despite your best efforts, it’s a strong signal that there’s a deeper issue at play, like a persistent leak or moisture coming up through the subfloor.
This also highlights the effectiveness of different cleaning methods. For instance, studies have shown that hot water carpet extraction is an incredibly effective mould removal technique, reducing fungal colony-forming units from 300 CFU down to just 5.5 CFU after treatment. That's a reduction of about 98%, which is worlds apart from what simple surface cleaning can achieve.
You can read more about the research into fungal growth in carpets to see just how deep the problem can go. It’s this deep-down clean that professionals can achieve, which often makes all the difference.
When to Put Down the Tools and Call a Professional
Look, there’s absolutely no shame in admitting when a job is just too big to handle on your own. In fact, knowing your limits when it comes to mould is one of the smartest moves you can make. Sometimes, a DIY approach just won't cut it, and trying to push through can actually make things worse.
Let's have an honest chat about the signs that scream, "It's time to call in the professionals." This isn't about giving up; it's about making the right call for the long-term health of your building and the people inside it.
The Problem Is Bigger Than You Think
That small spot you found might just be the tip of the iceberg. Mould is sneaky. It loves to hide deep in the carpet backing, the underlay, and even the subfloor beneath where you can't see it.
A few clear signs that the problem has moved beyond a simple DIY fix include:
- The Size of the Patch: If you’re looking at a patch of mould that’s bigger than a dinner plate, stop right there. An area this large indicates a significant, underlying moisture issue and can release a massive volume of spores when disturbed.
- Deep Contamination: Gently pull back a corner of the carpet near the affected area. If you see mould on the carpet backing or dark stains on the underlay, the problem is too deep to fix from the surface. You're only cleaning what you can see, not what's causing the real damage.
- The Mould Keeps Coming Back: Did you clean a spot thoroughly, only for it to reappear a few weeks later? This is a classic sign that you haven’t dealt with the original moisture source or that the mould has penetrated too deeply for your cleaning methods to be effective.
When a Hidden Issue Is the Real Culprit
Sometimes, the mould on your carpet isn’t the primary problem. It’s actually a symptom of a much bigger, hidden issue that needs a professional diagnosis.
Think about it… mould needs water to survive. If you can’t easily explain where that water is coming from (like a simple spill), then you could be dealing with something more serious. This could be a slow leak from a pipe inside a wall, moisture wicking up through a concrete slab, or a waterproofing failure in the building’s structure.
These are not issues you can fix with a spray bottle and a scrubbing brush. A professional mould remediation service has the diagnostic tools, like moisture meters and thermal imaging cameras, to trace the problem back to its source.
DIY vs Professional Mould Removal: When to Make the Call
Deciding whether to tackle mould yourself or bring in the experts can be tricky. This table breaks down common scenarios to help you figure out the best course of action.
| Situation | DIY Approach (Best for…) | Call a Pro (Recommended for…) |
|---|---|---|
| Size of Mould Patch | Small, isolated spots smaller than a dinner plate on a hard, non-porous surface. | Any patch larger than 1 square metre or mould growth on porous materials like carpet or drywall. |
| Source of Moisture | Obvious and easily fixed, like a small, recent spill that has been dried immediately. | The water source is unknown, ongoing (e.g., a slow leak), or from a major event like a flood. |
| Recurrence | A first-time occurrence of mould that hasn't come back after initial cleaning. | Mould that reappears in the same spot after you've cleaned it, signalling a deeper issue. |
| Health Concerns | No one in the building has respiratory issues, allergies, or a compromised immune system. | Anyone in the building is experiencing health symptoms, or you have vulnerable occupants (children, elderly). |
| Location | Mould on surface-level, easily accessible areas like bathroom tiles. | Mould inside walls, under carpets, in the underlay, or within the HVAC system. |
Ultimately, if you have any doubt about the extent of the problem or your ability to handle it safely, calling a professional is always the safer bet.
What the Pros Bring to the Table
Calling in a professional isn’t about admitting defeat; it’s about bringing in specialised expertise and equipment. They can do things that are simply out of reach for a DIY attempt, and that's where you see the real difference in results.
A professional team like That Cleaning Crew doesn’t just clean the visible mould. They offer a complete service that includes:
- Advanced Equipment: They use high-powered, HEPA-filtered vacuums that capture spores, commercial-grade dehumidifiers, and air scrubbers to purify the air during the removal process.
- Source Identification: Their main goal is to find out why the mould grew in the first place and help you address that source. No point cleaning if it's just going to come back.
- Safe and Contained Removal: Professionals will properly seal off the work area to prevent cross-contamination, ensuring spores don’t spread to other parts of your building. This is a critical step most DIY efforts miss.
- Guaranteed Results: They have the experience to know when a carpet can be saved and when it’s a lost cause that needs to be safely removed and replaced.
You might also be curious about what professional services cost. Understanding the pricing structure can help you make an informed decision, so feel free to check out our breakdown of how much carpet cleaners charge for a better idea of the investment involved. It's often more affordable than you'd think, especially when you consider the cost of recurring mould problems and potential health issues down the line.
Answering Your Top Questions About Carpet Mould
When you're staring down a patch of mould on your carpet, a lot of questions start running through your head. I've heard them all over the years, from late-night worries about smells to quick-fix ideas that sound good but can make things a whole lot worse.
Let's cut through the noise. Here are some straight, practical answers to the questions we get asked most often.
"Can I Just Pour Some Bleach on It?"
This is always the first question, and my answer is always the same: please, step away from the bleach. It’s a gut reaction for many people… bleach kills germs, right? But for a porous surface like a carpet, it’s one of the worst things you can do.
Think of it this way: the bleach might kill the surface mould you see on the carpet fibres, but the water in the bleach solution soaks right through to the carpet backing and underlay. And what does mould absolutely love? Moisture. You're essentially giving the mould's root system a big drink, encouraging it to come back stronger and dig in deeper.
On top of that, bleach is almost guaranteed to strip the colour from your carpet, leaving you with a faded, blotchy mess that looks even worse than the mould did.
"How Fast Does Mould Actually Grow After a Spill?"
It's a lot quicker than you might think. We're not talking weeks here.
If the conditions are right… a bit of moisture, a food source like dirt or the carpet fibres themselves, and a warmish spot… mould can begin to take hold in as little as 24 to 48 hours.
This is exactly why responding to spills and leaks with urgency is so critical. It’s not just about mopping up the visible water; it’s a race against the clock to get the area bone-dry before those tiny, invisible spores can set up a colony. That window of opportunity closes fast.
"Is a Mouldy Carpet a Lost Cause?"
This is the million-dollar question, and the honest answer is, it really depends. The deciding factor is how far the contamination has spread.
You can often save a carpet if:
- The mould is only on the surface. If you’ve caught it early and it hasn’t worked its way into the carpet backing, a professional clean can often knock it out for good.
- The source of the water is fixed. You can clean a carpet ten times, but if that leaky pipe or faulty window seal is still letting moisture in, the mould will always win.
- The underlay and subfloor are dry. The carpet itself might look okay, but if the padding underneath is a soggy, mouldy mess, it has to go. There’s no saving it.
But here's the reality check: if mould has deeply penetrated the carpet backing and underlay, or if the area has been wet for more than 48 hours, the chances of saving it plummet. At that point, removal and replacement isn't just the best option… it's the only safe and effective one.
"I Can Smell a Musty Odour, but I Can't See Any Mould. Is It Still a Problem?"
Absolutely. In fact, your nose is one of the best mould detectors you have. That distinct, damp, earthy smell is often the first red flag that you have a problem, long before any visible spots appear.
Think of that smell as the mould's off-gassing. If you can smell it, it’s there, hiding somewhere out of sight. It could be lurking deep in the carpet padding, under the floorboards, or behind a wall where a slow leak has been happening.
Never ignore a persistent musty smell. It’s your building’s way of screaming for help. It’s a clear signal to start investigating and find the hidden source of moisture before a small issue becomes a major remediation project.
When you're dealing with a mould problem that feels out of your depth or just keeps coming back, it's time to bring in the professionals. For a thorough assessment and remediation that gets to the root of the problem, contact That Cleaning Crew. Learn more about how our specialised mould cleaning services can restore the health and safety of your commercial space.